Lea

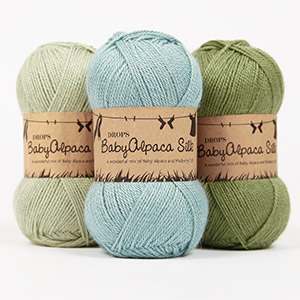
Knitted jacket with wavy edge and textured pattern for baby and children in DROPS BabyAlpaca Silk

DROPS Baby 21-14
DROPS design: Pattern no BS-002-by
Yarn group A
--------------------------------------------------------
Size: 1/3 - 6/9 - 12/18 months (2 - 3/4) years
Finished measurements:
Bust: 46-52-58 (64-70) cm / 18"-20½"-22 3/4" (25 1/4"-27½")
Full length: 32-34-38 (43-47) cm / 12½"-13 3/8"-15" (17"-18½")

Materials: DROPS BABY ALPACA SILK from Garnstudio
150-150-200 (200-200) g color no 3125, light pink

DROPS STRAIGTH NEEDLES AND CIRCULAR NEEDLE (60 cm / 24'') size 3 mm/ US 2or3 - or size needed to get 24 sts x 32 rows in stockinette st = 10 x 10 cm / 4'' x 4''.

DROPS STRAIGHT NEEDLES and CIRCULAR NEEDLE (60 cm / 24'') size 2.5 mm/US 1or2 - for rib.

DROPS WOODEN BUTTONS LIGHT, #503: 5-5-6 (6-7) pieces

-------------------------------------------------------

Alternative Yarn – See how to change yarns here
Yarn Groups A to F – Use the same pattern and change the yarn here
Yarn usage using an alternative yarn – Use our yarn converter here

-------------------------------------------------------

Pattern instructions

NOTE: This pattern is written in American English. All measurements in charts are in cm. For conversion from inches to cm - click here. There are different terms for crocheting in American and British English. If this pattern includes crochet, click for "crochet terms" here. For this pattern in British English, please click here.
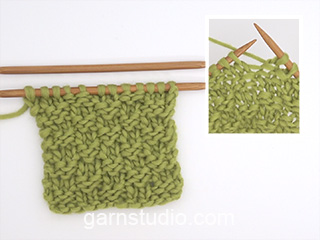
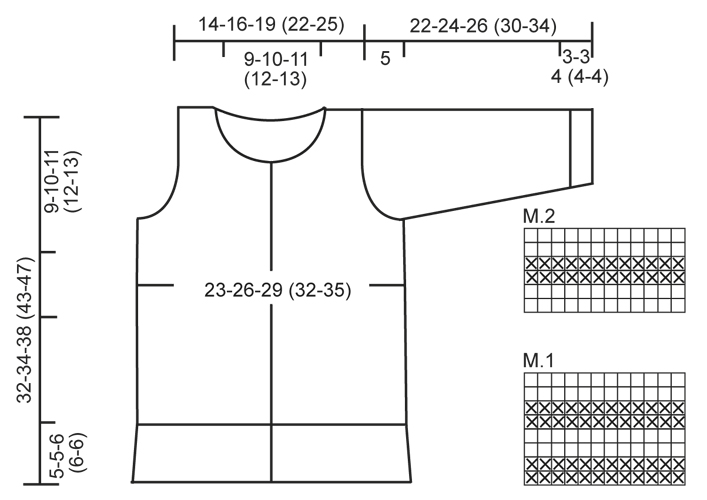
DOUBLE SEED ST:
1st row: * K 2, P 2 *, repeat from *-*.
2nd row: K over K and P over P.
3rd row: P over K and K over P.
4th row: As 2nd row.
Repeat row 1 to 4.

DECREASE TIP:
Dec as follows before marker: Beg 2 sts before marker. Slip 1 st as if to K, K 1, psso.
Dec as follows after marker: K 2 tog.

GARTER ST (back and forth on needle): K all rows.

PATTERN:
See diagrams M.1 and M.2. The diagrams show the pattern from RS.
--------------------------------------------------------

JACKET:
Worked back and forth on circular needle.
Cast on 366-394-422 (450-478) sts on circular needle size 2.5 mm / US 1or2 with Baby Alpaca Silk.
Work rib as follows: 1 st in GARTER ST – see explanation above, P 2, * K 10, P 4 *, repeat from *-* until 13 sts remain and finish with K 10, P 2 and 1 st in GARTER ST.
Continue like this until 8-8-12 (12-12) rows in rib have been worked.
Now dec 1 st on each side of every K-section by working all K 10 sts as follows (P 4 as before): Slip 1 st as if to K, K 1, psso, K until 2 sts remain, K 2 tog. Repeat dec on every other row a total of 4 times = 158-170-182 (194-206) sts (= K 2/P 4).
Work 1 row from WS with K over K and P over P. Switch to circular needle size 3 mm / US 2or3.
Now K 1 row from RS while AT THE SAME TIME dec 44-44-40 (40-36) sts evenly = 114-126-142 (154-170) sts. Insert a marker after 29-32-36 (39-43) sts and a marker after 85-94-106 (115-127) sts (marks the mid of the sides). Back piece = 56-62-70 (76-84) sts. Now measure the piece from here.
Continue in stockinette st and 1 st in Garter st in each side towards mid front until piece measures 10-11-12 (16-18) cm / 4"-4 3/8"-4 3/4" (6 1/4"-7") from marker.
Now work diagram M.1. When diagram M.1 has been worked 1 time vertically, continue in DOUBLE SEED ST - see explanation above.
When piece measures 18-19-21 (25-28) cm / 7"-7½"-8 1/4" (9 3/4"-11") from marker, bind off 6 sts in each side (i.e. 3 sts on each side of every marker) for armholes. Then finish front and back piece separately.

BACK PIECE:
= 50-56-64 (70-78) sts. Continue back and forth in double seed st. AT THE SAME TIME bind off for armholes in beg of each row each side: 2 sts 1 time and 1 st 2 times = 42-48-56 (62-70) sts.
When piece measures 21-22-24 (28-31) cm / 8 1"-8 3/4"-9½" (11"-12 1/4"), work diagram M.2 over all sts. When diagram M.2 has been worked 1 time vertically, continue in double seed st until piece measures 25-27-30 (35-39) cm / 9 3/4"-10 5/8"-11 3/4" (13 3/4"-15 1/4").
Now bind off the middle 20-22-24 (26-28) sts for neck and finish each part separately.
Continue to dec 1 st on the next row towards the neck = 10-12-15 (17-20) sts remain on each shoulder. Continue until piece measures 27-29-32 (37-41) cm / 10 5/8"-11 3/8"-12½" (14½"-16 1/8") from marker. Loosely bind off.
Piece measures 32-34-38 (43-47) cm / 12½"-13 3/8"-15" (17"-18½") in total.

LEFT FRONT PIECE:
= 26-29-33 (36-40) sts.
Continue back and forth in Double seed st. AT THE SAME TIME dec for armhole in the side as on back piece = 22-25-29 (32-36) sts. Then when piece measures 21-22-24 (28-31) cm / 8 1"-8 3/4"-9½" (11"-12 1/4"), work diagram M.2 over all sts. When diagram M.2 has been worked 1 time vertically, continue in double seed st. AT THE SAME TIME when piece measures 23-25-27 (31-34) cm / 9"-9 3/4"-10 5/8" (12 1/4"-13 3/8") from marker, slip the 6-7-7 (7-8) sts towards mid front on a stitch holder for neck. Continue to bind off for neck at beg of every row from neck: 2 sts 2 times and 1 st 2-2-3 (4-4) times = 10-12-15 (17-20) sts remain on shoulder. Continue until piece measures 27-29-32 (37-41) cm / 10 5/8"-11 3/8"-12½" (14½"-16 1/8") from marker.
Loosely bind off. Piece measures 32-34-38 (43-47) cm / 12½"-13 3/8"-15" (17"-18½") in total.

RIGHT FRONT PIECE:
Work as left front piece but reversed.

SLEEVE:
Worked back and forth on needle.
Cast on 44-44-44 (50-50) sts on needle size 2.5 mm / US 1or2 with Baby Alpaca Silk. P 1 row from WS. Then work rib (1st row = from RS) P 4/K 2 with 1 edge st in each side. When rib measures 3-3-4 (4-4) cm / 1 1/8"-1 1/8"-1½" (1½"-1½"), K 1 row from RS while AT THE SAME TIME dec 6-4-4 (8-6) sts evenly = 38-40-40 (42-44) sts. Switch to needle size 3 mm / US 2or3.
Work back and forth in stockinette st with 1 edge st in garter st each side.
AT THE SAME TIME when piece measures 5 cm / 2'', inc 1 st in each side, repeat inc every 4-2½-2 (2-2) cm / 1½"-7/8"-3/4" (3/4"-3/4") a total of 3-5-7 (9-10) times = 44-50-54 (60-64) sts.
AT THE SAME TIME when piece measures 11-13-14 (17-19) cm / 4 3/8"-5 1/8"-5½" (6 3/4"-7½"), work diagram M.2. When diagram M.2 has been worked 1 time vertically, continue in DOUBLE SEED ST. NOTE! Make sure that the double seed st is the same in each side when beg to work. Continue to inc in each side – work the inc sts in double seed st.
Work until piece measures 17-19-21 (25-29) cm / 6 3/4"-7½"-8 1/4" (9 3/4"-11 3/8"). Now bind off 3 sts in beg of next 2 rows for sleeve cap. Continue to bind off for sleeve cap at beg of every row in each side: 3 sts 0-0-0 (1-1) time, 2 sts 2-3-3 (3-3) times and 1 st 3-1-0 (0-0) times. Then bind off 2 sts in each side until piece measures 21-23-25 (29-33) cm / 8 1/4"-9"-9 3/4" (11 3/8"-13"). Now bind off 3 sts 1 time in each side. Piece now measures approx. 22-24-26 (30-34) cm / 8 3/4"-9½"-10 1/4" (11 3/4"-13 3/8"). Bind off the remaining sts.

ASSEMBLY:
Sew the shoulder seams. Sew sleeve seams inside 1 edge st and sew in sleeves.

LEFT BAND:
Beg at top of neck. Knit up 82-86-94 (106-118) sts on needle size 2.5 mm / US 1or2 from RS inside 1 edge st down along left front piece. K 1 row from WS. Then work rib as follows (from RS): * P 2, K 2 *, repeat from *-* and finish with 2 sts in GARTER ST. Continue to work like this until band measures approx. 2-2-2 (2½-2½) cm / 3/4"-3/4"-3/4" (7/8"-7/8"). Loosely bind off sts with K over K and P over P.

RIGHT BAND:
Work as on left band but when rib measures approx. 1 cm / 3/8'', bind off for 5-5-6 (6-7) button holes. Bind off for the upper button hole approx. 1 cm / 3/8'' from neck, bind off for bottom button hole approx. 2 cm / 3/4'' from bottom edge. Bind off for the other button holes approx. 6-7-6 (7-6) cm / 2 3/8"-2 3/4"-2 3/8" (2 3/4"-2 3/8") apart. All button holes are bind off in 2 P, by P 2 tog and making 1 YO. Then work rib as before until it measures approx. 2-2-2 (2½-2½) cm / 3/4"-3/4"-3/4" (7/8"-7/8"). Loosely bind off sts with K over K and P over P.

COLLAR:
Knit up 68 to 96 sts from RS on needle size 3 mm / US 2or3 (including sts on stitch holders) and also knit up sts over front bands in each side (on bands knit up in front loop of outermost st). K 1 row from WS. K 1 row from RS while AT THE SAME TIME adjusting no of sts to 76-84-92 (100-108). K 1 row from WS. Continue in DOUBLE SEED ST over all sts until piece measures approx. 4 cm / 1½''. Loosely bind off.

This pattern has been corrected.

Updated online: 10.09.2019
Correction: Materials: DROPS BABY ALPACA SILK from Garnstudio 150-150-200 (200-250) g color no 3125, light pink

Diagram

All measurements in charts are in cm.

symbols = K from RS, P from WS
symbols = P from RS, K from WS
diagram
Do you have a question? See a list of frequently asked questions (FAQ)

Knitting tension is what determines the final measurements of your work, and is usually measured per 10 x 10 cm. It is provided like so: number of stitches in width x number of rows in height - eg: 19 stitches x 26 rows = 10 x 10 cm.

The knitting tension is very individual; some people knit/crochet loosely while others work tightly. You adjust the knitting tension with the needle size, which is why the suggested needle size only serve as a guide! You need to adjust this (up or down) to ensure that YOUR knitting tension matches the knitting tension provided in the pattern. If you work with a different knitting tension than provided you will have a different yarn consumption, and your work will have different measurements than what the pattern suggests.

The knitting tension also determines which yarns can replace each other. As long as you achieve the same knitting tension you can replace one yarn with another.

See DROPS lesson: How to measure your tension/gauge

See DROPS video: How to make a gauge tension swatch

The required amount of yarn is provided in grams, eg: 450 g. To calculate how many balls you’ll need you first need to know how many grams are in 1 ball (25g, 50g or 100g). This information is available if you click on the individual yarn quality on our pages. Divide the amount required with the amount of each ball. For example, if each ball is 50g (the most common amount), the calculation will be as follows: 450 / 50 = 9 balls.

The important thing when changing from one yarn to another is that the knitting/crochet tension remains the same. This is so that the measurements of the finished piece will be the same as on the sketch provided. It is easier to achieve the same knitting tension using yarns from the same yarn group. It is also possible to work with multiple strands of a thinner yarn to achieve the knitting tension of a thicker one. Please try our yarn converter. We recommend you to always work a test swatch.

Please NOTE: when changing yarn the garment might have a different look and feel to the garment in the photo, due to individual properties and qualities of each yarn.

See DROPS lesson: Can I use a different yarn than the one mentioned in the pattern?

All our yarns are categorised into yarn groups (from A to F) according to thickness and knitting tension – group A contains the thinnest yarns and group F the thickest. This makes it easier for you to find alternative yarns to our patterns, should you wish to switch yarn. All yarns within the same group have a similar knitting tension and can easily replace each other. However, different yarn qualities have different structures and properties which will give the finished work a unique look and feel.

Click here for an overview of the yarns in each yarn group

At the top of all our patterns you’ll find a link to our yarn converter, which is a helpful tool should you wish to use a different yarn than suggested. By filling in the yarn quality you wish to replace, the amount (in your size) and number of strands, the converter will present good alternative yarns with the same knitting tension. Additionally it will tell you how much you’ll require in the new qualities and whether you’ll need to work with multiple strands. Most skeins are 50g (some are 25g or 100g).

If the pattern is worked with multiple colours, every colour will have to be converted separately. Similarly, if the pattern is worked with several strands of different yarns (for example 1 strand Alpaca and 1 strand Kid-Silk) you will have to find alternatives for each, individually.

Click here to see our yarn converter

Since different yarns have different qualities and textures we have chosen to keep the original yarn in our patterns. However, you can easily find options among our available qualities by using our yarn converter, or simply pick a yarn from the same yarn group.

It is possible that some retailers still have discontinued yarns in stock, or that someone has a few skeins at home that they would like to find patterns for.

The yarn converter will provide both alternative yarn as well as required amount in the new quality.

If you think it's hard to decide what size to make, it can be a good idea to measure a garment you own already and like the size of. Then you can pick the size by comparing those measures with the ones available in the pattern's size chart.

You'll find the size chart at the bottom of the pattern.

See DROPS lesson: How to read size chart

The needle size provided in the pattern serves only as a guide, the important thing is to follow the knitting tension. And since knitting tension is very individual, you will have to adjust the needle size to ensure that YOUR tension is the same as in the pattern – maybe you’ll have to adjust 1, or even 2 needle sizes, up or down to achieve the correct tension. For this, we recommend that you work test swatches.

Should you work with a different knitting tension than the one provided, the measurements of the finished garment might deviate from the measurement sketch.

See DROPS lesson: How to measure your tension/gauge

See DROPS video: How to make a gauge tension swatch

Working a garment top-down provides more flexibility and room for personal adjustment. For example it is easier to try the garment on while working, as well as making adjustments to length of yoke and shoulder caps.

The instructions are carefully explaining every step, in the correct order. Diagrams are adjusted to the knitting direction and are worked as usual.

The diagram depicts all rows/rounds, and every stitch seen from the right side. It is read from bottom to top, from right to left. 1 square = 1 stitch.

When working back and forth, every other row is worked from the right side and every other row is worked from the wrong side. When working from the wrong side, the diagram will have to be worked reversed: from left to right, knit stitches are purled, purl stitches are knit etc.

When working in the round every round is worked from the right side and the diagram are worked from right to left on all rounds.

See DROPS lesson: How to read knitting diagrams

The diagram depicts all rows/rounds, and every stitch seen from the right side. It is worked from bottom to top, from right to left.

When working back and forth every other row is worked from the right side: from right to left and every other row is worked from the wrong side: from left to right.

When working in the round, every row in the diagram are worked from the right side, from right to left.

When working a circular diagram you start in the middle and work your way outwards, counter clockwise, row by row.

The rows usually start with a given number of chain stitches (equivalent to the height of the following stitch), this will either be depicted in the diagram or explained in the pattern.

See DROPS lesson: How to read crochet diagrams

Instructions for working several diagrams after each other on the same row/round, will often be written like so: “work A.1, A.2, A.3 a total of 0-0-2-3-4 times". This means you work A.1 once, then A.2 is worked once, and A.3 is repeated (in width) the number of times provided for your size – in this case like so: S = 0 times, M = 0 times, L=2 times, XL= 3 times and XXL = 4 times.

The diagrams are worked as usual: begin with the first row in A.1, then work the first row in A.2 etc.

See DROPS lesson: How to read knitting diagrams

See DROPS lesson: How to read crochet diagrams

The total width of the garment (from wrist-to-wrist) will be larger in the larger sizes, despite the actual sleeves being shorter. The larger sizes have longer sleeve caps and wider shoulders, so there will be a good fit in all sizes.

The measurement sketch/schematic drawing provides information regarding the full length of the garment. If it’s a jumper or a jacket the length is measured from the highest point on the shoulder (usually closest to the neckline), and straight down to the bottom of the garment. It is NOT measured from the tip of shoulder. Similarly, the length of yoke is measured from the highest point on the shoulder and down to where yoke is split into body and sleeves.

See DROPS lesson: How to read a schematic drawing

Diagrams are often repeated on the round or in height. 1 repeat is the diagram the way it appears in the pattern. If it says to work 5 repeats of A.1 in the round, then you work A.1 a total of 5 times after/next to each other in the round. If it says to work 2 repeats of A.1 vertically/in height you work the entire diagram once, then begin again at the start and work the entire diagram one more time.

Chain stitches are slightly narrower than other stitches and to avoid working the cast-on edge too tight, we simply chain more stitches to begin with. The stitch count will be adjusted on the following row to fit the pattern and measurement sketch.

The rib edge is more elastic and will contract slightly compared to, for example, stocking stitch. By increasing before the rib edge, you avoid a visible difference in width between the rib edge and the rest of the body.

It’s very easy to cast off too tightly, and by making yarn overs while casting off (and simultaneously casting these off) you avoid a too tight cast off edge.

See DROPS video: How to bind off with yarn overs (yo)

To achieve an even increase (or decrease) you can increase on, for example: every 3rd and 4th row alternately, like so: work 2 rows and increase on the 3rd row, work 3 rows and increase on the 4th. Repeat this until the increase is complete.

See DROPS lesson: Increase or decrease 1 st on every 3rd and 4th row alternately

Should you prefer to work in the round instead of back and forth, you may of course adjust the pattern. You’ll need to add steeks mid-front (usually 5 stitches), and follow the instructions. When you would normally turn and work from the wrong side, simply work across the steek and continue in the round. At the end you’ll cut the piece open, pick up stitches to work bands, and cover the cut edges.

See DROPS video: How to knit steeks and cut open

Should you prefer to work back and forth instead of in the round, you may of course adjust the pattern so you work the pieces separately and then assemble them at the end. Divide the stitches for the body in 2, add 1 edge stitch in each side (for sewing) and work the front and back pieces separately.

See DROPS lesson: Can I adapt a pattern for circular needles into straight needles?

Pattern repeats can vary slightly in the different sizes, in order to get the correct proportions. If you’re not working the exact same size as the garment in the photo, yours might deviate slightly. This has been carefully developed and adjusted so that the complete impression of the garment is the same in all sizes.

Make sure to follow instructions and diagrams for your size!

If you have found a pattern you like which is available in women’s size it’s not very difficult to convert it to men’s size. The biggest difference will be the length of sleeves and body. Start working on the women size that you think would fit across the chest. The additional length will be worked right before you cast off for the armhole/sleeve cap. If the pattern is worked top-down you can add the length right after the armhole or before the first decrease on sleeve.

Regarding additional yarn amount, this will depend on how much length you add, but it is better with a skein too many than too few.

All yarns will have excess fibres (from production) that might come off as lint or shedding. Brushed yarns (ie hairier yarns) have more of these loose, excess fibres, causing more shedding.

Shedding also depends on what is worn under or over the garment, and whether this pulls at the yarn fibres. It’s therefore not possible to guarantee that there will be no shedding

Below are some tips on how to get the best result when working with hairier yarns:

1. When the garment is finished (before you wash it) shake it vigorously so the looser hairs come off. NOTE: do NOT use a lint roller, brush or any method that pulls at the yarn.

2. Place the garment in a plastic bag and put it in your freezer - the temperature will cause the fibres to become less attached to each other, and excess fibres will come off easier.

3. Leave in the freezer for a few hours before taking it out and shaking it again.

4. Wash the garment according to the instructions on the yarn label.

Pilling is a natural process that happens to even the most exclusive of fibers. It's a natural sign of wear and tear that is hard to avoid, and that is most visible in high friction areas of your garment like a sweater's arms and cuffs.

You can make your garment look as new by removing the pilling, using a fabric comb or a pill/lint remover.

Still can't find the answer you need? Then scroll down and leave your question so one of our experts can try to help you. This will be done normally within 5 to 10 working days.
In the meantime, you can read the questions and answers that others have left to this pattern or join the DROPS Workshop on Facebook to get help from fellow knitters/crocheters!

You might also like...

Post a comment to pattern DROPS Baby 21-14

We would love to hear what you have to say about this pattern!

If you want to leave a question, please make sure you select the correct category in the form below, to speed up the answering process. Required fields are marked *.

Comments / Questions (73)

country flag Laura wrote:

When we add the markers, do we still knit the front and back all together as 1 row, I don’t understand why we place the markers here, besides measuring 10 rows from marker?

11.06.2023 - 17:45

DROPS Design answered:

Dear Laura, the markers on the sides will be used when dividing piece for armhole, this means add the marker as stated for the size then continue with stocking stitch until piece measures 10 cm from markers on the side (from where it says Now measure the piece from here.. Happy knitting!

12.06.2023 - 09:04

country flag Martina Rönty wrote:

Olen tekemässä jakkua pienimmässä koossa ja jo hyvässä vauhdissa helmineuleen kimpussa pyöröpuikoilla. Leikataanko tätä jakkua auki ollenkaan? Vai onko jossain vaiheessa jotain mennyt pieleen?

01.05.2023 - 11:24

DROPS Design answered:

Hei, tämä jakku neulotaan tasoneuleena, eli sitä ei leikata auki.

01.05.2023 - 17:29

country flag Marja wrote:

Hei. teen kokoa 2-3/4. Hihan ohjeen loppu hämmentää: \"Päätä vielä kummastakin reunasta 2 s kunnes työn pituus on 21-23-25 (29-33) cm. Päätä lopuksi kummastakin reunasta 1 x 3 s. Työn pituus on nyt n. 22-24-26 (30-34) cm. Päätä loput s:t kerralla.\" Varsinkin tuo ensimmäinen lause on outo.\r\n Kuinka paljon silmukoita pitäisi olla puikolla ennen päättelyä?

19.03.2023 - 10:59

DROPS Design answered:

Kummastakin reunasta päätetään 2 silmukkaa, kunnes työn pituus on 33 cm. Mikäli neuletiheytesi on sama kuin ohjeessa annettu tiheys, tämä tarkoittaa, että kummastakin reunasta päätetään 2 silmukkaa n. 2 tai 3 kertaa. Tärkeintä on, että työn mitta on sama kuin ohjeessa annettu mitta ennen kuin työn loput silmukat päätetään.

20.03.2023 - 17:13

country flag Marja Steinhoff wrote:

Hei Millä lmuulla langalla jakun voi tehdä. Ohjeessa mainittua ei ole enää saatavilla.

18.02.2023 - 15:32

DROPS Design answered:

Voit valita jonkun muun lankaryhmään A kuuluvan langan. Esim. DROPS Baby Merino on pehmeä lanka, joka sopii hyvin vauvan neuleeseen.

20.02.2023 - 17:29

country flag Marja Nyman wrote:

Hei! Ohjeessa mainittua lankaa ei ilmeisesti ole enää saatavilla. Mikä muu lanka korvaisi sen?

18.02.2023 - 15:30

country flag Felicitas Stegemann wrote:

Hallo, in der Anleitung steht, das nach 8 Reihen für den Volant in der Größe 6-9 Monate mit den Abnehmen begonnen wird, laut Maßangabe ist der Volant aber 5 cm hoch. Das sind mit Nadel Größe 2 und laut Maschenprobe aber mind. 15 Reihen. Handelt es sich um einen Druckfehler?

03.06.2022 - 18:09

DROPS Design answered:

Liebe Frau Stegemann, der Volant begint nach 8 Reihen und die Abnahmen werden insgesamt 4 Mal in jeder 2. Reihe gestrickt = ca 16 Reihen, dh ca 5 cm bis der Volant fertig ist. Viel Spaß beim stricken!

07.06.2022 - 08:04

country flag Andrea wrote:

Nachtrag zu meiner Anfrage: soll nicht heißen"Häkchen" sondern "Jäckchen"😅

02.09.2021 - 09:26

country flag Andrea wrote:

Hallo, ich bräuchte die Anleitung für das Häkchen mit einem Garn der Gruppe B. Danke für baldige Nachricht Grüßle Andrea

02.09.2021 - 09:24

DROPS Design answered:

Liebe Andrea, hier finden Sie alle unsere Anleitungen für Babyjacken mit einem Garn der Gruppe B. Viel Spaß beim stricken!

02.09.2021 - 09:41

country flag Sissel wrote:

Det hadde vært fint om det hadde vært mulig å ha søkeord i "spørsmål" i hver enkelt oppskrift. Her ligger det jo veldig mange spørsmål fra norske og utenlanske strikkere. Så hadde jeg lett funnet det om andre stilte samme spørsmål , som altså gjelder å lese/forstå en bestemt oppskrift (ikke strikking generelt). Dessuten ønsker jeg meg et oversettersettelse(program) for spørsmål på andre språk.

26.06.2021 - 09:16

country flag Sissel wrote:

Jeg har problemer med å forstå hvordan strikke kragen! Det står at jeg skal plukke opp 68 - 96 m, hvordan forstå dette? Samt hva er ytterste ledd av ytterste maske?

26.06.2021 - 09:05

DROPS Design answered:

Hei Sissel, Du trenger mellom 68 og 96 masker til kragen, avhengig av størrelsen du strikker. Det ytterste ledd i ytterste masken er løkken som er på kanten av maskeraden eller halslinjen. Håper dette hjelper og god fornøyelse!

28.06.2021 - 09:13