
Popular categories
Looking for a yarn?


Comments / Questions (101)
![]() Carole Montaigne wrote:
Carole Montaigne wrote:
Bonjour, Pour le bonnet, j’ai fini mes 5cms de côtes, il faut maintenant que je fasse le Rand jersey avec 36 augmentations. Si on divise 120 par 36 on obtient 3,333 . Donc qu’est-ce que vous préconisez comme nombre de mailles entre ces 36 augmentations ? Merci d’avance pour votre réponse Cordialement
12.12.2025 - 14:34DROPS Design answered:
Bonjour Mme Montaigne, utilisez la petite calculatrice en bas à droite de la page, elle vous donnera une méthode pour augmenter à intervalles réguliers sur ce nombre de mailles/d'augmentations. Bon tricot!
12.12.2025 - 16:44
![]() Sharmeen wrote:
Sharmeen wrote:
Should the hat be knit with yarn held double?
14.11.2025 - 06:21DROPS Design answered:
Hi Sharmeen, the hat is worked using single strand. Happy knitting!
14.11.2025 - 07:06
![]() Cherie wrote:
Cherie wrote:
Shift one stitch to the right. Does that mean that I’m just kitting one extra stitch at the end of the row before doing be one stitch over row? So that it moves the next rows all over one stitch?
03.11.2025 - 20:28
![]() Hélène Longpré wrote:
Hélène Longpré wrote:
Merci pour la réponse rapide.
07.05.2025 - 13:47
![]() Hélène Longpré wrote:
Hélène Longpré wrote:
Bonjour, si je suis le patron, on monte 57 mailles, 4 point mousse + diagramme + 4 point mousse = 56, il reste 1 maille, je fais quoi avec?? merci
06.05.2025 - 22:31DROPS Design answered:
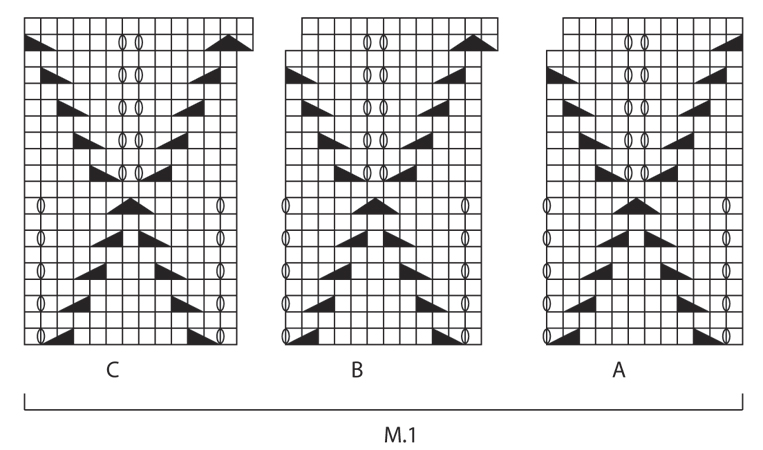
Bonjour Mme Longpré, tricotez vos 57 mailles ainsi: 4 m au point mousse, tricotez ensuite les 12 mailles de M.1A, tricotez ensuite 2 fois les 12 mailles de M.1B, tricotez ensuite 1 fois les 13 mailles de M.1C et terminez par 4 m au point mousse soit: 4+12+24+13+4=57 mailles. Bon tricot!
07.05.2025 - 09:30
![]() Kerstin Bergman wrote:
Kerstin Bergman wrote:
Om jag vill sticka mössan till en 10 årig flicka, hur kan jag förminska mössan.
03.11.2024 - 14:20DROPS Design answered:
Hei Kerstin. Da kan du ut fra 10-åringens hodemål og den oppgitt strikkefastheten regne det ut, men husk det må være nok masker til at diagrammet skal gå opp. mvh DROPS Design
04.11.2024 - 11:45
![]() Crys Keiser wrote:
Crys Keiser wrote:
Corrected message: What magic am I missing that I am on row 3 of the hat pattern and have ended up with 157 stitches when I started with 156? I know this means I likely didn't do a YO or a PSSO, but I've checked and re-checked and the outcome is the same. I had 156 when I finished row 2. Any tips?
07.03.2024 - 21:32DROPS Design answered:
Dear Crys, unfortunately, I cannot say anything else, than you suggest, that since in the pattern 's first 9 patterned rows (that is the rows where you knit yarnovers and decreases) each yarnover should have a corresponding decrease, the stitchnumber should stay the same as you started with. Increases only happen in the last patterned row of the diagram. You might have missed a decrease somewhere, or picked up a yarnover between stitches. Hope you find the extra stitch. Happy Knitting!
07.03.2024 - 22:39
![]() Crys Keiser wrote:
Crys Keiser wrote:
What magic am I missing that I am on row 3 of the hat pattern and have ended up with 156 stitches when I started with 156? I know this means I likely didn't do a YO or a PSSO, but I've checked and re-checked and the outcome is the same. I had 156 when I finished row 2. Any tips?
07.03.2024 - 19:35DROPS Design answered:
Dear Crys, as each yarnover has a corresponding decrease, you actually should have the same amount of stitches in the third row as you saterted with in the first row of the pattern (156 that is). Happy Knitting.
07.03.2024 - 22:36
![]() El wrote:
El wrote:
Habe ein Problem. Am Anfang der Runde (dort wo bei Magic Loop der Anfangsfaden hängt) habe ich ein falsches Muster bekommen - nur 1 Loch, nicht 2 nebeneinander. Sonst sieht es aus wie auf dem Foto. Kann mir jemand einen Tipp geben?
30.12.2022 - 23:58DROPS Design answered:
Liebe El, dieses Video zeigt, wie man ein Vollpatent in Runden strickt - kann das vielleicht helfen?
02.01.2023 - 13:41
![]() Francine Filiatrault wrote:
Francine Filiatrault wrote:
Très beau modèle ça fait 2x que je le fait merci
23.01.2022 - 15:16
|
||||||||||||||||
Sweet Caroline#sweetcarolineset |
||||||||||||||||
|
|
||||||||||||||||
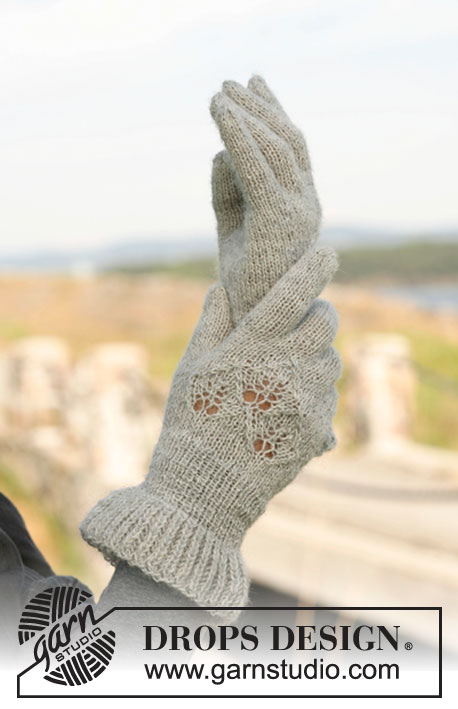
Set consists of: Knitted DROPS scarf and hat with lace pattern in “Alpaca”.
DROPS 131-11 |
||||||||||||||||
|
GARTER ST (back and forth on needle): K all rows. PATTERN: See diagrams M.1 and M.2. The diagrams show the pattern from RS. ENGLISH RIB (back and forth on needle): 1st row: 1 st in garter st, * K 1, 1 YO, slip 1 st as if to P *, repeat from *-* until 2 sts remain, finish with K 1 and 1 st in garter st. 2nd row: 1 st in garter st, * 1 YO, slip 1 st as if to P, K tog YO and slipped st *, repeat from *-* until 2 sts remain, finish with 1 YO, slip 1 st as if to P, 1 st in garter st. 3rd row: 1 st in garter st, * K tog YO and slipped st, 1 YO, slip 1 st as if to P *, repeat from *-* until 3 sts remain, K tog YO and slipped st, 1 st in garter st. Repeat 2nd and 3rd row upwards. RIB: 1st row: * K 1, P 1 *, repeat from *-* and finish with K 1. 2nd row: K over K and P over P. Repeat 2nd row upwards. --------------------------------------------------------- SCARF: The scarf consist of 2 equal parts that are sewn together in the middle at the end. Cast on 57 sts on needle size 3.5 mm / US 4 with Alpaca and work 4 rows in GARTER ST - see explanation above. Work next row from RS as follows: 4 sts in garter st, diagram M.1A 1 time, diagram M.1B 2 times, diagram M.1C 1 time, 4 sts in garter st. Continue like this until piece measures approx. 72 cm / 28½", finish nicely according to pattern. On next row inc by working * K 2, 1 YO *, repeat from *-* until 1 st remains, K 1 = 85 sts. Now work 4 cm / 1½" in RIB - see explanation above - make sure to work 1 row from WS at the end. Then switch to needle size 4.5 mm / US 7 and work 10 rows in ENGLISH RIB - see explanation above. LOOSELY bind off on next row, bind off YOs as K sts. Knit another part the same way. ASSEMBLY: Sew the two parts tog in outermost loops of sts along cast on edge. The piece measures approx. 160 cm / 63". ------------------------------------------------------------------ HAT: Worked in the round on circular needle and then on double pointed needles. Cast on 120 sts on circular needle size 3.5 mm / US 4 with Alpaca and work 5 cm / 2" in rib; K1, P1. Work next round in stockinette st while at the same time inc 36 sts evenly = 156 sts. Then work diagram M.2 13 times on round. NOTE! After each repetition of diagram M.2 vertically, the pattern will shift 1 st to the right. Work diagram M.2 a total of 3 times vertically. Then work 1 round in stockinette st. * On next round dec by K2 tog around. Switch to double pointed needles when needed. Work 2 cm / ¾" in stockinette st *, repeat from *-* 1 more time = 39 sts. Dec on next round by K2 tog around, finish with K 1 = 20 sts. Cut the yarn and pull it through the remaining sts and tighten tog, fasten tightly. |
||||||||||||||||
Diagram explanations |
||||||||||||||||
|
||||||||||||||||
 |
||||||||||||||||
 |
||||||||||||||||
Have you finished this pattern?Tag your pictures with #dropspattern #sweetcarolineset or submit them to the #dropsfan gallery. Do you need help with this pattern?You'll find 12 tutorial videos, a Comments/Questions area and more by visiting the pattern on garnstudio.com. © 1982-2026 DROPS Design A/S. We reserve all rights. This document, including all its sub-sections, has copyrights. Read more about what you can do with our patterns at the bottom of each pattern on our site. |
||||||||||||||||


With over 40 years in knitting and crochet design, DROPS Design offers one of the most extensive collections of free patterns on the internet - translated to 17 languages. As of today we count 325 catalogs and 12298 patterns - 12288 of which are translated into English (US/in).
We work hard to bring you the best knitting and crochet have to offer, inspiration and advice as well as great quality yarns at incredible prices! Would you like to use our patterns for other than personal use? You can read what you are allowed to do in the Copyright text at the bottom of all our patterns. Happy crafting!
Post a comment to pattern DROPS 131-11
We would love to hear what you have to say about this pattern!
If you want to leave a question, please make sure you select the correct category in the form below, to speed up the answering process. Required fields are marked *.