DROPS Andes
DROPS Andes
65% Wool, 35% Alpaca
from 6.60 $ /100g
Get the yarn to make this pattern from 52.80$.

The yarn cost is calculated from the pattern’s smallest size and the yarn’s cheapest product type. Looking for an even better price? You might find it on the DROPS Deals!

DROPS SS24

A Taste of Fall

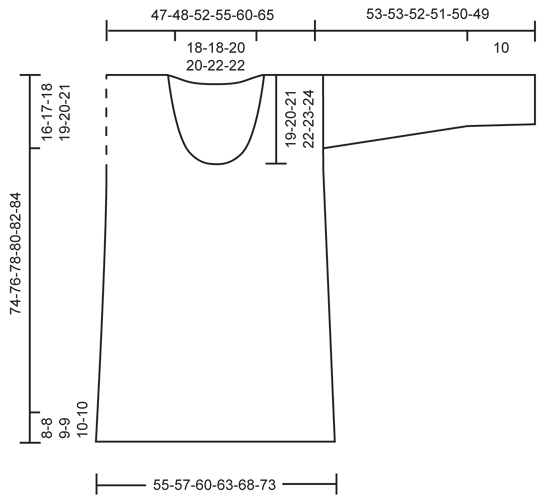
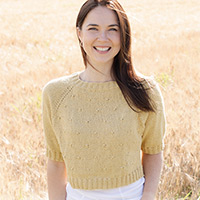
Knitted DROPS jumper with cables in ”Andes” or “Snow”. Size: S - XXXL.

DROPS 132-3
DROPS design: Pattern no EE-360
Yarn group E
--------------------------------------------------------
Size: S - M - L - XL - XXL - XXXL
Finished measurements:
Bust: 94-96-104-110-120-130 cm / 37"-37¾"-41"-43½"-47¼"-51"
Full length: 74-76-78-80-82-84 cm / 29⅛"-30"-30¾"-31½"-32¼"-33"

Materials: DROPS ANDES from Garnstudio
Color no 4300, old pink:
800-900-900-900-1000-1100 g

Or use DROPS Snow from Garnstudio:
750-800-850-850-950-1050 g

DROPS CIRCULAR NEEDLE size 7mm / US 10½ (80 cm / 32") - or size needed to get 12 sts x 16 rows in stockinette st with Andes = 10 x 10 cm / 4" x 4".

DROPS CIRCULAR NEEDLE size 6mm / US 10 (80 cm / 32") - for rib.

DROPS CIRCULAR NEEDLE size 6mm / US 10 (60 cm / 24") - for neck edge.

-------------------------------------------------------

Alternative Yarn – See how to change yarns here
Yarn Groups A to F – Use the same pattern and change the yarn here
Yarn usage using an alternative yarn – Use our yarn converter here

-------------------------------------------------------

DROPS Andes
DROPS Andes
65% Wool, 35% Alpaca
from 6.60 $ /100g
Get the yarn to make this pattern from 52.80$.

The yarn cost is calculated from the pattern’s smallest size and the yarn’s cheapest product type. Looking for an even better price? You might find it on the DROPS Deals!

Pattern instructions

NOTE: This pattern is written in American English. All measurements in charts are in cm. For conversion from inches to cm - click here. There are different terms for crocheting in American and British English. If this pattern includes crochet, click for "crochet terms" here. For this pattern in British English, please click here.
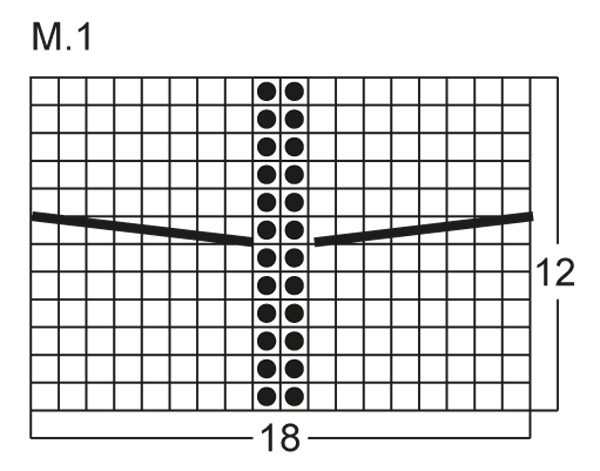
GARTER ST: K all rows.

PATTERN:
See diagram M.1 (the diagram shows the pattern from RS)

DECREASE TIP 1:
Dec 1 st at end of every K/P section as follows: Work until 2 sts remain, work these 2 sts tog.

DECREASE TIP 2:
Dec 1 st at beg of every K/P section as follows: Work the first 2 sts tog.

INCREASE TIP:
Inc 1 st by making 1 YO. On next row work YO twisted (i.e. work in the back loop of YO instead of front) to avoid holes.
--------------------------------------------------------

BODY:
Worked in the round on circular needle. Cast on 144-150-156-168-180-192 sts (no of sts can be divided by 6) on circular needle size 6 mm / US 10 with Andes. On 1st round, work rib as follows: * K 3, P 3 *, repeat from *-* the entire round. Work rib for 8-8-9-9-10-10 cm / 3⅛"-3⅛"-3½"-3½"-4"-4", then P 1 round - At the same time dec 12-14-12-16-16-16 sts evenly = 132-136-144-152-164-176 sts.
Switch to circular needle size 7mm / US 10½ and work next round as follows (round beg in the side): P 4-5-7-9-12-15, K 10, P 10, diagram M.1 (= 18 sts), P 10, K 10, P 8-10-14-18-24-30, K 10, P 10, diagram M.1 (= 18 sts), P 10, K 10, finish round with P 4-5-7-9-12-15 (= 1 P section with 8-10-14-18-24-30 sts on each side of piece). REMEMBER THE GAUGE!
Continue with diagram M.1 and rib (K 10, P 10 front and back) until piece measures 18-18-19-19-20-20 cm / 7"-7"-7½"-7½"-8"-8", then dec 1 st in every K section and every P section - Read Decrease tip 1 above = 122-126-134-142-154-166 sts (= 10 dec sts). Continue with diagram and rib (K 9 and P 9 front and back, 7-9-13-17-23-29 P sts in each side) until piece measures 35-36-37-38-39-40 cm / 13¾"-14¼"-14½"-15"-15¼"-15¾", then dec again 1 st in every K section and every P section - Read DECREASE TIP 2 above = 112-116-124-132-144-156 sts.
Continue with diagram M.1 and rib (K 8 and P 8 front and back, 6-8-12-16-22-28 P sts in each side) until piece measures 55-56-57-58-59-60 cm / 21⅝"-22"-22½"-22 ¾"-23¼"-23⅝". Now insert 2 markers in the middle of P sections in each side of piece = 3-4-6-8-11-14 P sts on each side of both markers. Now divide the piece at the markers and finish each part separately.

BACK PIECE:
= 56-58-62-66-72-78 sts. Now work back and forth on needle in pattern as before. Cast on 1 st at beg of the next 2 rows = 58-60-64-68-74-80 sts. Work next row (= RS) as follows: 1 edge st in garter st, P 3-4-6-8-11-14, K 8, P 8, diagram M.1, P 8, K 8, finish with P 3-4-6-8-11-14 and 1 edge st in garter st. Continue like this until piece measures 58-59-60-61-62-63 cm / 22¾"-23¼"-23⅝"-24"-24⅜"-24¾", now insert a marker in each side of piece (= beg of armhole). When piece measures 72-74-76-78-80-82 cm / 28⅜"-29⅛"-30"-30¾"-31½"-32¼", bind off for shoulder and neck as follows from RS: bind off the first 8-9-10-11-12-13 sts on row, work 11-11-11-12-13-15 sts and bind off the next 20-20-22-22-24-24 sts for neck, work the rest of row. Now finish each shoulder separately. Bind off the first 8-9-10-11-12-13 sts on next row from WS (= left shoulder), work the rest of row. Bind off 1 st at beg of next row from RS = 10-10-10-11-12-14 sts remain on the shoulder. Loosely bind off on next row, piece now measures approx. 74-76-78-80-82-84 cm / 29⅛"-30"-30¾"-31½"-32¼"-33". Work right shoulder the same way but reversed.

FRONT PIECE:
= 56-58-62-66-72-78 sts. Work back and forth on needle in pattern as before. Cast on 1 st at beg of the next 2 rows = 58-60-64-68-74-80 sts. Work next row (= RS) as follows: 1 edge st in garter st, P 3-4-6-8-11-14, K 8, P 8, work diagram M.1 - At the same time bind off the middle 10-10-12-12-14-14 sts in diagram M.1, now finish each part separately. Bind off on following rows from neck as follows: bind off 2 sts 2 times and 1 st 2 times = 18-19-20-22-24-27 sts remain on needle. Continue until piece measures 72-74-76-78-80-82 cm / 28⅜"-29⅛"-30"-30¾"-31½"-32¼", then bind off for shoulder as on back piece. Loosely bind off all sts when piece measures 74-76-78-80-82-84 cm / 29⅛"-30"-30¾"-31½"-32¼"-33".

SLEEVE:
Worked back and forth on circular needle. Cast on 38-38-44-44-50-50 sts (no of sts can be divided by 6 + 2 edge sts) on circular needle size 6mm / US 10 and work rib on 1st row (= RS) as follows: 1 edge st in garter st, * K 3, P 3 *, repeat from *-* and finish with 1 edge st in garter st. When rib measures 10 cm / 4", K 1 row from WS - and at the same time dec 4-4-8-8-12-12 sts evenly = 34-34-36-36-38-38 sts. Switch to circular needle size 7mm / US 10½ and continue as follows: 1 edge st in garter st, P 4-4-5-5-6-6, K 8, P 8, K 8, P 4-4-5-5-6-6, end with 1 edge st in garter st. When piece measures 18 cm / 7", inc 1 st inside 1 edge st in each side of piece. NOTE: Work the inc sts into rib (= K 8, P 8). Repeat inc every 8-7-6-5-5-4 cm / 3⅛"-2¾"-2⅜"-2"-2"-1½" a total of 4-5-5-6-6-7 times = 42-44-46-48-50-52 sts. Continue until piece measures 50-50-49-48-47-46 cm / 19¾"-19¾"-19¼"-19"-18½"-18" (shorter measurements in the larger sizes because of wider shoulder width). Then bind off for sleeve cap starting from RS as follows: bind off 6 sts at beg of the next 4 rows = 18-20-22-24-26-28 sts remain, then loosely bind off all sts on next row from RS. Piece measures approx. 53-53-52-51-50-49 cm / 21"-21"-20½"-20"-19¾"-19¼". Work another sleeve.

ASSEMBLY:
Sew the shoulder seams tog. Sew in sleeves and sew underarm and side seams in one inside 1 edge st.

NECK EDGE:
Worked in the round on circular needle size 6mm / US 10. Beg mid back, knit up approx. 80-100 sts around the neck edge. On next round P all sts while at the same time adjusting no of sts to 90-90-96-96-102-102 (no of sts can be divided by 6). On next round, work rib as follows: * K 3, P 3 *, repeat from *-* the entire round. Continue until rib measures 4 cm / 1½". Then work as follows while binding off: * K 3, P 1, P 2 tog *, repeat from *-*.

This pattern has been corrected.

Updated online: 18.11.2011
Materials: DROPS ANDES from Garnstudio
Color no 4300, old pink:
800-900-900-900-1000-1100 g

Or use DROPS Snow from Garnstudio:
750-800-850-850-950-1050 g

Diagram

All measurements in charts are in cm.

symbols = K on RS, P on WS
symbols = P on RS, K on WS
symbols = put 4 sts on cable needle behind work, K4, K4 from cable needle.
symbols = put 4 sts on cable needle in front of work, K4, K4 from cable needle.
diagram
diagram
Do you have a question? See a list of frequently asked questions (FAQ)

Knitting tension is what determines the final measurements of your work, and is usually measured per 10 x 10 cm. It is provided like so: number of stitches in width x number of rows in height - eg: 19 stitches x 26 rows = 10 x 10 cm.

The knitting tension is very individual; some people knit/crochet loosely while others work tightly. You adjust the knitting tension with the needle size, which is why the suggested needle size only serve as a guide! You need to adjust this (up or down) to ensure that YOUR knitting tension matches the knitting tension provided in the pattern. If you work with a different knitting tension than provided you will have a different yarn consumption, and your work will have different measurements than what the pattern suggests.

The knitting tension also determines which yarns can replace each other. As long as you achieve the same knitting tension you can replace one yarn with another.

See DROPS lesson: How to measure your tension/gauge

See DROPS video: How to make a gauge tension swatch

The required amount of yarn is provided in grams, eg: 450 g. To calculate how many balls you’ll need you first need to know how many grams are in 1 ball (25g, 50g or 100g). This information is available if you click on the individual yarn quality on our pages. Divide the amount required with the amount of each ball. For example, if each ball is 50g (the most common amount), the calculation will be as follows: 450 / 50 = 9 balls.

The important thing when changing from one yarn to another is that the knitting/crochet tension remains the same. This is so that the measurements of the finished piece will be the same as on the sketch provided. It is easier to achieve the same knitting tension using yarns from the same yarn group. It is also possible to work with multiple strands of a thinner yarn to achieve the knitting tension of a thicker one. Please try our yarn converter. We recommend you to always work a test swatch.

Please NOTE: when changing yarn the garment might have a different look and feel to the garment in the photo, due to individual properties and qualities of each yarn.

See DROPS lesson: Can I use a different yarn than the one mentioned in the pattern?

All our yarns are categorised into yarn groups (from A to F) according to thickness and knitting tension – group A contains the thinnest yarns and group F the thickest. This makes it easier for you to find alternative yarns to our patterns, should you wish to switch yarn. All yarns within the same group have a similar knitting tension and can easily replace each other. However, different yarn qualities have different structures and properties which will give the finished work a unique look and feel.

Click here for an overview of the yarns in each yarn group

At the top of all our patterns you’ll find a link to our yarn converter, which is a helpful tool should you wish to use a different yarn than suggested. By filling in the yarn quality you wish to replace, the amount (in your size) and number of strands, the converter will present good alternative yarns with the same knitting tension. Additionally it will tell you how much you’ll require in the new qualities and whether you’ll need to work with multiple strands. Most skeins are 50g (some are 25g or 100g).

If the pattern is worked with multiple colours, every colour will have to be converted separately. Similarly, if the pattern is worked with several strands of different yarns (for example 1 strand Alpaca and 1 strand Kid-Silk) you will have to find alternatives for each, individually.

Click here to see our yarn converter

Since different yarns have different qualities and textures we have chosen to keep the original yarn in our patterns. However, you can easily find options among our available qualities by using our yarn converter, or simply pick a yarn from the same yarn group.

It is possible that some retailers still have discontinued yarns in stock, or that someone has a few skeins at home that they would like to find patterns for.

The yarn converter will provide both alternative yarn as well as required amount in the new quality.

If you think it's hard to decide what size to make, it can be a good idea to measure a garment you own already and like the size of. Then you can pick the size by comparing those measures with the ones available in the pattern's size chart.

You'll find the size chart at the bottom of the pattern.

See DROPS lesson: How to read size chart

The needle size provided in the pattern serves only as a guide, the important thing is to follow the knitting tension. And since knitting tension is very individual, you will have to adjust the needle size to ensure that YOUR tension is the same as in the pattern – maybe you’ll have to adjust 1, or even 2 needle sizes, up or down to achieve the correct tension. For this, we recommend that you work test swatches.

Should you work with a different knitting tension than the one provided, the measurements of the finished garment might deviate from the measurement sketch.

See DROPS lesson: How to measure your tension/gauge

See DROPS video: How to make a gauge tension swatch

Working a garment top-down provides more flexibility and room for personal adjustment. For example it is easier to try the garment on while working, as well as making adjustments to length of yoke and shoulder caps.

The instructions are carefully explaining every step, in the correct order. Diagrams are adjusted to the knitting direction and are worked as usual.

The diagram depicts all rows/rounds, and every stitch seen from the right side. It is read from bottom to top, from right to left. 1 square = 1 stitch.

When working back and forth, every other row is worked from the right side and every other row is worked from the wrong side. When working from the wrong side, the diagram will have to be worked reversed: from left to right, knit stitches are purled, purl stitches are knit etc.

When working in the round every round is worked from the right side and the diagram are worked from right to left on all rounds.

See DROPS lesson: How to read knitting diagrams

The diagram depicts all rows/rounds, and every stitch seen from the right side. It is worked from bottom to top, from right to left.

When working back and forth every other row is worked from the right side: from right to left and every other row is worked from the wrong side: from left to right.

When working in the round, every row in the diagram are worked from the right side, from right to left.

When working a circular diagram you start in the middle and work your way outwards, counter clockwise, row by row.

The rows usually start with a given number of chain stitches (equivalent to the height of the following stitch), this will either be depicted in the diagram or explained in the pattern.

See DROPS lesson: How to read crochet diagrams

Instructions for working several diagrams after each other on the same row/round, will often be written like so: “work A.1, A.2, A.3 a total of 0-0-2-3-4 times". This means you work A.1 once, then A.2 is worked once, and A.3 is repeated (in width) the number of times provided for your size – in this case like so: S = 0 times, M = 0 times, L=2 times, XL= 3 times and XXL = 4 times.

The diagrams are worked as usual: begin with the first row in A.1, then work the first row in A.2 etc.

See DROPS lesson: How to read knitting diagrams

See DROPS lesson: How to read crochet diagrams

The total width of the garment (from wrist-to-wrist) will be larger in the larger sizes, despite the actual sleeves being shorter. The larger sizes have longer sleeve caps and wider shoulders, so there will be a good fit in all sizes.

The measurement sketch/schematic drawing provides information regarding the full length of the garment. If it’s a jumper or a jacket the length is measured from the highest point on the shoulder (usually closest to the neckline), and straight down to the bottom of the garment. It is NOT measured from the tip of shoulder. Similarly, the length of yoke is measured from the highest point on the shoulder and down to where yoke is split into body and sleeves.

See DROPS lesson: How to read a schematic drawing

Diagrams are often repeated on the round or in height. 1 repeat is the diagram the way it appears in the pattern. If it says to work 5 repeats of A.1 in the round, then you work A.1 a total of 5 times after/next to each other in the round. If it says to work 2 repeats of A.1 vertically/in height you work the entire diagram once, then begin again at the start and work the entire diagram one more time.

Chain stitches are slightly narrower than other stitches and to avoid working the cast-on edge too tight, we simply chain more stitches to begin with. The stitch count will be adjusted on the following row to fit the pattern and measurement sketch.

The rib edge is more elastic and will contract slightly compared to, for example, stocking stitch. By increasing before the rib edge, you avoid a visible difference in width between the rib edge and the rest of the body.

It’s very easy to cast off too tightly, and by making yarn overs while casting off (and simultaneously casting these off) you avoid a too tight cast off edge.

See DROPS video: How to bind off with yarn overs (yo)

To achieve an even increase (or decrease) you can increase on, for example: every 3rd and 4th row alternately, like so: work 2 rows and increase on the 3rd row, work 3 rows and increase on the 4th. Repeat this until the increase is complete.

See DROPS lesson: Increase or decrease 1 st on every 3rd and 4th row alternately

Should you prefer to work in the round instead of back and forth, you may of course adjust the pattern. You’ll need to add steeks mid-front (usually 5 stitches), and follow the instructions. When you would normally turn and work from the wrong side, simply work across the steek and continue in the round. At the end you’ll cut the piece open, pick up stitches to work bands, and cover the cut edges.

See DROPS video: How to knit steeks and cut open

Should you prefer to work back and forth instead of in the round, you may of course adjust the pattern so you work the pieces separately and then assemble them at the end. Divide the stitches for the body in 2, add 1 edge stitch in each side (for sewing) and work the front and back pieces separately.

See DROPS lesson: Can I adapt a pattern for circular needles into straight needles?

Pattern repeats can vary slightly in the different sizes, in order to get the correct proportions. If you’re not working the exact same size as the garment in the photo, yours might deviate slightly. This has been carefully developed and adjusted so that the complete impression of the garment is the same in all sizes.

Make sure to follow instructions and diagrams for your size!

If you have found a pattern you like which is available in women’s size it’s not very difficult to convert it to men’s size. The biggest difference will be the length of sleeves and body. Start working on the women size that you think would fit across the chest. The additional length will be worked right before you cast off for the armhole/sleeve cap. If the pattern is worked top-down you can add the length right after the armhole or before the first decrease on sleeve.

Regarding additional yarn amount, this will depend on how much length you add, but it is better with a skein too many than too few.

All yarns will have excess fibres (from production) that might come off as lint or shedding. Brushed yarns (ie hairier yarns) have more of these loose, excess fibres, causing more shedding.

Shedding also depends on what is worn under or over the garment, and whether this pulls at the yarn fibres. It’s therefore not possible to guarantee that there will be no shedding

Below are some tips on how to get the best result when working with hairier yarns:

1. When the garment is finished (before you wash it) shake it vigorously so the looser hairs come off. NOTE: do NOT use a lint roller, brush or any method that pulls at the yarn.

2. Place the garment in a plastic bag and put it in your freezer - the temperature will cause the fibres to become less attached to each other, and excess fibres will come off easier.

3. Leave in the freezer for a few hours before taking it out and shaking it again.

4. Wash the garment according to the instructions on the yarn label.

Pilling is a natural process that happens to even the most exclusive of fibers. It's a natural sign of wear and tear that is hard to avoid, and that is most visible in high friction areas of your garment like a sweater's arms and cuffs.

You can make your garment look as new by removing the pilling, using a fabric comb or a pill/lint remover.

Still can't find the answer you need? Then scroll down and leave your question so one of our experts can try to help you. This will be done normally within 5 to 10 working days.
In the meantime, you can read the questions and answers that others have left to this pattern or join the DROPS Workshop on Facebook to get help from fellow knitters/crocheters!

Post a comment to pattern DROPS 132-3

We would love to hear what you have to say about this pattern!

If you want to leave a question, please make sure you select the correct category in the form below, to speed up the answering process. Required fields are marked *.

Comments / Questions (31)

country flag Covas wrote:

Bonjour, je viens de terminer ce pull (enfin presque car il me manque 1 pelote !!!grrrr) il faut en rajouter une !!! j'ai commandé la quantité indiquée pour une taille S, j'ai acheté la laine et les aiguilles sur la boutique kalidou et 6.48€ pour une pelote supplémentaire... pas cool... snif.. alors prévoyez une pelote de plus...

31.01.2017 - 19:44

country flag Sylvie wrote:

Bonjour Je suis allergique aux aiguilles circulaires. Peut on transposer les explications de ce beau modèle aux aiguilles droites? Et comment? Bravo pour la qualité de vos laines et pour celle de votre site.

22.10.2015 - 14:51

DROPS Design answered:

Bonjour Sylvie, et merci. Vous trouverez ici toutes les informations pour adapter un modèle tricoté en circulaire sur aiguilles droites. Rappelez-vous que votre magasin DROPS pourra également vous aider si besoin. Bon tricot!

22.10.2015 - 15:12

country flag Marian wrote:

Het is nu inmiddels 2014 en jammer genoeg is de benodigde hoeveelheid wol nog niet aangepast in het patroon! Hierdoor veel te weinig wol aangeschaft en naar een ander filiaal moeten gaan voor extra wol. Voor maat s is 1000 gram nodig.

28.02.2014 - 22:02

DROPS Design answered:

Hoi Marian. Het patroon is inmiddels gecontroleerd en aangepast.

13.03.2014 - 12:52

Tricotine wrote:

La quantité de laine préconisée pour une taille S ne suffit pas. J'ai utilisé 9 pelotes de 100 g plutôt que 7 pour réaliser ce pull.

01.11.2013 - 04:40

country flag Karo wrote:

Der Pullover fühlt sich richtig fest an, ein "schweres" Stück, kann man fast hinstellen. Also mit der Angabe der Nadelstärke wird es jedenfalls kein locker leichtes Gestrick, eher ein Stück für den tiefsten Winter. Leider komme ich mit der Angabe des Wollverbrauchs nicht zurecht. Für die kleinste Größe reichen 700 Gramm bei mir nicht aus. Werde auf jeden Fall ein weiteres Knäuel hinzufügen müssen.

14.09.2013 - 22:04

country flag Kumor wrote:

Schreklich...

02.03.2013 - 14:57

country flag Ineke wrote:

Zoals hieronder gemeld heb ik meer wol nodig dan gemeld. Van de 2 extra bollen heb ik nog 18 gram over. Hier moet ik de halskant van 4 cm nog van breien. Heb ik dan genoeg of moet ik nog 1 bol aanschaffen?

04.01.2013 - 14:13

DROPS Design answered:

Dat kan ik helaas niet duidelijk zeggen. Neem contact op met je verkooppunt

14.01.2013 - 12:28

country flag Ineke wrote:

Mijn proeflapje klopt precies. Toch kom ik voor maat M zeker 1 1/2 bol tekort. Ik ben niet de enige, zie een paar opmerkingen hieronder. Nu maar proberen of ze de wol met het juiste verfbad nog hebben en weer extra verzendkosten, jammer hoor.

26.12.2012 - 21:41

DROPS Design answered:

We hadden al de hoeveelheid aangepast op 18/11 n.a.v. reacties op deze trui. Het zou nu moeten kloppen. Ik zal uw opmerking wel registreren en doorsturen.

27.12.2012 - 11:43

country flag Ineke wrote:

Ik denk dat er een fout staat in het patroon. Voor het lijf moet ik 150 st opzetten en boordst 3r/3av breien. Aan het eind vd eerste toer eindig ik met 3r. De eerste steken op de 2e tour zijn echter ook 3 r. Dus 6 steken r naast elkaar. Dit kan toch niet kloppen?

18.12.2012 - 19:06

DROPS Design answered:

Het patroon klopt. Je hebt 150 st. De boord is 3 r, 3 av (= 6 st), dat zijn 25 herhalingen over de 150 st. Je zou dan ook moeten eindigen met 3 av.

19.12.2012 - 11:07

country flag Anne-Mette wrote:

Jeg har brugt 850 g Andes på den i str. M.

29.12.2011 - 22:48