
Popular categories
Looking for a yarn?


Comments / Questions (16)
![]() Marie wrote:
Marie wrote:
Bonsoir, Puis je tricoter ce petit cardigan avec un fil Alpaca bouclé et des aiguilles de 5 mm ? IL sera sans doute plus fin mais c'est ce que je veux. Un grand merci, Marie.
05.03.2018 - 19:13DROPS Design answered:
Bonjour Marie, Puddel appartenait au groupe E alors que Alpaca Bouclé fait partie du groupe C, pour obtenir le même échantillon, il vous faudrait à priori plutôt tricoter 2 fils Alpaca Bouclé ou 1 fil Alpaca Bouclé et 1 fil Brushed Alpaca Silk. Si vous ne voulez qu'un seul fil, il faudra faire un échantillon pour vérifier l'échantillon et si la texture vous convient et éventuellement ajuster les aiguilles/les explications. Bon tricot!
06.03.2018 - 08:41
![]() Veerle wrote:
Veerle wrote:
Het aantal steken wat je moet opnemen voor de hals klopt helemaal niet ! Het dubbele komt beter uit ! Voor de rest prima gelukt !
09.10.2017 - 12:19
![]() Veerle wrote:
Veerle wrote:
Het aantal steken wat je moet opnemen voor de hals klopt helemaal niet ! Het dubbele komt beter uit ! Voor decreet prima gelukt !
09.10.2017 - 12:16
![]() De Meulenaere Mieke wrote:
De Meulenaere Mieke wrote:
Ik heb de ganse trui gebreid maar voor de mouwkop versta ik het niet goed. de 2 steken afkanten aan iedere kant begrijp ik maar dan 1 st afkanten aan iedere kant tot de hoogte van bv. 42 cm. bedoelt U dan telkens 1 st aan iedere naald herhalen tot de hoogte van 42 cm? of éénmalig 1 st afkanten aan iedere kant?
11.10.2014 - 14:21DROPS Design answered:
Het betekent dat u aan elke kant 1 st afkant aan het begin van de naald tot de totale mouw 42 cm hoog is.
11.10.2014 - 22:53
![]() Konny wrote:
Konny wrote:
Hallo, Ich möchte mir die Jacke in Größe L mit der Wolle Drops Cloud stricken. Allerdings möchte ich die Ärmel etwas länger haben. Strick ich statt 8 cm dann bspw. 10 cm? Oder wo nehme ich am besten die Verlängerung vor? Danke für Eure Hilfe. Mit freundlichen Grüßen Konny
04.08.2014 - 11:36DROPS Design answered:
Liebe Konny, wenn Sie die Ärmel unten etwas schmäler möchten, schlagen Sie ein paar Maschen weniger an und machen entsprechend mehr Aufnahmen oder Sie beginnen wie beschrieben und erhöhen den Abstand zwischen den Aufnahmen um die Ärmel zu verlängern. Eine andere Möglichkeit ist, dass Sie den Beginn der Aufnahmen etwas verschieben, aber da würde ich Ihnen nicht mehr als 10 cm empfehlen.
15.08.2014 - 08:04
![]() Linnéa wrote:
Linnéa wrote:
Kikade på olika mönster för puddel-garnet och hittade precis den enkla, lilla, söta, superdupergosiga kofta jag letade efter! Ny favorit!!!
30.01.2014 - 13:12
![]() Andrieu wrote:
Andrieu wrote:
Bonjour, Je souhaite faire ce modèle avec les manches longues. Pouvez-vous me dossier un conseil sur la longueur à rajouter environ et sur la quantité de laibe ? Merci par avance Cdt
25.11.2012 - 13:56DROPS Design answered:
Bonjour Madame Andrieu, pour ce genre de modification, vous pouvez vous inspirer d'un modèle analogue et n'hésitez pas à demander de l'aide à votre magasin DROPS. Bon tricot !
26.11.2012 - 09:45
![]() Marianne wrote:
Marianne wrote:
Diagram till drops 125-11 gäller siffrorna i diagrammet på storleken på koftan eller på kroppen typ stl m
25.08.2012 - 20:17DROPS Design answered:
Måtten på måttskissen är plaggets mått när det är färdigt. Man mäter det när det ligger platt från sida till sida i centimeter.
28.08.2012 - 02:39
![]() Ulrike wrote:
Ulrike wrote:
Eine süße Jacke- sehr schlicht aber durch das Garn auch sehr feminin.
21.07.2010 - 11:52
![]() Malou wrote:
Malou wrote:
Fin färg, härlig kofta.
01.07.2010 - 18:59
|
|
DROPS 125-11 |
|
|
|
|
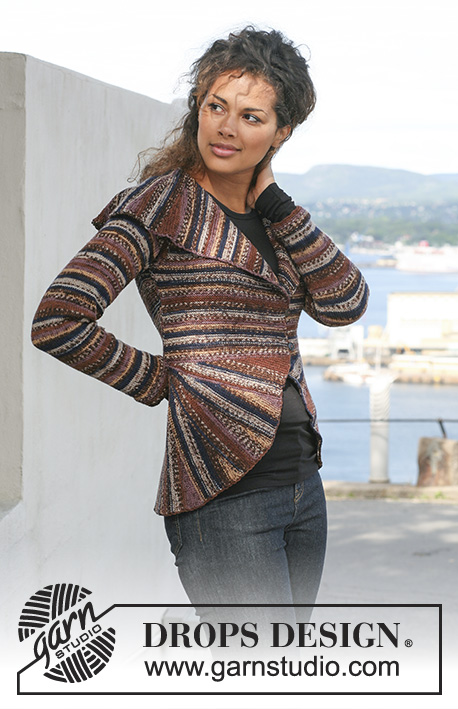
DROPS jacket in garter st in ”Puddel”.
DROPS 125-11 |
|
|
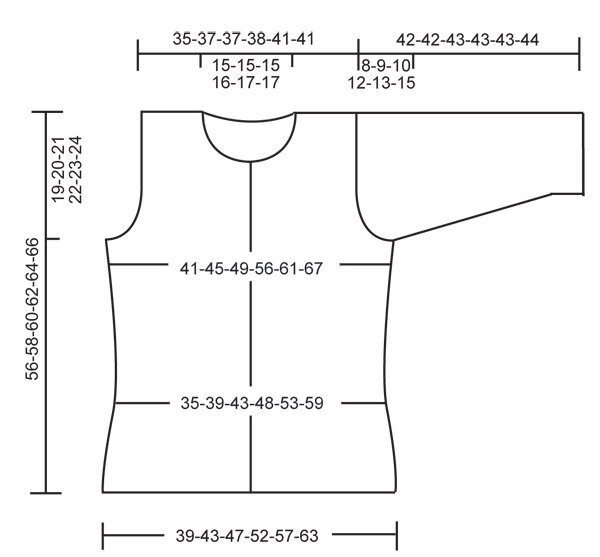
BUTTONHOLES: Make buttonholes on right front band. 1 buttonhole = bind off 3rd front band st and cast on 1 new st on next row. Make buttonholes when piece measures: SIZE S: 30, 37, 44 cm / 11¾", 14½", 17¼" SIZE M: 32, 39, 46 cm / 12½", 15¼", 18". SIZE L: 32, 40, 48 cm / 12½", 15¾", 19". SIZE XL: 29, 36, 43, 50 cm / 11⅜", 14¼", 17", 19¾". SIZE XXL: 31, 38, 45, 52 cm / 12¼", 15", 17¾", 20½". SIZE XXXL: 30, 38, 46, 54 cm / 11¾", 15", 18", 21¼". -------------------------------------------------------- The whole jacket is worked in Garter st, i.e. K all rows. BACK PIECE: Cast on 39-43-47-52-57-63 sts on needle size 7 mm / US 10½ with Puddel and work garter st back and forth on needle until piece measures approx 7 cm / 2¾". REMEMBER THE GAUGE! Now dec 1 st each side and repeat the dec when piece measures 15 cm / 6" = 35-39-43-48-53-59 sts. Continue until piece measures approx 20-21-22-23-24-25 cm / 8"-8¼"-8¾"-9"-9½"-9¾". Now inc 1 st each side and repeat the inc on every 6-6-6-4-4-4 cm / 2⅜"-2⅜"-2⅜"-1½"-1½"-1½" a total of 3-3-3-4-4-4 times = 41-45-49-56-61-67 sts. Continue until piece measures 37-38-39-40-41-42 cm / 14½"-15"-15¼"-15¾"-16⅛"-16½". Now bind off 2 sts each side for armhole and bind off each side at beg of every row: 2 sts 0-0-1-2-2-3 times and 1 st 1-2-2-3-4-5 times = 35-37-37-38-41-41 sts. Continue until piece measures approx 54-56-58-60-62-64 cm / 21¼"-22"-22¾"-23⅝"-24⅜"-25¼". Now bind off the middle 13-13-13-14-15-15 sts for neck and complete each shoulder separately. Bind off 1 st on neckline on next row = 10-11-11-11-12-12 sts left on shoulder. Continue until piece measures 56-58-60-62-64-66 cm / 22"-22¾"-23⅝"-24⅜"-25¼"-26", bind off LOOSELY. LEFT FRONT PIECE: Cast on 23-25-27-30-32-35 sts (includes 3 front band sts towards mid front) on needle size 7 mm / US 10½ with Puddel. Continue and dec at the side as described for back piece = 21-23-25-28-30-33 sts. When piece measures approx 20-21-22-23-24-25 cm / 8"-8¼"-8¾"-9"-9½"-9¾" inc at the side as described for back piece = 24-26-28-32-34-37 sts. When piece measures 37-38-39-40-41-42 cm / 14½"-15"-15¼"-15¾"-16⅛"-16½" bind off for armhole at the side as described for back piece = 21-22-22-23-24-24 sts. Continue back and forth on needle until piece measures 46-48-50-52-54-56 cm / 18"-19"-19¾"-20½"-21¼"-22". Now bind off 8 sts towards mid front for neck and bind off to shape the neckline at beg of every row from mid front: 2 sts 1 time and 1 st 1-1-1-2-2-2 times = 10-11-11-11-12-12 sts left on shoulder. Continue until piece measures 56-58-60-62-64-66 cm / 22"-22¾"-23⅝"-24⅜"-25¼"-26", bind off LOOSELY. RIGHT FRONT PIECE: Like left front piece, but mirrored. NOTE! Remember BUTTONHOLES - see above. SLEEVE: Cast on 27-29-29-31-31-33 sts on needle size 7 mm / US 10½ with Puddel. Work garter st back and forth on needle until piece measures 8 cm / 3". Now inc 1 st each side, and repeat the inc on every 10-10-5-4.5-3.5-3 cm / 4"-4"-2"-1¾"-1¼"-1⅛" a total of 3-3-5-5-6-7 times = 33-35-39-41-43-47 sts. Continue until piece measures 34-33-33-31-30-29 cm / 13⅜"-13"-13"-12¼"-11¾"-11⅜" (NOTE! less for the larger sizes because of longer sleeve cap and wider shoulders). Now bind off 2 sts in beg of following 2 rows for sleeve cap and then bind off 1 st at the beg of every row each side until piece measures approx 41-41-42-42-42-43 cm / 16"-16"-16½"-16½"-16½"-17". Now bind off 2 sts each side 1 time and bind off remaining sts. Piece measures approx 42-42-43-43-43-44 cm / 16½"-16½"-17"-17"-17"-17½". ASSEMBLY: Sew shoulder seams. Set in sleeves. Sew sleeve and side seams edge to edge in outer loops of sts to avoid a chunky seam. Sew on buttons. NECKLINE: Pick up approx 40 to 48 sts from RS on circular needle size 7 mm / US 10½ round the neck. K 1 row from WS, K 1 row from RS and K 1 row from WS. Bind off. |
|
 |
|
Have you finished this pattern?Tag your pictures with #dropspattern or submit them to the #dropsfan gallery. Do you need help with this pattern?You'll find 11 tutorial videos, a Comments/Questions area and more by visiting the pattern on garnstudio.com. © 1982-2026 DROPS Design A/S. We reserve all rights. This document, including all its sub-sections, has copyrights. Read more about what you can do with our patterns at the bottom of each pattern on our site. |


With over 40 years in knitting and crochet design, DROPS Design offers one of the most extensive collections of free patterns on the internet - translated to 17 languages. As of today we count 325 catalogs and 12298 patterns - 12288 of which are translated into English (US/in).
We work hard to bring you the best knitting and crochet have to offer, inspiration and advice as well as great quality yarns at incredible prices! Would you like to use our patterns for other than personal use? You can read what you are allowed to do in the Copyright text at the bottom of all our patterns. Happy crafting!
Post a comment to pattern DROPS 125-11
We would love to hear what you have to say about this pattern!
If you want to leave a question, please make sure you select the correct category in the form below, to speed up the answering process. Required fields are marked *.