
Popular categories
Looking for a yarn?


|
||||||||||||||||||||||
Liberty |
||||||||||||||||||||||
 |
 |
|||||||||||||||||||||
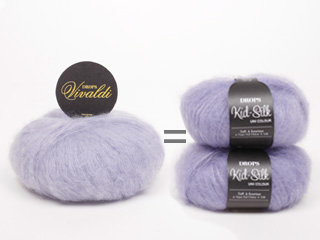
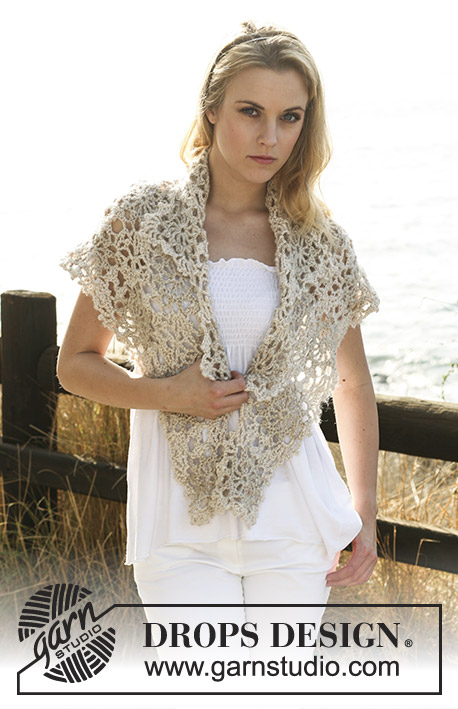
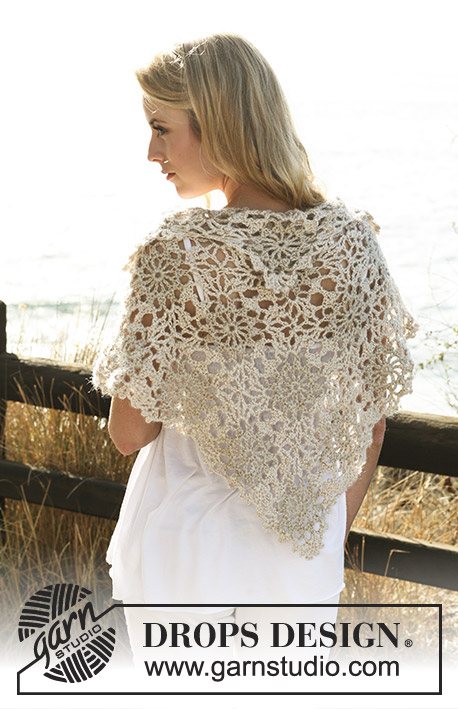
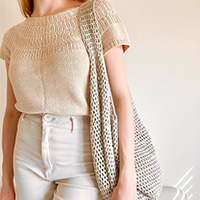
Crochet DROPS shawl in ”Cotton Viscose” and ”Vivaldi”.
DROPS 119-11 |
||||||||||||||||||||||
|
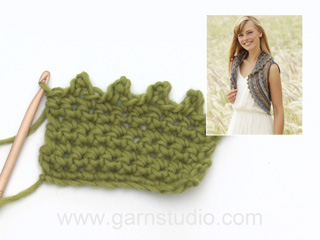
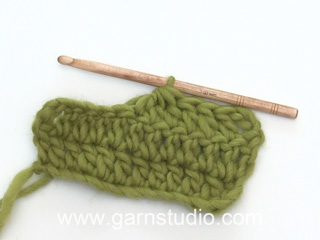
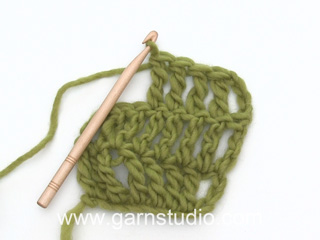
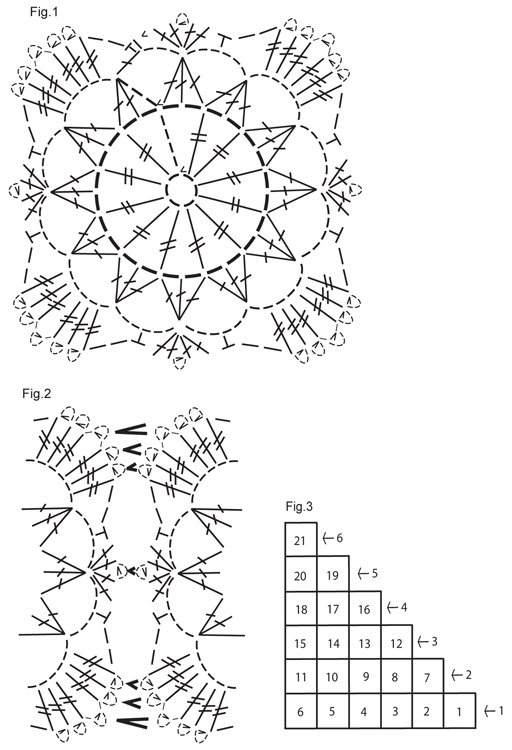
DIAGRAMS: Fig.1 shows how to crochet a square. Fig.2 shows how to crochet 2 squares tog. Fig.3 shows the order of the squares. -------------------------------------------------------- -------------------------------------------------------- SHAWL: The shawl is crochet in rows. For each row there is 1 less square (first square on a new row is crochet in second square from the row below) until there is only 1 square on row. The shawl is crochet from one short side and across – see Fig.3. FIRST ROW – SQUARE 1: Also see Fig.1. Ch 6 with 1 thread light beige Cotton Viscose + 1 thread Vivaldi and hook size 4 mm / G/6 and form a ring with 1 sl st in first ch. ROUND 1: ch 6 (= 1 tr + 2 ch), * 1 tr in ch-ring, ch 2 *, repeat from *-* a total of 11 times, finish with 1 sl st in 4th ch from beg of round = 12 tr. ROUND 2: ch 3 (= 1 dc), 1 dc in ch-loop but wait with last pull-through, 1 dc in next tr, and when doing the last pull-through pull thread through all 3 sts on hook, * ch 6, 1 dc in same tr but wait with last pull-through, 1 dc in ch-loop but wait with last pull-through, 1 dc in next tr and when doing the last pull-through pull thread through all 4 sts on hook *, repeat from *-* a total of 11 times , finish with ch 3 and 1 dc at the top of the first dc-group (= 12 dc-groups). ROUND 3: Change to 1 thread off-white Cotton Viscose + 1 thread Vivaldi and continue as follows: ch 1, 1 sc in last dc from previous round, ** ch 2, * 1 tr in 6-ch-loop, 1 picot (=ch 4, 1 sl st in first ch) *, repeat from *-* a total of 2 times, 1 tr in the same 6-ch-loop, ch 1, 1 picot, ch 1, repeat from *-* 2 times (= 5 picots), 1 tr in the same 6-ch-loop, ch 2, 1 sc in next 6-ch-loop, in next dc-group crochet as follows: [2 dc, 1 picot, 2 dc], 1 sc in next 6-ch-loop **, in next 6-ch-loop repeat from **-**, do this a total of 4 times, but finish with 1 sl st in first sc on round. Cut and fasten threads. FIRST ROW – SQUARE-2: Beg + round 1 and 2: Like square 1. ROUND 3: Also see Fig.2. Change to 1 thread off-white Cotton Viscose + 1 thread Vivaldi. Ch 1, 1 sc in last dc on previous round, ch 2, * 1 tr in 6-ch-loop, 1 picot *, repeat from *-* a total of 2 times, 1 tr in the same 6-ch-loop, ch 5, insert hook in the middle picot in corner of previous square, 1 sl st in this picot. Now continue on square 2 again as follows: 1 sl st back in 2nd ch (of the 5), ch 1, 1 tr in 6-ch-loop, ch 4, insert hook in the next picot on previous square, 1 sl st in this picot, 1 sl st back in the first ch (of the 4), 1 tr in 6-ch-loop, ch 4, insert hook in the last of the picots in this corner on previous square, 1 sl st in this picot, 1 sl st back in the first ch (of the 4), 1 tr in the same 6-ch-loop, ch 2, 1 sc in next 6-ch-loop, in next dc-group crochet as follows: [2 dc, ch 4, insert hook in next picot from previous square (i.e. the picot in the middle of the side), 1 sl st in this picot, 1 sl st back in the first ch (of the 4), 2 dc], 1 sc in next 6-ch-loop, ch 2, skip to the next 6-ch-loop, ** 1 tr in 6-ch-loop, ch 4, insert hook in the first of the picots from next corner in the previous square, 1 sl st in this picot, 1 sl st back in the first ch (of the 4) **, repeat from **-** 1 more time in the next picot, 1 tr in the same 6-ch-loop, ch 5, insert hook in the middle picot in the corner of previous square, 1 sl st in this picot, 1 sl st back in the 2nd ch (of the 5), ch 1, repeat from *-* (see beg of round) 2 times (= 5 picots), continue in the round as described for square 1. Crochet another 4 squares like square 2 = 6 squares on first row. SECOND ROW – SQUARE 7: Beg + round 1 and 2: Like square 1. ROUND 3: Change to 1 thread off-white Cotton Viscose + 1 thread Vivaldi. Ch 1, 1 sc in last dc on previous round, 2 ch, * 1 tr in 6-ch-loop, 1 picot *, repeat from *-* a total of 2 times, 1 tr in the same 6-ch-loop, ch 5, insert hook in sl st where square 2 and 3 from previous row are crochet tog, 1 sl st here, 1 sl st back in 2nd ch (of the 5), 1 tr in 6-ch-loop, ch 4, insert hook in the next picot on square 2, 1 sl st in picot, 1 sl st back in the first ch (of the 4), 1 tr in 6-ch-loop, ch 4, insert hook in the last picot in this corner on square 2, 1 sl st in picot, 1 sl st back in first ch (of the 4), 1 tr in the same 6-ch-loop, 2 ch, 1 sc in next 6-ch-loop, in next dc-group crochet as follows: [2 dc, ch 4, insert hook in next picot on square 2 (i.e. the picot in the middle of the side), 1 sl st in picot, 1 sl st back in the first ch (of the 4), 2 dc], 1 sc in next 6-ch-loop, ch 2, skip to next 6-ch-loop, ** 1 tr in 6-ch-loop, ch 4, insert hook in the first picot in next corner on square 2, 1 sl st in picot, 1 sl st back in the first ch (of the 4) **, repeat from **-** 1 more time in the next picot, 1 tr in the same 6-ch-loop, ch 5, insert hook in sl st where square 1 and 2 are crochet tog, 1 sl st here, 1 sl st back in the second ch (of the 5), ch 1, repeat from *-* (see beg of round) 2 times (= 5 picots), Continue in the round as described for square 1. SQUARE 8: Beg + round 1 and 2: Like square 1. ROUND 3: Change to 1 thread off-white Cotton Viscose + 1 thread Vivaldi: Crochet like square 7 – but crochet the first side of square tog with picots from next square on previous row and crochet second side of square tog with picots from previous square on this row. Crochet another 3 squares in the same way as square 8 = 5 squares on second row. Continue as row 2 with 1 less square per row until there is only 1 square on row. |
||||||||||||||||||||||
Diagram explanations |
||||||||||||||||||||||
|
||||||||||||||||||||||
|
||||||||||||||||||||||
|
Have you made this or any other of our designs? Tag your pictures in social media with #dropsdesign so we can see them! Do you need help with this pattern?You'll find tutorial videos, a Comments/Questions area and more by visiting the pattern on garnstudio.com. © 1982-2024 DROPS Design A/S. We reserve all rights. This document, including all its sub-sections, has copyrights. Read more about what you can do with our patterns at the bottom of each pattern on our site. |
||||||||||||||||||||||


With over 40 years in knitting and crochet design, DROPS Design offers one of the most extensive collections of free patterns on the internet - translated to 17 languages. As of today we count 304 catalogs and 11422 patterns - 11417 of which are translated into English (US/in).
We work hard to bring you the best knitting and crochet have to offer, inspiration and advice as well as great quality yarns at incredible prices! Would you like to use our patterns for other than personal use? You can read what you are allowed to do in the Copyright text at the bottom of all our patterns. Happy crafting!
Comments / Questions (35)
Vil det fungere å hekle dette sjalet i drops brushed alpaca? Ser for meg et luftig, men varmt somnersjal.
15.05.2022 - 14:41DROPS Design answered:
Hei Aud, Oppskriften bruker 1 garn fra garngruppe A og 1 garn fra garngruppe C (Babay Alpaca + Brushed Alpaca). Hvis du bruker kun Brushed Alpaca har du bare 1 garn fra garngruppe C. Da må du justere maskeantall og antall rad slik at du får riktige mål. God fornøyelse
16.05.2022 - 09:04Grazie mille per il modello e le spiegazioni che risultano chiare. Si tratta di un bellissimo coprispalle estivo e ho subito deciso di realizzarlo. \r\nCordiali saluti!
27.07.2021 - 19:14Ivm het samenhaken : Wordt dit achteraf gedaan of per vierkantje erbij eraan gehaakt? Is er een instructiefilmpje v deze sjaal of kijk ik daarover? Alvast dank,
28.05.2021 - 01:58DROPS Design answered:
Dag Els,
Telkens als je een nieuw vierkantje haakt, haak je deze aan een vorig vierkantje, zoals uitgelegd in de beschrijving. Helaas is er specifiek voor deze omslagdoek geen instructiefilmpje.
31.05.2021 - 10:42Hej! På Rad 1, Ruta 1 står det "Virka 6 lm med 1 tråd ljus beige Cotton Viscose + 1 tråd Vivaldi" (alt garnalternativ). På varv 1 och 2 står inget om vilket garn som ska användas. På varv 3 står plötsligt att man ska BYTA till Viscose + Vivaldi " (eller garnalternativ). SÅ: Vilket garn ska användas på varv 1 och 2? Samma fråga gäller även övriga rutor där det också står att man ska BYTA till Cotton Viscose + Vivaldi.
11.08.2020 - 22:48DROPS Design answered:
Hej Sofia. Du börjar med att virka med 1 tråd ljus beige Cotton Viscose + 1 tråd Vivaldi (detta används även på varv 1-2) och sedan på varv 3 byter du till 1 tråd natur Cotton Viscose + 1 tråd Vivaldi. Det är alltså färgen på Cotton Viscose du byter. Mvh DROPS Design
13.08.2020 - 11:24Dziękuję!
27.03.2019 - 08:25Dzień Dobry! Proszę o opis do modelu w języku polskim. Z góry dziękuję.
26.03.2019 - 15:28DROPS Design answered:
Witaj Ewo! Do końca tygodnia będzie gotowy. Pozdrawiamy!
26.03.2019 - 15:39Hi! I love your crochet patterns! There are so many I want to make. My question is I noticed that you categorize yarn by group(A,B, etc). In United States, we go by category weight( fine-1,2,fingerling -3,sport-3, etc). How do I know what thickness/weight to use? I tried to find a conversion chart, group to category weight, on the internet but didn't find one. Please let me know how to convert the yarn. Thank you.
03.06.2017 - 16:07DROPS Design answered:
Dear Diane, please have a look HERE. And remember to always make a little swatch. Happy crocheting with DROPS yarns!
05.06.2017 - 15:00Har lyst til å lage denne, men i andre farger. Er det slik at man trenger både Viscosegarnet og Vivaldigarnet, og hvordan vet jeg hvilket vivaldigarn jeg trenger? Jeg ser også at Vivaldigarnet er utgått fra grossist?
30.08.2015 - 16:29DROPS Design answered:
Hej Kristin, Ja hvis du vil have modellen som på billedet, så behöver du 2 kvaliteter. Hvis du hellere vil have den i ren CottonViscose i andre farver, så kan det lade sig göre men ruderne bliver da lidt mindre. Her må du selv lave en rude og se om du er tilfreds med den. Istedet for Vivaldi kan du bruge DROPS Kid Silk og häkle sammen med Viscosen. God fornöjelse!
04.09.2015 - 13:06Das Tuch wird wirklich wunderbar, aber die Anleitung entspricht nicht dem Foto und auch nicht der Garn-Mengenangabe; es muss eine Aussen-Reihe mehr gearbeitet werden (also mit 8 Vierecken als Basis).
08.09.2012 - 16:54DROPS Design answered:
Sie können das Tuch natürlich gerne etwas grösser häkeln, brauchen dann aber wirklich mehr Garn. Unser Modell ist wie beschrieben mit einer Basis von 6 Quadraten gemacht. Quadrat 7 und 8 sind bereits in der 2. Reihe.
10.09.2012 - 15:13Erste Reihe-2.Viereck:..(2Stb, 4Lm, die Nadel in das: ..nächste.. Picot des vorherigen 4-Ecks einführen (das Picot in der Mitte der Seite), 1Km in dieses Picot, 1Km zurück in die 1.Lm der 4Lm, 2 Stb.) vgl. auch engl. Anleitung
07.03.2011 - 19:45