
Popular categories
Looking for a yarn?


Comments / Questions (5)
![]() Sinikka Sihvo wrote:
Sinikka Sihvo wrote:
Jatkokysymys alla olevaan vastaukseenne: Jos kudon yhdessä baby merinoa ja Brushed Alpaca Silkiä. Tuleeko näistä yhdessä sama vahvuus kuin karisma? DROPS Design answered: DROPS Baby Merino -lanka ja DROPS Karisma-lanka kuuluvat eri lankaryhmiin. Baby Merino on on Karisma-lankaa ohuempi lanka, joten se ei sovi tähän malliin. Voit kuitenkin kokeilla jotakin toista lankaryhmään B kuuluvaa lankaa, esim. DROPS Merino Extra Fine.
18.11.2024 - 21:06DROPS Design answered:
Valitettavasti tämäkään ei käy. Baby Merino kuuluu lankaryhmään A ja Brushed Alpaca Silk kuuluu lankaryhmään C, kun taas Karisma kuuluu lankaryhmään B. Eli vaikka neuloisit ainoastaan Brushed Alpaca Silk -langalla, neuleesta tulisi liian iso ja puikkokoko muuttuisi.
19.11.2024 - 18:14
![]() Sinikka Sihvo wrote:
Sinikka Sihvo wrote:
Jatkokysymys alla olevaan vastaukseenne: Jos kudon yhdessä baby merinoa ja Brushed Alpaca Silkiä. Tuleeko näistä yhdessä sama vahvuus kuin karisma? DROPS Design answered: DROPS Baby Merino -lanka ja DROPS Karisma-lanka kuuluvat eri lankaryhmiin. Baby Merino on on Karisma-lankaa ohuempi lanka, joten se ei sovi tähän malliin. Voit kuitenkin kokeilla jotakin toista lankaryhmään B kuuluvaa lankaa, esim. DROPS Merino Extra Fine.
18.11.2024 - 21:06
![]() Sinikka Sihvo wrote:
Sinikka Sihvo wrote:
DROPS Design answered: DROPS Baby Merino -lanka ja DROPS Karisma-lanka kuuluvat eri lankaryhmiin. Baby Merino on on Karisma-lankaa ohuempi lanka, joten se ei sovi tähän malliin. Voit kuitenkin kokeilla jotakin toista lankaryhmään B kuuluvaa lankaa, esim. DROPS Merino Extra Fine. Jatkokysymykseni: Mitä jos kudon yhdessä baby merinoa ja Drops Brushed Alpaca Silkiä? Vastaako nämä vahvuudeltaan merino extra fineä?
18.11.2024 - 21:00
![]() Sinikka Sihvo wrote:
Sinikka Sihvo wrote:
Haluaisin kutoa neuletakin baby merino langasta kokoa xl. Mikä olisi langan menekki?
15.11.2024 - 10:47DROPS Design answered:
DROPS Baby Merino -lanka ja DROPS Karisma-lanka kuuluvat eri lankaryhmiin. Baby Merino on on Karisma-lankaa ohuempi lanka, joten se ei sovi tähän malliin. Voit kuitenkin kokeilla jotakin toista lankaryhmään B kuuluvaa lankaa, esim. DROPS Merino Extra Fine.
18.11.2024 - 18:45
![]() Siv Jakobsen wrote:
Siv Jakobsen wrote:
Tusen takk for oppskriften. Det var en smart en, Men skulle ønske det var et nærfoto av tå og hæl for raggsokkene. Ellers veldig flott oppskrift
31.03.2019 - 00:41
|
|||||||||||||||||||||||||
DROPS 52-22 |
|||||||||||||||||||||||||
|
|
|||||||||||||||||||||||||
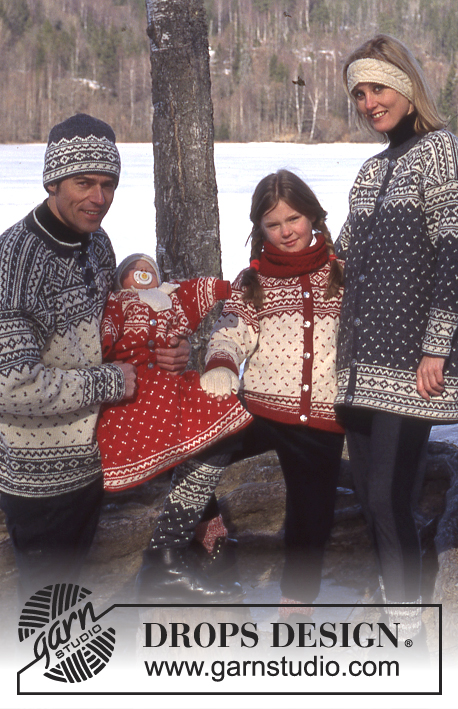
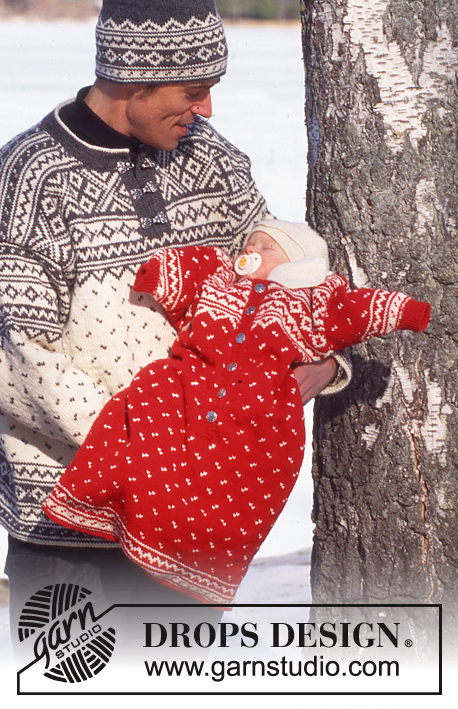
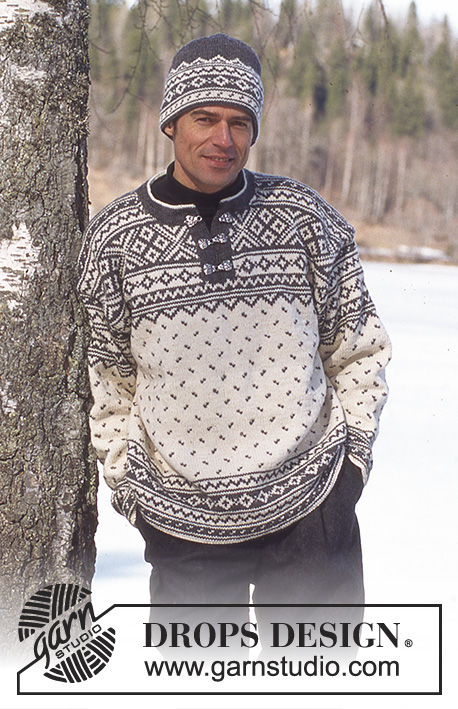
DROPS Cardigan, headband and socks in Karisma Superwash
DROPS 52-22 |
|||||||||||||||||||||||||
|
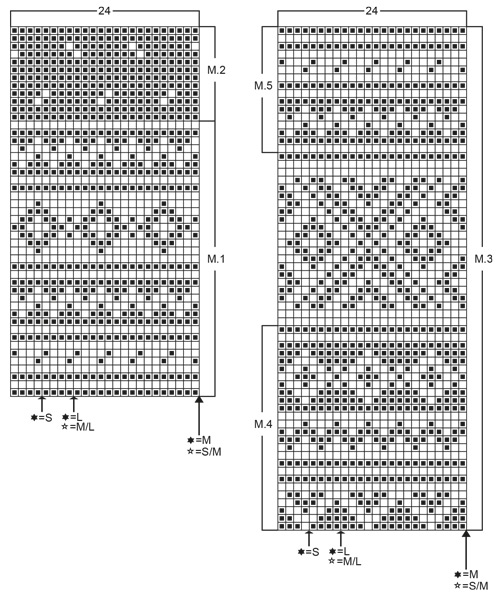
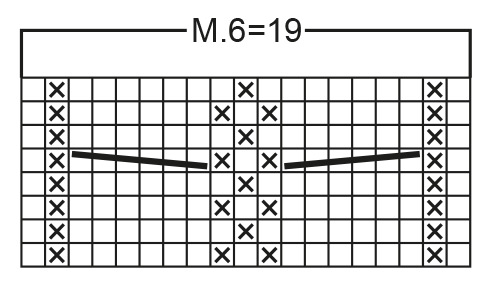
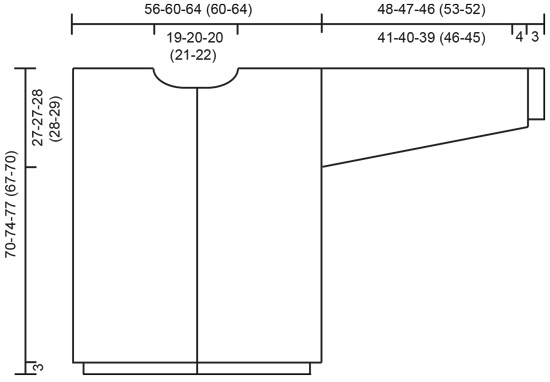
Gauge: 22 sts and 30 rows on largest needle in stockinette stitch = 10 x 10 cm [4" x 4"] Pattern: See charts (1 chart = 1 repeat). The pattern is shown from the right side and is knit entirely in stockinette stitch. Arrows indicate starting points for different sizes («dame» = women’s; «herre» = men’s). . Border: Knit 3 cm [1.25"] stockinette stitch, purl 1 row (for the folding edge), 3 cm [1.25"] stockinette stitch. Body: Knit the cardigan in the round after the border and cut steeks for armholes and at the center front. Cast on 251-267-283 (267-283) sts (including 1 edge stitch on either side at the center front) on mid-size circular needles with gray and knit 3 cm [1.25"] stockinette stitch, purl 1 row (for the folding edge - measure the work from here) back and forth on needle. Change to largest circular needles and inc 3 sts at the center front - these sts + edge sts (= 5 sts) are for the center front steek and are not knitted into the pattern = 249-265-281 (265-281) sts + 5 steek sts. Join and knit Pattern 1 in the round - start at the appropriate arrow on the chart and knit across all sts. After Pattern 1 repeat Pattern 2. When the work measures approximately 43-47-49 (39-41) cm [16-⅞" - 18.5" - 19.25" (15.25" - 16-⅛")], inc 5 sts on either side (these sts are for the steeks and are not knitted into the pattern): 124-132-140 (132-140) + 5 steek sts = front, 125-133-141 (133-141) sts = back. At the same time, when the work measures 49-53-56 (46-49) cm [19.25" - 20-⅞" - 22" (19.25" - 19.25")] - adjust for complete pattern - change to Pattern 3 and repeat to finished dimensions. When the work measures 64-68-71 (61-64) cm [25.25" - 26.75" - 28" (24" - 25.25")], bind off the center front 22-24-24 (26-28) sts + 5 sts for the neck and knit the rest of the work back and forth on the needle. Then bind off at each neck edge every other row: 3 sts 1 time, 2 sts 2 times, 1 st 3 times. At the same time, when the work measures 68-72-75 (65-68) cm [26.75" - 28.25" - 29.5" (25-⅝" - 26.75")], bind off the center back 39-41-41 (43-45) sts for the neck and then bind off 2 sts at each back neck edge on the next row. Bind off all sts when the work measures 70-74-77 (67-70) cm [27-⅝" - 29-⅛" - 30.25" (26-⅜" - 27-⅝")]. Sleeves: Cast on 46-48-50 (50-52) sts on mid-size double pointed needles with gray; join and place a marker at the join. Knit 3 cm [1.25"] stockinette stitch, purl 1 row (for the folding edge - measure the work from here). Change to largest double pointed needles and knit Pattern 1. At the same time, when the work measures 7 cm [2.75"], inc 1 st each side of marker 37-36-37 (37-38) times: Women's S + M + L and Men's M/L: every 3rd row Men's S/M: alternately every 3rd and 4th row = 120-120-124 (124-128) sts. After Pattern 1 repeat Pattern 2 until the work measures 34-33-32 (39-38) cm [13-⅜" - 13" - 12-⅝" (15.25" - 14-⅞")] - adjust for complete pattern. Then knit Pattern 4 once, then Pattern 5 once. The work measures approximately 48-47-46 (53-52) cm [18-⅞" - 18.5" - 18-⅛" (20-⅞" - 20.5")]. Now knit 2 cm [0.75"] reverse stockinette stitch with gray for a seam allowance over the cut edge on the body, bind off. Assembly: Sew a marker thread in the center of the steek sts on either side and at the center front. Sew two machine seams around the marker thread, 1st seam = 1/2 stitch from the marker thread, 2nd seam = 1/2 stitch from first seam. Cut steeks for armholes and at the center front. Sew shoulder seams. Pick up approximately 145-165 sts along the left front on smallest needles with gray and knit border (see instructions above), bind off. Repeat along the right front, but after 1 cm [3/8"] make 7 buttonholes evenly distributed on the row (1 buttonhole = bind off 2 sts and cast on 2 new sts over the bound-off sts on the next row). Remember to make corresponding buttonholes on the folding edge. Fold the buttonband over against the wrong side and sew. Pick up approximately 110-120 sts around the neck on smallest needles with gray and knit border. Fold the edge over against the wrong side and sew. Sew the sleeves to the body from the right side as follows: sew alternately a stitch in the last row on the sleeve before the seam allowance and a stitch on the body after the machine seam. Turn the sweater inside out and sew the seam allowance from the sleeve over the cut edge on the body by hand. Sew on the buttons. HEADBAND: Size: Women's circumference: approximately 54 cm [21.25"] Materials: DROPS KARISMA SUPERWASH from Garnstudio 650-700-800 (700-750) g col. 16, gray 250-300-300 (350-350) g col. 01, natural white DROPS 3.5 mm [US 4] double pointed needles, or size needed to obtain correct gauge. Gauge: 22 sts and 30 rows in stockinette stitch = 10 x 10 cm [4" x 4"] Pattern: See chart (1 chart = 1 repeat). The pattern is shown from the right side. Seed stitch (even number of sts): All rows: *K 1, P 1* Headband: Cast on 23 sts and establish pattern as follows: 2 sts seed stitch, Pattern 6, 2 sts seed stitch. Continue the pattern until the work measures approximately 54 cm (somewhat stretched), bind off. Sew ends together. SOCKS: Sizes: European shoe sizes 23 - 25/28 - 32/34 (36/37 - 38-40 - 42-44) US child’s shoe sizes 6-1/2 - 8/11 - youth sizes 1 - 2-1/2 (women’s sizes 5-1/2 - 6-1/2 - 7/9 - 10/11) Materials: DROPS Viking from Garnstudio 80% Norwegian wool, 20% nylon (50 g./109 yards) 50-50-50 (50-50-100) g col. 3, light gray tweed 50-50-50 (50-50-50) g col. 4, dark gray tweed 50-50-50 (50-50-50) g col. 2, gray DROPS 3.5 mm [US 4] double pointed needles, or size needed to obtain correct gauge. Gauge: 22 sts and 30 rows in stockinette st = 10 x 10 cm [4" x 4"] Pattern: * 3 rows color no. 4, 4 rows color no. 2, 3 rows color no. 3 *, repeat from * - * throughout. Rib: * P 2, K 2 *. Repeat from * - *. Sock: Cast on 44-48-52 (56-60-68) sts on double pointed needles; join and place a marker at the join. Knit rib for 10-12-14 (16-18-20) cm [4" - 4.75" - 5.5" (6.25" - 7" - 7-⅞")]. Knit the next row as follows: 22-26-26 (30-30-34) sts rib (this is the top of the foot), then 22-22-26 (26-30-34) sts stockinette stitch (this is the heel). Put the rib sts on a stitch holder. Knit 4- 4.5- 5 (5.5- 6- 6.5) cm [1.5" - 1.75" - 2" (2-⅛" - 2-⅜" - 2.5")] stockinette stitch back and forth on the needles for the heel over the 22-22-26 (26-30-34) sts in the back. Knit the heel in light gray mixed. Then turn the heel as follows: 1st row (right side): knit until 7-7-8 (8-9-10) sts remain on the needle, slip 1, knit 1, psso. Turn the work. 2nd row (wrong side): purl until 7-7-8 (8-9-10) sts remain on needle, slip 1, purl 1, psso. Turn the work. 3rd row: knit until 6-6-7 (7-8-9) sts remain on needle, slip 1, knit 1, psso. Turn the work. 4th row: purl until 6-6-7 (7-8-9) sts remain on the needle, slip 1, purl 1, psso. Turn the work. 5th row: knit until 5-5-6 (6-7-8) sts remain on needle, slip 1, knit 1, psso. Turn the work. Continue in this manner, working 1 less stitch before decreasing every other row, until 10-10-12 (12-14-16) sts remain on needle. Pick up 9-10-12 (13-14-15) sts on either side of the heel and put the sts from the stitch holder back on the needles = 50-56-62 (68-72-80) sts on needles. Knit in the round and at the same time decrease as follows: Dec 1 st each side of ribbing (before the rib: K 2 tog; after the rib: slip 1, knit 1, psso) 6-7-9 (10-10-12) times every other row = 38-42-44 (48-52-56) sts on needle. Continue with stockinette stitch, Pattern and rib. When the foot measures 12-16.5-18.5 (20-21-23) cm [4.75" - 6.5" - 7.25" (7-⅞" - 8.25" - 9")] shape toe as follows: attach 1 marker after the first 4 sts of rib and 1 marker before the last 4 sts of rib = 14-18-18 (18-22-26) sts on top of the foot, 16-16-18 (18-22-22) sts under the foot and 4 sts on either side. Knit the toe in light gray mixed. Now dec 1 st each side of the markers as follows alternately every and every other row - 7-8-8 (9-10-11) times in all (10-10-12 (12-12-12) sts on needle. Knit the next row *K 2 tog* across. Now sew the last 5-5-6 (6-6-6) sts together with a double strand of yarn. Finished dimensions of the foot = 15-20-22 (24-25-28) cm [5-⅞" - 7-⅞" - 8-⅝" (9.5" - 9-⅞" - 11")]. |
|||||||||||||||||||||||||
Diagram explanations |
|||||||||||||||||||||||||
|
|||||||||||||||||||||||||
 |
|||||||||||||||||||||||||
 |
|||||||||||||||||||||||||
 |
|||||||||||||||||||||||||
Have you finished this pattern?Tag your pictures with #dropspattern or submit them to the #dropsfan gallery. Do you need help with this pattern?You'll find 29 tutorial videos, a Comments/Questions area and more by visiting the pattern on garnstudio.com. © 1982-2025 DROPS Design A/S. We reserve all rights. This document, including all its sub-sections, has copyrights. Read more about what you can do with our patterns at the bottom of each pattern on our site. |
|||||||||||||||||||||||||


With over 40 years in knitting and crochet design, DROPS Design offers one of the most extensive collections of free patterns on the internet - translated to 17 languages. As of today we count 320 catalogs and 12073 patterns - 12063 of which are translated into English (US/in).
We work hard to bring you the best knitting and crochet have to offer, inspiration and advice as well as great quality yarns at incredible prices! Would you like to use our patterns for other than personal use? You can read what you are allowed to do in the Copyright text at the bottom of all our patterns. Happy crafting!
Post a comment to pattern DROPS 52-22
We would love to hear what you have to say about this pattern!
If you want to leave a question, please make sure you select the correct category in the form below, to speed up the answering process. Required fields are marked *.