
Popular categories
Looking for a yarn?


Comments / Questions (2)
![]() Barbara Krause wrote:
Barbara Krause wrote:
259 Maschen der mustersatz ist 36 plus 5 zum aufschneiden geht das Muster nicht auf ! Oder?
07.12.2020 - 12:36DROPS Design answered:
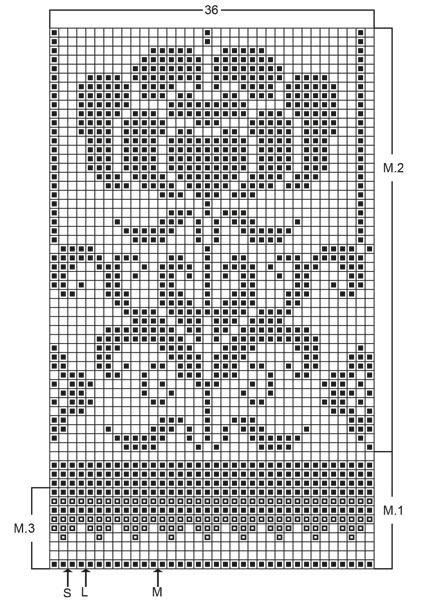
Liebe Frau Krause, die 5 Maschen (= SteekMaschen) sind nicht im Muster gestrickt, dh so stricken Sie die 257 M: starten Sie mit der Masche bei der Pfeil = 4 letzten Maschen im Diagram, wierdeholen Sie 7 Mal die 36 M in M.1 und enden Sie mit den 3 ersten Maschen im Diagram, so wird das Muster symetrisch (= 257 Maschen + 5 Steekmaschen). Viel Spaß beim stricken!
07.12.2020 - 16:15
![]() Mariëtte Folgers wrote:
Mariëtte Folgers wrote:
Het telpatroon staat er niet bij, kunt u mij aangeven waar het staat of hoe ik dit kan openen? Hartelijke groeten, Mariëtte
10.11.2015 - 17:32DROPS Design answered:
Hoi Mariëtte. Kijk nu - het patroon is toegevoegd.
11.11.2015 - 10:34
|
||||||||||
DROPS 52-12 |
||||||||||
 |
 |
|||||||||
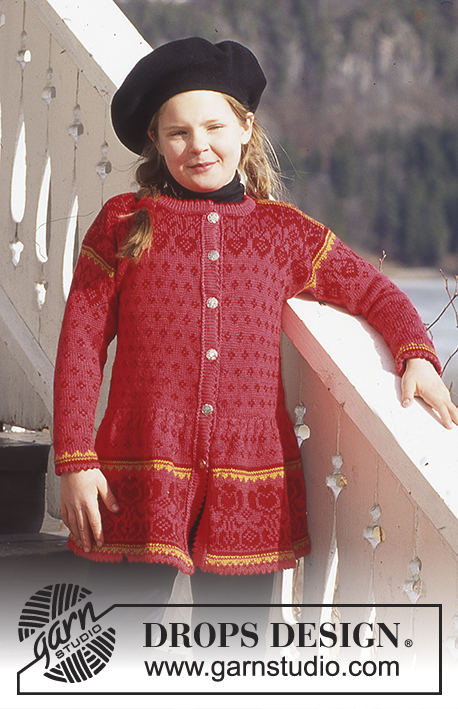
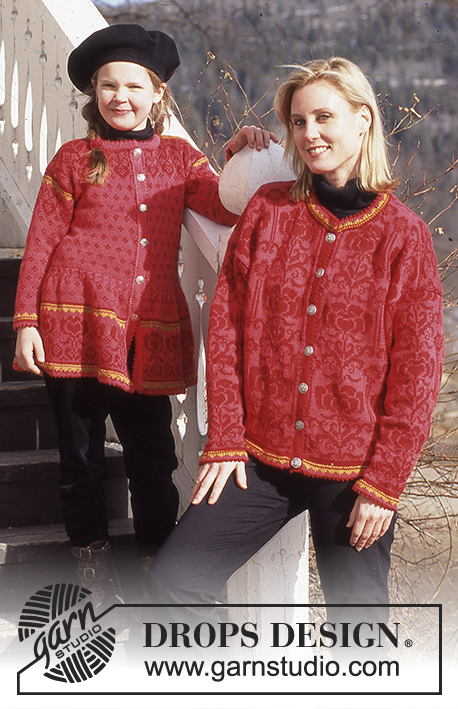
DROPS Cardigan in Alpaca
DROPS 52-12 |
||||||||||
|
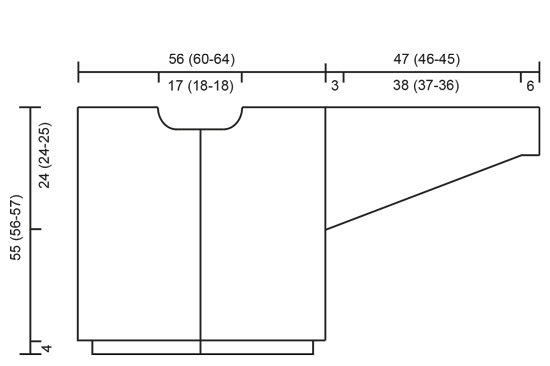
Gauge: 23 sts and 30 rows on largest needles in pattern = 10 x 10 cm [4" x 4"] Pattern: See chart (1 chart = 1 repeat). The pattern is shown from the right side and is knit entirely in stockinette stitch. Arrows indicate the starting point for different sizes. Border: Knit 3 cm [1.25"] stockinette stitch, knit the next row as follows: * K 2 tog, yarn over *, repeat from * - * (for the folding edge), 3 cm [1.25"] stockinette stitch. Body: Knit the Border back and forth on circular needles. Knit the cardigan in the round after the border and cut steeks for armholes and at the center front. Cast on 259 (279-299) sts (including 2 edge sts) on mid-size circular needles with wine red and knit the border - measure the worlk from the folding edge). Change to largest circular needles and inc 3 sts at the center front - these sts + edge sts = 5 sts are for the steeks and are not knitted into the pattern. Join and knit Pattern 1 once, then repeatt Pattern 2 to finished dimensions. Start at the appropriate arrow on the chart after the 5 steek sts at the center front. When the work measures 31 (32-32) cm [12.25" (12⅝" - 12⅝")], knit the next row as follows: 5 steek sts, 64 (69-74) sts for the front, inc 4 sts (armhole steek sts which are not knitted into the pattern), 129 (139-149) sts for the back, inc 4 sts (armhole steek sts which are not knitted into the pattern), 64 (69-74) sts for the front. When the work measures 48 (49-50) cm [18⅞" (19.25" - 19.75")], bind off the center front 14 (16-16) sts + the 5 steek sts for the neck and knit the rest back and forth on the needle. Then bind off at each neck edge every other row: 3 sts 2 times, 2 sts 2 times, 1 st 2 times. When the work measures 53 (54-55) cm [20⅞" (21.25" -21⅝"], bind off the center back 35 (37-37) sts for the neck. Bind off when the work measures approximately 55 (56-57) cm [21⅝" (22" - 22.5")]. Sleeves: Cast on 52 (52-52) sts on mid-size double pointed needles with wine red and knit border - measure the work from the folding edge). Change to largest double pointed needles; join and knit Pattern 1, then repeat Pattern 2 to finished dimensions - see that you center the pattern on the sleeve. At the same time, when the work measures 6 cm [2⅜"], inc 1 st each side of marker 29 (29-32) times: Sizes S + M: alternately every 3rd and 4th row Size L: every 3rd row = 110 (110-116) sts. When the work measures 44 (43-42) cm [17.25" (16⅞" - 16.5")], put 2 sts each side of marker on a stitch holder and knit back and forth on the needle. Then put 9 (9-9) sts on a stitch holder each side for sleeve caps every other row 3 times. The work measures approximately 47 (46-45) cm [18.5" (18⅛" - 17.75")]. Put all sts on the same needles again and knit in the round over all sts: 2 cm [0.75"] reverse stockinette stitch for a seam allowance over the cut edge on the body, bind off. Assembly: Sew a marker thread in the center of the steek sts on either side and at the center front. Sew two machine seams around the marker thread, 1st seam = 1/2 stitch from the marker thread, 2nd seam = 1/2 stitch from first seam. Cut steeks. Sew shoulder seams. Pick up approximately 110-120 sts along the left front on smallest needles with wine red and knit border, bind off. Fold the edge over against the cut edge on the body and sew. Repeat along the right front, but after 1 cm [⅜"] make 7 buttonholes evenly distributed on the row (1 buttonhole = bind off 2 sts and cast on 2 new sts over the bound-off sts on the next row). Remember to make corresponding buttonholes on the folding edge. Pick up approximately 121 sts (divisible by 4+1) around the neck on mid-size needles with wine red and knit Pattern 3 in reverse (from the top down on the chart), continue with wine red and knit border, bind off. Sew the sleeves to the body from the right side as follows: Sew alternately a stitch in the last row on the sleeve before the seam allowance and a stitch on the body after the machine seam. Turn the sweater inside out and sew the seam allowance from the sleeve over the cut edge on the body by hand. Fold all edges over against the wrong side and sew. Sew on buttons. |
||||||||||
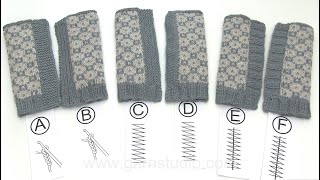
Diagram explanations |
||||||||||
|
||||||||||
 |
||||||||||
 |
||||||||||
Have you finished this pattern?Tag your pictures with #dropspattern or submit them to the #dropsfan gallery. Do you need help with this pattern?You'll find 28 tutorial videos, a Comments/Questions area and more by visiting the pattern on garnstudio.com. © 1982-2026 DROPS Design A/S. We reserve all rights. This document, including all its sub-sections, has copyrights. Read more about what you can do with our patterns at the bottom of each pattern on our site. |
||||||||||


With over 40 years in knitting and crochet design, DROPS Design offers one of the most extensive collections of free patterns on the internet - translated to 17 languages. As of today we count 325 catalogs and 12298 patterns - 12288 of which are translated into English (US/in).
We work hard to bring you the best knitting and crochet have to offer, inspiration and advice as well as great quality yarns at incredible prices! Would you like to use our patterns for other than personal use? You can read what you are allowed to do in the Copyright text at the bottom of all our patterns. Happy crafting!
Post a comment to pattern DROPS 52-12
We would love to hear what you have to say about this pattern!
If you want to leave a question, please make sure you select the correct category in the form below, to speed up the answering process. Required fields are marked *.