
Looking for a yarn?


Comments / Questions (51)
![]() Martine wrote:
Martine wrote:
Ik heb de vrag gesteld voor het meerderen van raglan. Hoe doe ik dat met die markeerders? Om de 4de rij eens links van de markeerder meerderen en dan de 6de rij rechts van de markeerder meerderen?
31.08.2025 - 23:11DROPS Design answered:
Dag Martine,
Je meerdert telkens bij iedere markeerder en je meerdert de ene keer rechts van alle markeerders en de andere keer links van alle markeerders. Dit doe je steeds om en om.
07.09.2025 - 19:56
![]() Anne wrote:
Anne wrote:
I'm confused by the yoke increase instructions. It says to increase either side of the markers but that means that the outer edges don't seem right (because there is only half the number of increases for the end two markers. Is that right? or is there an error please?
07.04.2025 - 20:14DROPS Design answered:
Hi Anne, You increase alternately on the left and right side of all the markers (including the first and last markers). Happy knitting!
08.04.2025 - 06:49
![]() Raija Tervo wrote:
Raija Tervo wrote:
Ohjeessa ei mainita missä vaiheessa mallineule A9 neulotaan? A8 jälkeen käsketään palata A7 ja sen jälkeen A2 A3 A4 , itse kyllä tein 8 :n jälk 9 ja nyt yritän A2 jne. En tiedä mitä tulee. Ohje on epäselvä.
25.06.2024 - 10:00DROPS Design answered:
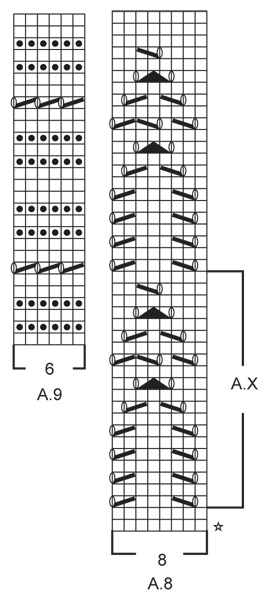
Hei, piirroksen A.9 mallineule neulotaan hihan alareunassa.
25.06.2024 - 12:05
![]() Lore wrote:
Lore wrote:
Buongiorno, non capisco ..alla fine dello schema A1 mi ritrovo da fare un ferro dritto..ma la spiegazione dice di mettere i 10 segnapunti e poi iniziare gli aumenti dal dritto..! Bisogna fare un ferro in più?
03.01.2024 - 19:36DROPS Design answered:
Buongiorno Lore, inserisce i segnapunti in un giro dal diritto del lavoro, lavora un altro giro a legaccio e poi inizia gli aumenti. Buon lavoro!
17.03.2024 - 17:31
![]() Nathalie wrote:
Nathalie wrote:
Que pensez vous d’utiliser de la kid Silk à la place de la baby alpaca silk épuisée ? Et en ce cas, plutôt avec un fil ou 2 fils tenus ensemble ? J’ai peur qu’un seul fil ne mette pas la dentelle en valeur.
16.06.2023 - 22:17DROPS Design answered:
Bonjour Nathalie, utilisez notre convertisseur pour voir les alternatives possible, 1 fil Alpaca sera parfait pour remplacer 1 fil Baby Alpaca Silk ou bien sûr 1 fil Kid-Silk (mais pas 2, car vous n'auriez alors pas la bonne tension ou pas la bonne texture). Bon tricot!
19.06.2023 - 09:58
![]() Jutta Reisch wrote:
Jutta Reisch wrote:
Ich bin am Ende des Rumpfteils und finde keine Anleitung/Tipp, was "Mit 1 M Re, 1M li im Wechsel abketten" bedeutet, bzw. wie das genau geht. Gibt es dazu ein Video?
18.04.2023 - 14:49DROPS Design answered:
Liebe Frau Reisch, in diesem Video zeigen wir, wie man im Rippenmuster abkettet; im Video sind es 2 re/2 li aber man wird genauso mit 1 re/1 li stricken. Viel Spaß beim stricken!
18.04.2023 - 15:35
![]() Marina wrote:
Marina wrote:
Hallo, kann man die Ärmel auch in Runden stricken? Viele Grüße Marina
17.09.2022 - 13:18DROPS Design answered:
Liebe Marina, ja sicher, man strickt aber meistens krausrippen am besten in Reihen aber gerne können Sie auch in Runden stricken (nur so anpassen). Viel Spaß beim stricken!
11.10.2022 - 16:09
![]() Evelyn Lim wrote:
Evelyn Lim wrote:
I am able to get 24 sts in width but I have more that 48 rows in garter st = 10 x 10cm , what is your advice?
25.02.2022 - 07:24DROPS Design answered:
Dear Mrs Lim, you can adjust the rows with increasing on yoke to your own gauge in height or work increases as stated and continue working garter stitch until the piece measures the required height for your size. Happy knitting!
25.02.2022 - 09:34
![]() Mme POTFER Sylvie wrote:
Mme POTFER Sylvie wrote:
Bonjour. Les photos affichées ne correspondent pas au modèle... The photos don't fit with the model, it's another one...
17.08.2021 - 11:09DROPS Design answered:
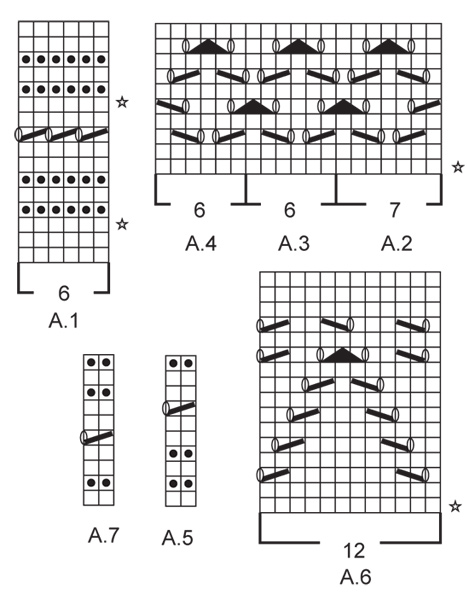
Bonjour Mme Potter, les explications du modèle correspondent bien à la photo. Ce gilet se tricote de haut en bas, on tricote A.1 pour la bordure ajouré puis on va augmenter dans le point mousse à intervalles réguliers, diviser l'ouvrage quand l'empiècement est terminé et tricoter les points ajourés sur le bas du gilet (dos & devants). Bon tricot!
17.08.2021 - 17:40
![]() Cinzia wrote:
Cinzia wrote:
Buongiorno, Devo iniziare il modello. Non mi e' chiaro che significa lavorare 2 Coste a legaccio avanti e indietro. Praticamente dovrei fare 4 ferri a dritto??? Vi ringrazio
24.02.2021 - 17:43DROPS Design answered:
Buonasera Cinzia, 2 coste corrispondono a 4 ferri a legaccio. Buon lavoro
24.02.2021 - 21:46
|
|||||||||||||||||||
Timeless Beauty Cardigan#timelessbeautycardigan |
|||||||||||||||||||
 |
 |
||||||||||||||||||
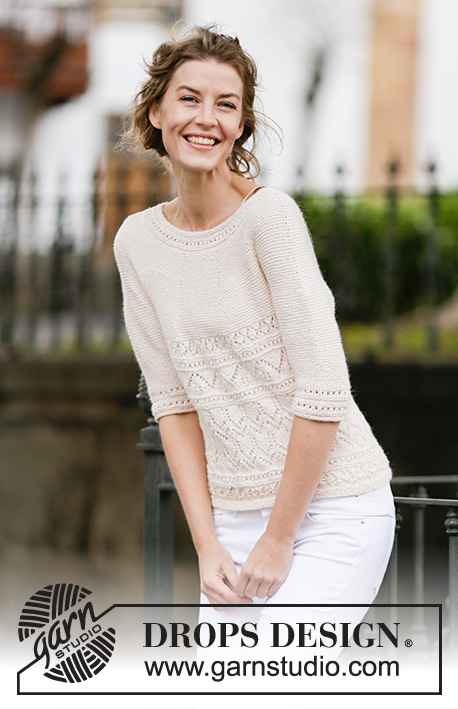
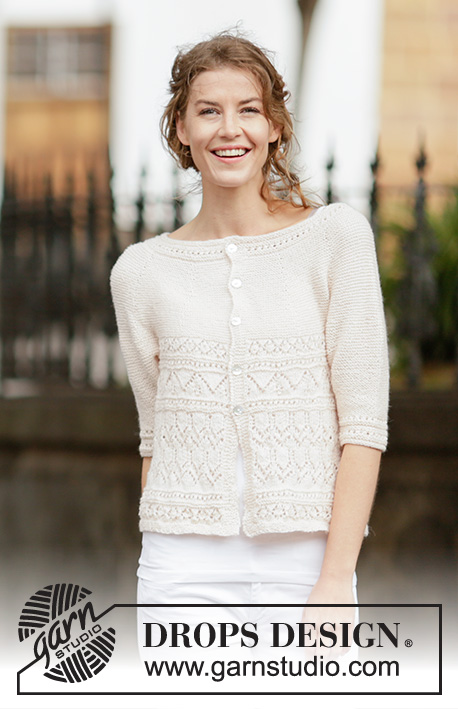
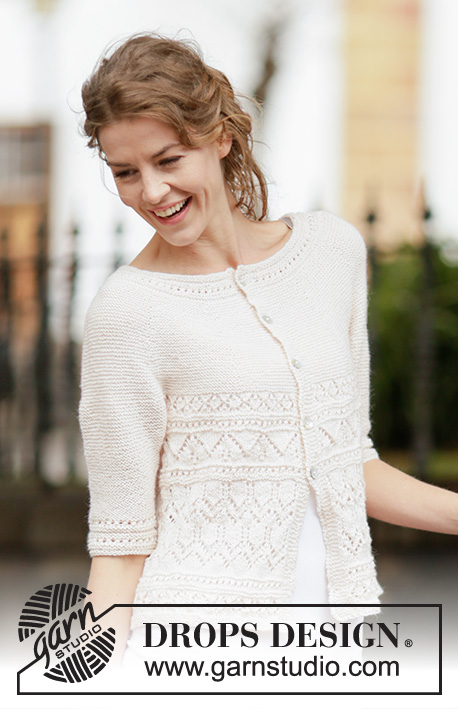
Knitted DROPS jacket in garter st with lace pattern and round yoke, worked top down in ”BabyAlpaca Silk”. Size: S - XXXL.
DROPS 160-8 |
|||||||||||||||||||
|
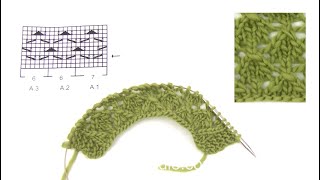
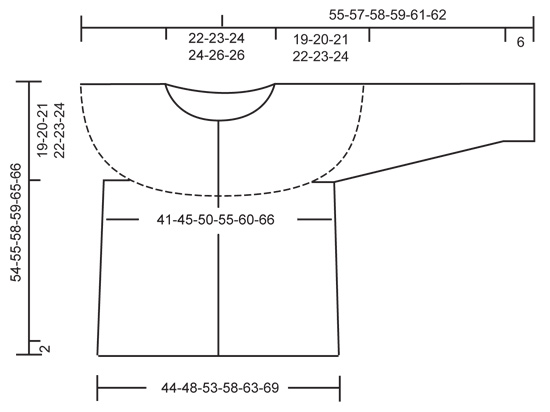
GARTER ST (back and forth): K all rows. 1 ridge = 2 rows K. PATTERN: See diagrams A.1 to A.9. The diagrams show all rows in pattern seen from RS. INCREASE TIP: Inc 1 st by making 1 YO, on next row K YO twisted (i.e. work in the back loop of st instead front) to avoid holes. BUTTONHOLES: Dec for buttonholes on right band, i.e. in right side of piece seen from RS (i.e. seen from knitting direction). 1 buttonhole = K tog third and fourth st from edge and make 1 YO. Dec for buttonholes when piece measures: SIZE S: 2, 9, 16, 23 and 30 cm SIZE M: 2, 9, 16, 23 and 30 cm SIZE L: 2, 10, 18, 26 and 34 cm SIZE XL: 2, 10, 18, 26 and 34 cm SIZE XXL: 2, 9, 16, 23, 30 and 37 cm. SIZE XXXL: 2, 9, 16, 23, 30 and 37 cm. ---------------------------------------------------------- JACKET: Worked top down, back and forth on circular needle. YOKE: Cast on 133-141-157-161-161-177 sts (incl 6 band sts in each side) on circular needle size 2,5 mm with BabyAlpaca Silk. K 1 row from WS. Work 2 ridges in GARTER ST back and forth - see explanation above! Remember BUTTONHOLES on right band - see explanation above. Now work PATTERN A.1 with 6 band sts in garter st in each side (on 9th row K last st before band), AT THE SAME TIME on 3rd row in diagram inc 18-20-30-32-32-34 sts evenly - READ INCREASE TIP, and on 11th row inc 15-19-29-29-29-33 sts evenly = 166-180-216-222-222-244 sts. REMEMBER THE KNITTING TENSION When A.1 has been worked vertically, continue in garter st and insert 10 markers in the piece as follows: Work the first 16-18-18-21-21-23 sts, insert a marker, then insert a marker 15-16-20-20-20-22 sts apart, after last marker there are 15-18-18-21-21-23 sts. On next row from RS beg inc. Inc alternately on right and left side of markers (= 10 inc). Inc every other row 0-2-0-3-7-7 times, every 4th row 10-10-9-9-8-8 times and every 6th row 5-5-7-7-7-8 times = 316-350-376-412-442-474 sts. On next row from RS, inc 7-3-9-1-3-9 sts evenly = 323-353-385-413-445-483 sts. Piece measures approx. 19-20-21-22-23-24 cm. On next row (= from WS) work as follows: K the first 51-55-61-66-72-80 (= front piece), slip the next 66-72-76-80-84-88 sts on a stitch holder (= sleeve), cast on 10-10-10-12-12-12 sts under sleeve, work the next 89-99-111-121-133-147 sts (= back piece), slip the next 66-72-76-80-84-88 sts on a stitch holder (= sleeve), cast on 10-10-10-12-12-12 sts under sleeve, work the remaining 51-55-61-66-72-80 sts (= front piece). BODY: There are now 211-229-253-277-301-331 sts for body. Now switch to circular needle size 3 mm. Then Work as follows: 6 band sts in garter st, A.2, repeat A.3 until 12 sts remain, A.4, 6 band sts in garter st. NOTE: Work the 6 band sts in each side in garter st until finished measurements. When A.2-A.4 have been worked vertically, continue with A.5 (on 7th row K the last st before band). Then work A.6, inc 6-0-0-0-0-6 sts evenly on 1st row (K last st before band) = 217-229-253-277-301-337 sts. When A.6 has been worked vertically, continue with A.7 1 time vertically (on 5th row K the last st before band). Then work A.8, inc 4-8-8-8-8-4 sts evenly on 1st row (K last st before band) = 221-237-261-285-309-341 sts. When A.X has been worked 1 time vertically, repeat A.X 0-0-0-0-1-1 more time before continuing with the rest of diagram. Now continue with A.7 (K last st before band). Then work as follows: A.2, A.3 until 6 sts remain before band, AT THE SAME TIME inc 2-4-4-4-4-2 sts evenly on 1st row in A.3, A.4 = 223-241-265-289-313-343 sts. Finish with A.7 0-0-1-1-0-0 times vertically (on 5th row K last st before band). When entire diagram has been worked vertically, work 2 row in stocking st inside band sts while AT THE SAME TIME on row from RS inc 17-20-23-25-27-27 sts evenly = 240-261-288-314-340-370 sts. Switch to circular needle size 2.5 mm and work in garter st back and forth for 2 cm. Cast off alternately with K 1 and P 1. Piece measures approx. 54-55-58-59-65-66 cm. SLEEVE: Worked in garter st back and forth on circular needle. There are 66-72-76-80-84-88 sts for each sleeve. NOW MEASURE THE PIECE FROM HERE. Slip sts from stitch holder back on circular needle size 2.5 mm and cast on 6-6-6-7-7-7 new sts at the end of the next 2 rows = 78-84-88-94-98-102 sts. When sleeve measures 4 cm, dec 1 st inside 1 edge st in each side of piece by K 2 tog. Repeat dec every 1½-2-2½-3-3½-3½ cm 7-6-5-4-3-3 more times = 62-70-76-84-90-94 sts. When piece measures 19 cm in all sizes, work as follows: 1 edge st in garter st, A.9 until 1 st remains, 1 edge st in garter st. When entire A.9 have been worked vertically, work 1 ridge. Loosely cast off. Knit another sleeve the same way. ASSEMBLY: Sew underarm seams in outer loops of edge sts. Sew the openings under the sleeves. Sew the buttons on to the left band. |
|||||||||||||||||||
Diagram explanations |
|||||||||||||||||||
|
|||||||||||||||||||
 |
|||||||||||||||||||
 |
|||||||||||||||||||
 |
|||||||||||||||||||
Have you finished this pattern?Tag your pictures with #dropspattern #timelessbeautycardigan or submit them to the #dropsfan gallery. Do you need help with this pattern?You'll find 24 tutorial videos, a Comments/Questions area and more by visiting the pattern on garnstudio.com. © 1982-2025 DROPS Design A/S. We reserve all rights. This document, including all its sub-sections, has copyrights. Read more about what you can do with our patterns at the bottom of each pattern on our site. |
|||||||||||||||||||

With over 40 years in knitting and crochet design, DROPS Design offers one of the most extensive collections of free patterns on the internet - translated to 17 languages. As of today we count 320 catalogues and 12082 patterns translated into English (UK/cm).
We work hard to bring you the best knitting and crochet have to offer, inspiration and advice as well as great quality yarns at incredible prices! Would you like to use our patterns for other than personal use? You can read what you are allowed to do in the Copyright text at the bottom of all our patterns. Happy crafting!
Post a comment to pattern DROPS 160-8
We would love to hear what you have to say about this pattern!
If you want to leave a question, please make sure you select the correct category in the form below, to speed up the answering process. Required fields are marked *.