DROPS Paris
DROPS Paris
100% Cotton
from 1.10 £ /50g
Get the yarn to make this pattern from 15.40£.

The yarn cost is calculated from the pattern’s smallest size and the yarn’s cheapest product type. Looking for an even better price? You might find it on the DROPS Deals!

DROPS SS24

Sunny Stride

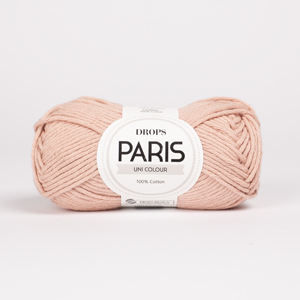
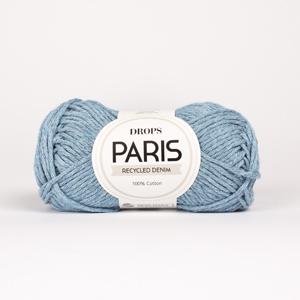
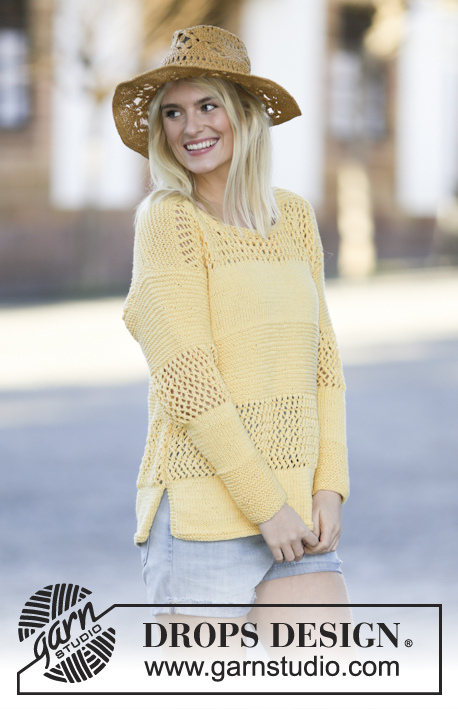
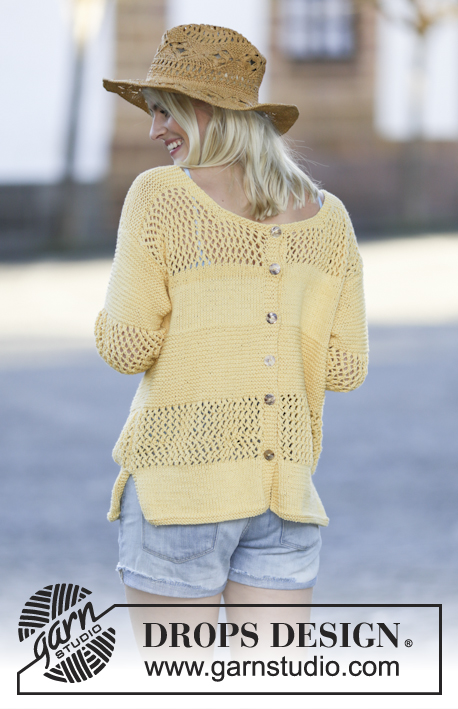
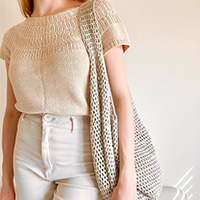
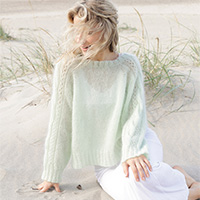
Knitted DROPS jumper with stripes and button on the back, in "Paris", can be turned and used as jacket. Size S- XXXL

DROPS 159-3
DROPS design: Pattern no w-549
Yarn group C or A + A
----------------------------------------------------------
Size: S - M - L - XL - XXL - XXXL
Materials:
DROPS PARIS from Garnstudio
700-750-850-950-1000-1100 g colour no 14, strong yellow

DROPS CIRCULAR NEEDLE (60 cm) SIZE 5 mm - or size needed to get 17 sts x 22 rows in stocking st = 10 x 10 cm.
DROPS MOTHER-OF-PEARL BUTTON: ARCHED (white), NO 522: 6 pieces in all sizes

-------------------------------------------------------

Alternative Yarn – See how to change yarns here
Yarn Groups A to F – Use the same pattern and change the yarn here
Yarn usage using an alternative yarn – Use our yarn converter here

-------------------------------------------------------

DROPS Paris
DROPS Paris
100% Cotton
from 1.10 £ /50g
Get the yarn to make this pattern from 15.40£.

The yarn cost is calculated from the pattern’s smallest size and the yarn’s cheapest product type. Looking for an even better price? You might find it on the DROPS Deals!

Pattern instructions

NOTE: This pattern is written in British English. All measurements in charts are in cm. For conversion from cm to inches - click here. There are different terms for crocheting in British and American English. If this pattern includes crochet, click for "crochet terms" here. For this pattern in American English, please click here.
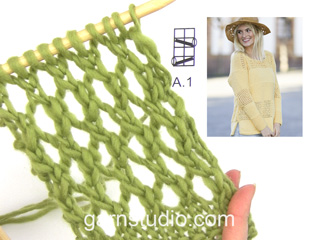
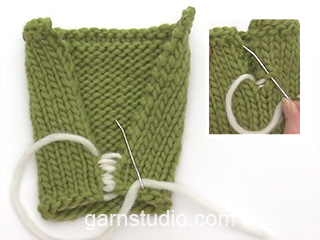
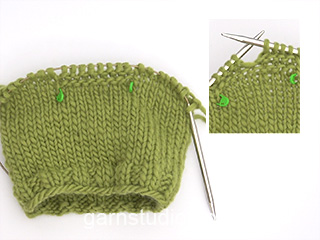
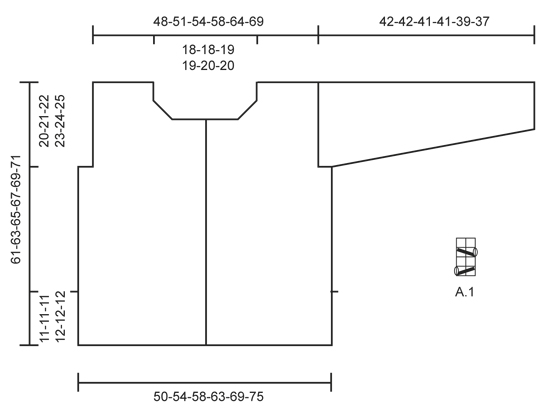
GARTER ST (back and forth):
K all rows. 1 ridge = 2 rows K.

PATTERN:
See diagram A.1. The diagrams show all rows in pattern seen from RS.

DECREASE TIP:
Dec inside 4 sts in garter st towards the neck. All dec are done from RS!
Dec as follows before 4 sts in garter st and 2 sts: K 2 tog.
Dec as follows after 4 sts in garter st: Slip 1 st as if to K, K 1, psso.

INCREASE TIP:
Inc 1 st in each side by working 2 sts in a st inside 1 edge st in garter st in each side.

BUTTONHOLES:
Dec for buttonholes on left back piece from right side. 1 buttonhole = K tog third and fourth st from edge and make 1 YO.
Dec for buttonholes when piece measures:
SIZE S: 13, 22, 28, 35, 44 and 50 cm.
SIZE M: 13, 22, 28, 35, 44 and 52 cm.
SIZE L: 13, 22, 28, 35, 44 and 53 cm.
SIZE XL: 14, 21, 23, 38, 48 and 55 cm.
SIZE XXL: 14, 21, 23, 38, 48 and 56 cm.
SIZE XXXL: 14, 21, 23, 38, 48 and 58 cm.
----------------------------------------------------------

JUMPER:
Piece is worked back and forth on circular needle in parts and sewn tog when finished. Can be turned and used as jacket.

FRONT PIECE:
Cast on 86-92-98-108-118-128 sts on circular needle size 5 mm with Paris. Work 2 ridges in GARTER ST back and forth - see explanation above! Continue in stocking st inside 3 sts in garter st in each side until piece measures 12-12-12-13-13-13 cm. On the next 2 rows cast on 1 new st at the end of row (vent ends here), AT THE SAME TIME dec 16-16-16-18-22-22 sts evenly on 1st row from RS = 72-78-84-92-98-108 sts. Now work A.1 and 1 edge st in garter st in each side (continue edge st in each side until finished measurements). When piece measures 23-23-23-25-25-25 cm in total, work 2 rows in stocking st while AT THE SAME TIME inc 16-16-16-18-22-22 sts evenly = 88-94-100-110-120-130 sts. Continue in garter st over all sts until piece measures 34-34-34-37-37-37 cm. Now work in stocking st. When piece measures 41-42-43-44-45-46 cm, cast off 2-3-3-5-5-5 sts at beg of the next 2 rows for armholes = 84-88-94-100-110-120 sts on needle. Continue in stocking st with 1 edge st in garter st in each side. When piece measures 45-45-45-49-49-49 cm, continue with A.1. When piece measures 50-52-53-55-56-58 cm, work in garter st over the middle 26-26-28-28-30-30 sts. When 2 ridges have been worked over these sts, loosely cast off the middle 18-18-20-20-22-22 sts from RS. There are now 4 sts for neck edge in each side. Then finish each shoulder separately as follows: On next row from RS, dec 1 st inside 4 sts in garter st towards the neck - SEE DECREASE TIP! Repeat dec on every row from RS 5 more times = 27-29-31-34-38-43 sts for shoulder. AT THE SAME TIME when piece measures 55-55-55-61-61-61 cm, work 2 rows in stocking st over pattern A.1. Then continue in garter st until finished measurements. Loosely cast off when piece measures 61-63-65-67-69-71 cm in total.

LEFT BACK PIECE:
Cast on 48-51-54-58-64-69 sts on circular needle size 5 mm with Paris. Work 2 ridges. Now work as follows: 5 band sts in garter st, stocking st until 3 sts remains, 3 sts in garter st. Continue to work like this until piece measures 12-12-12-13-13-13 cm. Work 2 rows in stocking st, AT THE SAME TIME on row from RS dec 7-8-7-9-11-12 sts evenly, and cast on 1 new st at the end of row = 42-44-48-50-54-58 sts. REMEMBER BUTTONHOLES! Continue with A.1 inside 5 band sts in garter st and 1 edge st in garter st in the side (continue edge st in garter st until finished measurements). When piece measures 23-23-23-25-25-25 cm, work 2 rows in stocking st AS THE SAME TIME on 1st row from RS inc 7-8-7-9-11-12 sts evenly = 49-52-55-59-65-70 sts. Continue with stripes as on front piece. AT THE SAME TIME cast off for armhole and neck as follows: When piece measures 41-42-43-44-45-46 cm, cast off 2-3-3-5-5-5 sts at beg of next row from WS for armholes = 47-49-52-54-60-65 sts. When piece measures 50-52-53-55-56-58 cm, work in garter st over the first 18-18-19-19-20-20 sts. When 2 ridges have been worked over these sts, loosely cast off the first 14-14-15-15-16-16 sts from RS. There are now 4 sts for neck edge. On next row from RS, dec 1 st inside 4 sts in garter st towards the neck - SEE DECREASE TIP! Repeat dec on every row from RS 5 more times = 27-29-31-33-38-43 sts for shoulder. AT THE SAME TIME when piece measures 55-55-55-61-61-61 cm, work 2 rows in stocking st over pattern A.1. Then continue in garter st until finished measurements. Loosely cast off when piece measures 61-63-65-67-69-71 cm in total.

RIGHT BACK PIECE:
Work as left back piece but reversed. I.e. work as follows after 2 ridges at the beg of piece: 3 sts in garter st, stocking st until 5 sts remain, 5 band sts in garter st. Do not dec for buttonholes on right band. When casting off sts for armhole, cast off at beg of row from RS. When casting off for neck cast off the first 14-14-15-15-16-16 sts from WS.

SLEEVE:
The sleeves are worked back and forth on circular needle.
Cast on 34-36-38-40-42-42 sts (incl 1 edge st in garter st in each side) on circular needle size 5 mm with Paris. Work in garter st back and forth. REMEMBER THE KNITTING TENSION When piece measures 11-11-11-12-10-8 cm,
Work pattern and inc AT THE SAME TIME as follows:
PATTERN:
Continue in stocking st with 1 edge st in garter st. When piece measures 22-22-22-24-22-20 cm, work A.1 inside 1 edge st in garter st in each side AT THE SAME TIME on 1st row dec 2-4-4-4-4-6 sts evenly. When A.1 has been worked for 11-11-11-12-12-12 cm, work 2 rows in stocking st, AT THE SAME TIME on 1st row from RS inc 2-4-4-4-4-6 sts evenly. Then continue in garter st until finished measurements.
INCREASE:
Inc 1 st inside 1 edge st in garter st in each side - READ INCREASE TIP. Repeat inc in each side every 1½-1-1-1-1-1 cm 18-19-19-20-21-23 times in total = 70-74-76-80-84-88 sts. When piece measures 42-42-41-41-39-37 cm, loosely cast off all sts. Knit another sleeve the same way.

ASSEMBLY:
Sew the shoulder seams tog. Sew sleeves in body. Sew underarm seams and side seams inside 1 edge st in garter st down to vent (= where 1 new st was cast on, 12-12-12-13-13-13 cm from cast-on edge). Sew the buttons on to the right band.

Diagram

symbols = K from RS, P from WS
symbols = K 2 tog, 1 YO
symbols = 1 YO, slip 1 st as if to K, K 1, psso
diagram

Each of our patterns has specific tutorial videos to help you.

Do you have a question? See a list of frequently asked questions (FAQ)

Knitting tension is what determines the final measurements of your work, and is usually measured per 10 x 10 cm. It is provided like so: number of stitches in width x number of rows in height - eg: 19 stitches x 26 rows = 10 x 10 cm.

The knitting tension is very individual; some people knit/crochet loosely while others work tightly. You adjust the knitting tension with the needle size, which is why the suggested needle size is only meant as a guide! You need to adjust this (up or down) to ensure that YOUR knitting tension matches the knitting tension provided in the pattern. If you work with a different knitting tension than provided you will have a different yarn consumption, and your work will have different measurements than what the pattern suggests.

The knitting tension also determines which yarns can replace each other. As long as you achieve the same knitting tension you can replace one yarn with another.

See DROPS lesson: How to measure your tension/gauge

See DROPS video: How to make a gauge tension swatch

The required amount of yarn is provided in grams, eg: 450 g. To calculate how many balls you’ll need you first need to know how many grams are in 1 ball (25g, 50g or 100g). This information is available if you click on the individual yarn quality on our pages. Divide the amount required with the amount of each ball. For example, if each ball is 50g (the most common amount), the calculation will be as follows: 450 / 50 = 9 balls.

The important thing when changing from one yarn to another is that the knitting/crochet tension remains the same. This is so that the measurements of the finished piece will be the same as on the sketch provided. It is easier to achieve the same knitting tension using yarns from the same yarn group. It is also possible to work with multiple strands of a thinner yarn to achieve the knitting tension of a thicker one. Please try our yarn converter. We recommend you to always work a test swatch.

Please NOTE: when changing yarn the garment might have a different look and feel to the garment in the photo, due to individual properties and qualities of each yarn.

See DROPS lesson: Can I use a different yarn than the one mentioned in the pattern?

All our yarns are categorised into yarn groups (from A to F) according to thickness and knitting tension – group A contains the thinnest yarns and group F the thickest. This makes it easier for you to find alternative yarns to our patterns, should you wish to switch yarn. All yarns within the same group have a similar knitting tension and can easily replace each other. However, different yarn qualities have different structures and properties which will give the finished work a unique look and feel.

Click here for an overview of the yarns in each yarn group

At the top of all our patterns you’ll find a link to our yarn calculator, which is a helpful tool should you wish to use a different yarn than suggested. By filling in the yarn quality you wish to replace, the amount (in your size) and number of strands, the calculator will present good alternative yarns with the same knitting tension. Additionally it will tell you how much you’ll require in the new qualities and whether you’ll need to work with multiple strands. Most skeins are 50g (some are 25g or 100g).

If the pattern is worked with multiple colours, every colour will have to be calculated separately. Similarly, if the pattern is worked with several strands of different yarns (for example 1 strand Alpaca and 1 strand Kid-Silk) you will have to find alternatives for each, individually.

Click here to see our yarn calculator

Since different yarns have different qualities and textures we have chosen to keep the original yarn in our patterns. However, you can easily find options among our available qualities by using our yarn calculator, or simply pick a yarn from the same yarn group.

It is possible that some retailers still have discontinued yarns in stock, or that someone has a few skeins at home that they would like to find patterns for.

The yarn calculator will provide both alternative yarn as well as required amount in the new quality.

If you think it's hard to decide what size to make, it can be a good idea to measure a garment you own already and like the size of. Then you can pick the size by comparing those measures with the ones available in the pattern's size chart.

You'll find the size chart at the bottom of the pattern.

See DROPS lesson: How to read size chart

The needle size provided in the pattern serves only as a guide, the important thing is to follow the knitting tension. And since knitting tension is very individual, you will have to adjust the needle size to ensure that YOUR tension is the same as in the pattern – maybe you’ll have to adjust 1, or even 2 needle sizes, up or down to achieve the correct tension. For this, we recommend that you work test swatches.

Should you work with a different knitting tension than the one provided, the measurements of the finished garment might deviate from the measurement sketch.

See DROPS lesson: How to measure your tension/gauge

See DROPS video: How to make a tension/gauge swatch

Working a garment top-down provides more flexibility and room for personal adjustment. For example it is easier to try the garment on while working, as well as making adjustments to length of yoke and shoulder caps.

The instructions are carefully explaining every step, in the correct order. Diagrams are adjusted to the knitting direction and are worked as usual.

The diagram depicts all rows/rounds, and every stitch seen from the right side. It is read from bottom to top, from right to left. 1 square = 1 stitch.

When working back and forth, every other row is worked from the right side and every other row is worked from the wrong side. When working from the wrong side, the diagram will have to be worked reversed: from left to right, knit stitches are purled, purl stitches are knit etc.

When working in the round every round is worked from the right side and the diagram are worked from right to left on all rounds.

See DROPS lesson: How to read knitting diagrams

The diagram depicts all rows/rounds, and every stitch seen from the right side. It is worked from bottom to top, from right to left.

When working back and forth every other row is worked from the right side: from right to left and every other row is worked from the wrong side: from left to right.

When working in the round, every row in the diagram are worked from the right side, from right to left.

When working a circular diagram you start in the middle and work your way outwards, counter clockwise, row by row.

The rows usually start with a given number of chain stitches (equivalent to the height of the following stitch), this will either be depicted in the diagram or explained in the pattern.

See DROPS lesson: How to read crochet diagrams

Instructions for working several diagrams after each other on the same row/round, will often be written like so: “work A.1, A.2, A.3 a total of 0-0-2-3-4 times". This means you work A.1 once, then A.2 is worked once, and A.3 is repeated (in width) the number of times provided for your size – in this case like so: S = 0 times, M = 0 times, L=2 times, XL= 3 times and XXL = 4 times.

The diagrams are worked as usual: begin with the first row in A.1, then work the first row in A.2 etc.

See DROPS lesson: How to read knitting diagrams

See DROPS lesson: How to read crochet diagrams

The total width of the garment (from wrist-to-wrist) will be larger in the larger sizes, despite the actual sleeves being shorter. The larger sizes have longer sleeve caps and wider shoulders, so there will be a good fit in all sizes.

The measurement sketch/schematic drawing provides information regarding the full length of the garment. If it’s a jumper or a jacket the length is measured from the highest point on the shoulder closest to the neckline, and straight down to the bottom of the garment. It is NOT measured from the tip of shoulder. Similarly, the length of yoke is measured from the highest point on the shoulder and down to where yoke is split into body and sleeves.

On a jacket measures are never taken along bands, unless specifically stated. Always measure inside band stitches when measuring the length.

See DROPS lesson: How to read a schematic drawing

Diagrams are often repeated on the round or in height. 1 repeat is the diagram the way it appears in the pattern. If it says to work 5 repeats of A.1 in the round, then you work A.1 a total of 5 times after/next to each other in the round. If it says to work 2 repeats of A.1 vertically/in height you work the entire diagram once, then begin again at the start and work the entire diagram one more time.

Chain stitches are slightly narrower than other stitches and to avoid working the cast-on edge too tight, we simply chain more stitches to begin with. The stitch count will be adjusted on the following row to fit the pattern and measurement sketch.

The rib edge is more elastic and will contract slightly compared to, for example, stocking stitch. By increasing before the rib edge, you avoid a visible difference in width between the rib edge and the rest of the body.

It’s very easy to cast off too tightly, and by making yarn overs while casting off (and simultaneously casting these off) you avoid a too tight cast off edge.

See DROPS video: How to bind off with yarn overs (yo)

To achieve an even increase (or decrease) you can increase on, for example: every 3rd and 4th row alternately, like so: work 2 rows and increase on the 3rd row, work 3 rows and increase on the 4th. Repeat this until the increase is complete.

See DROPS lesson: Increase or decrease 1 st on every 3rd and 4th row alternately

Should you prefer to work in the round instead of back and forth, you may of course adjust the pattern. You’ll need to add steeks mid-front (usually 5 stitches), and follow the instructions. When you would normally turn and work from the wrong side, simply work across the steek and continue in the round. At the end you’ll cut the piece open, pick up stitches to work bands, and cover the cut edges.

See DROPS video: How to knit steeks and cut open

Should you prefer to work back and forth instead of in the round, you may of course adjust the pattern so you work the pieces separately and then assemble them at the end. Divide the stitches for the body in 2, add 1 edge stitch in each side (for sewing) and work the front and back pieces separately.

See DROPS lesson: Can I adapt a pattern for circular needles into straight needles?

Pattern repeats can vary slightly in the different sizes, in order to get the correct proportions. If you’re not working the exact same size as the garment in the photo, yours might deviate slightly. This has been carefully developed and adjusted so that the complete impression of the garment is the same in all sizes.

Make sure to follow instructions and diagrams for your size!

If you have found a pattern you like which is available in women’s size it’s not very difficult to convert it to men’s size. The biggest difference will be the length of sleeves and body. Start working on the women size that you think would fit across the chest. The additional length will be worked right before you cast off for the armhole/sleeve cap. If the pattern is worked top-down you can add the length right after the armhole or before the first decrease on sleeve.

Regarding additional yarn amount, this will depend on how much length you add, but it is better with a skein too many than too few.

All yarns will have excess fibres (from production) that might come off as lint or shedding. Brushed yarns (ie hairier yarns) have more of these loose, excess fibres, causing more shedding.

Shedding also depends on what is worn under or over the garment, and whether this pulls at the yarn fibres. It’s therefore not possible to guarantee that there will be no shedding

Below are some tips on how to get the best result when working with hairier yarns:

1. When the garment is finished (before you wash it) shake it vigorously so the looser hairs come off. NOTE: do NOT use a lint roller, brush or any method that pulls at the yarn.

2. Place the garment in a plastic bag and put it in your freezer - the temperature will cause the fibres to become less attached to each other, and excess fibres will come off easier.

3. Leave in the freezer for a few hours before taking it out and shaking it again.

4. Wash the garment according to the instructions on the yarn label.

Pilling is a natural process that happens to even the most exclusive of fibers. It's a natural sign of wear and tear that is hard to avoid, and that is most visible in high friction areas of your garment like a sweater's arms and cuffs.

You can make your garment look as new by removing the pilling, using a fabric comb or a pill/lint remover.

Still can't find the answer you need? Then scroll down and leave your question so one of our experts can try to help you. This will be done normally within 5 to 10 working days.
In the meantime, you can read the questions and answers that others have left to this pattern or join the DROPS Workshop on Facebook to get help from fellow knitters/crocheters!

You might also like...

Post a comment to pattern DROPS 159-3

We would love to hear what you have to say about this pattern!

If you want to leave a question, please make sure you select the correct category in the form below, to speed up the answering process. Required fields are marked *.

Comments / Questions (38)

country flag Lucia wrote:

Buongiorno, nel davanti, "a 45 cm. proseguire seguendo il diagramma A1" non occorre diminuire alcune maglie come fatto in precedenza quando si passa al punto traforato? Grazie!

02.06.2021 - 16:14

DROPS Design answered:

Buonasera Lucia, a 45 cm deve proseguire lavorando A.1 come indicato. Buon lavoro!

02.06.2021 - 20:47

country flag Michelle Foster wrote:

I completed this beautiful jumper. However, the shoulders do not stay on the shoulder. They drop right off the arms which is very disappointing. The arms are very baggy which i was able to adjust. The buttons down the back are uneven. I realise it is keeping with the pattern but it looks a little odd.

15.12.2020 - 04:42

country flag Jane Edmonds wrote:

All your patterns seem to be knitted on circular needles. Is it possible to have some patterns for a pair of single ended needles?

23.08.2020 - 23:47

DROPS Design answered:

Dear Mrs Edmonds, we are using here circular needles to have enough room for all stitches - you can then use straight needles instead, just make sure to keep the tension - Read more about adapting into straight needles here. Happy knitting!

24.08.2020 - 09:15

country flag Kate wrote:

Hello there, In the materials needed, it is stated C or A+A. However, nowhere in the instructions is there mention to use 2 strands of PARIS. Should I do so?

23.08.2020 - 22:41

DROPS Design answered:

Dear Kate, DROPS Paris belong to yarn group C, this means you either work with 1 strand of Paris or use rather 2 strands any yarn group C instead. Happy knitting!

24.08.2020 - 09:14

country flag Lysvert wrote:

Bonjour, je souhaite remplacer le Coton Paris par deux fils de catégorie A, je n'ai jamais fait cela, faut-il tricoter plus serré les deux fils ensemble ? Ou garder la tension habituelle ? Un fil alpaga sera-t-il adapté ? Merci !

29.03.2020 - 11:21

DROPS Design answered:

Bonjour Mme Lysvert, vous utiliserez 2 fils du groupe A et devriez obtenir la même tension (pensez à faire votre échantillon pour ajuster la taille des aiguilles). Vous trouverez ici plus d'infos sur les alternatives ici, tout comme comment calculer la quantité nécessaire. Rappelez-vous que votre magasin DROPS saura également vous conseiller, même par mail ou téléphone. Bon tricot!

30.03.2020 - 10:25

country flag Fran7 wrote:

Bonjour à vous. J'ai tricoté une manche en suivant vos explications mais jme tromper : Les augmentations côtés commencent-elles vraiment après le motif A1 ? La manche est étroite jusqu'à A1 et trop longue après les 19 fois 2 augmentations. Pouvez-vous m'aider ? Merci, cordialement

27.09.2018 - 15:57

DROPS Design answered:

Bonjour Fran7, effectivement, on tricote A.1 et on augmente en même temps, en taille M, on tricote en jersey avec 1 m lis au point mousse en augmentant 1 m de chaque côté tous les 1 cm et en même temps, à 22 cm, on tricote A.1 (en diminuant 4 m au 1er rang) pendant 11 cm, etc. On va donc augmenter en même temps que l'on tricote A.1. Bon tricot!

28.09.2018 - 07:55

country flag Gabriela wrote:

Hola quisiera recibir mayores explicaciones para la realizacion de la manga, ya que no entiendo muy bien como esta explicado. muchas gracias

14.09.2017 - 23:28

DROPS Design answered:

Hola Gabriela. Cuando trabajamos la manga tenemos que tener en cuenta dos cosas: por un lado los aumentos dentro del patrón y por otro lado los aumentos para la forma de la manga. Ambas se trabajan al mismo tiempo. Puedes acercarte a la tienda de Drops más cercana para recibir más ayuda.

17.09.2017 - 17:12

country flag Valentina Tarantino wrote:

Buonasera, sto lavorando la manica e nn capisco un passaggio che riguarda gli aumenti: dopo aver lavorato 11 cm a legaccio devo iniziare gli aumenti ogni 1 cm x 19 volte(quindi x 19 cm) ma dopo 11cm (quindi a 22cm complessivi) devo iniziare cn il motivo A1 e allo stesso tempo diminuire 4m. Quindi come proseguo con gli aumenti sul motivo A1? Grazie in anticipo

12.03.2016 - 01:28

DROPS Design answered:

Buongiorno Valentina Gli aumenti da ripetere ogni 1 cm per 19 volte, vengono fatti ai lati. Per le 4 m che deve diminuire quando inizia il diagramma A1, potrebbe risultarle più semplice diminuirle a intervalli regolari nel corso dell'ultimo ferro lavorato a maglia rasata prima di iniziare il diagramma, oppure lavora per 4 volte 3 m insieme a dir al posto di 2. Gli aumenti ai lati proseguono come già impostati. Buon lavoro!

12.03.2016 - 08:19

country flag Antonella wrote:

Buon giorno vorrei sapere se sul modello 159_3 sia possibile utilizzare dei ferri normali invece che circolari? Grazie

24.01.2016 - 15:06

DROPS Design answered:

Buonasera Antonella. Il capo viene lavorato avanti e indietro sui ferri e in parti separate. Può usare i ferri dritti e seguire le spiegazioni così come riportate, senza apportare alcuna modifica. Buon lavoro!

24.01.2016 - 19:36

country flag Irene Hansen wrote:

Højre og venstre forstykke, står der ikke nævnt hvornår jeg skal strikke A 1 øverst oppe??

09.12.2015 - 17:44

DROPS Design answered:

Hej Irene, Jo du strikker nøjagtig de samme striber (incl A.1) som på forstykket! Vi har talt med Garneriet i dag, så hun ved hvordan du gør. God fornøjelse!

10.12.2015 - 15:28