
Popular categories
Looking for a yarn?


|
||||||||||||||||||||||||||||
Heartland |
||||||||||||||||||||||||||||
|
|
||||||||||||||||||||||||||||
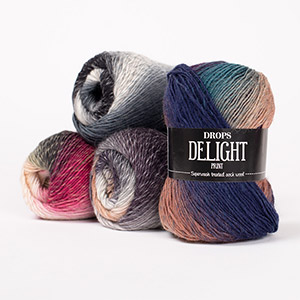
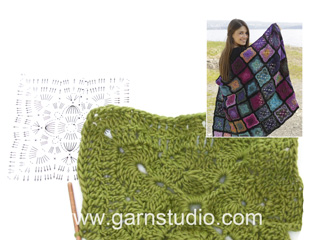
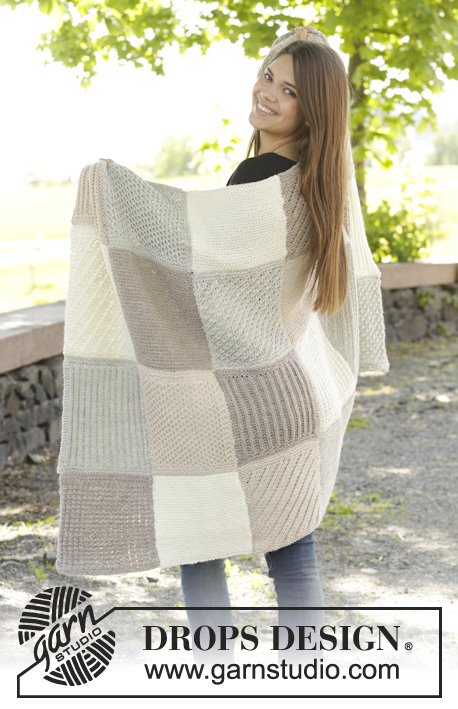
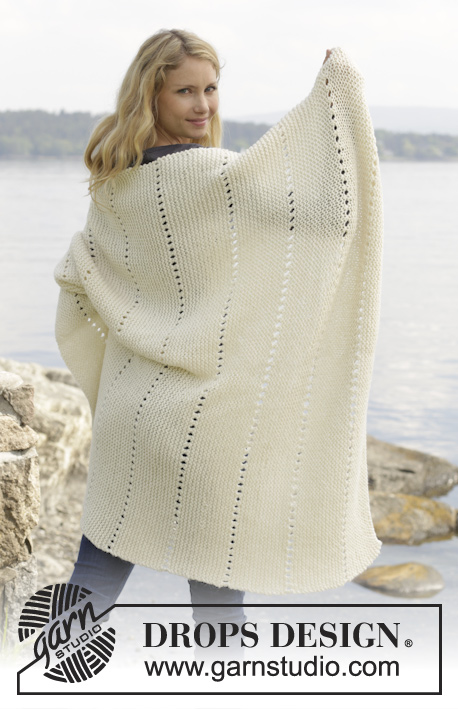
Crochet DROPS blanket with Granny squares in ”Delight” and “Fabel”.
DROPS 158-53 |
||||||||||||||||||||||||||||
|
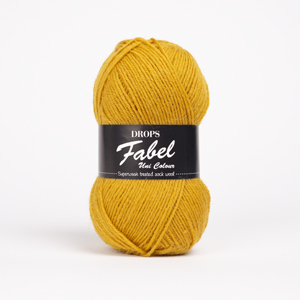
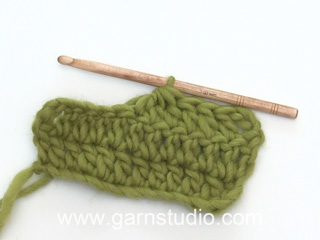
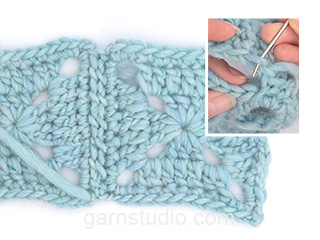
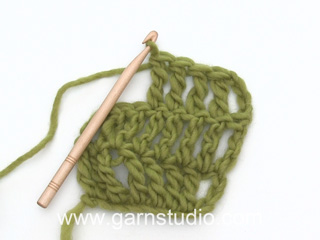
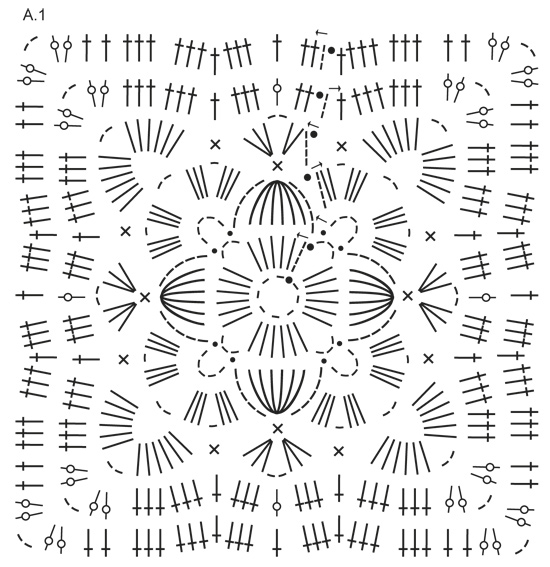
PATTERN: See diagram A.1. CROCHET INFO: Because of the marbling in the yarn, none of the squares will be like, this gives variation to each blanket. Therefore place the squares on the floor and match them so that the strongest colours (lilac/green and rainbow) are distributed over the entire blanket. SQUARE COLOURS: Work blanket with uneven number of squares in each colour. Work 6-10 squares in Rainbow, 13-21 squares in Purple/green, 25-39 squares in Turquoise/purple and 16-26 squares in Lilac/green. ---------------------------------------------------------- BLANKET: 1 ball Delight = 6 crochet squares. Work 60-96 squares in Delight in total – READ SQUARE COLOURS above. CROCHET SQUARE: Work according to diagram A.1, i.e. work as follows: Work 8 ch on hook size 4 mm with Delight and form 1 ring with 1 sl st in first ch. ROUND 1: Work 4 ch (= 1 dtr), 5 dtr in ch-ring, 3 ch, * 6 dtr in ch-ring, 3 ch *, repeat from *-* 3 times in total, finish with 1 sl st in the 4th ch from beg of round (= 4 dtr-leaves and 4 ch-spaces). ROUND 2: * 5 ch, continue to work 1 dtr in each of the 6 dtr from previous round, but wait with last pull through until all have been worked (= 7 sts on hook), now pull yarn trough all sts, 5 ch, 1 sl st in ch-space, 5 ch, 1 sl st in same ch-space *, repeat from *-* a total of 4 times (= 4 dtr-leaves and 4 ch-spaces). Turn piece. ROUND 3 (= WS): Work 4 ch, work in next ch-space (5 ch from previous round) as follows: 2 dtr, 1 ch, 3 dtr, 2 ch, 3 dtr, 1 ch, 3 dtr, work 1 dc at the top of leaf, * in next ch-space work 3 dtr, 1 ch, 3 dtr, 2 ch, 3 dtr, 1 ch, 3 dtr, work 1 dc at the top of next leaf *, repeat from *-* 3 times in total and finish with 1 sl st in 4th ch at beg of round = 8 small ch-spaces (1 ch) and 4 corner spaces (2 ch) on round. Turn piece. ROUND 4: Work 4 ch, in dc at the top of leaf work 2 dtr, 2 ch and 3 dtr, * in next small ch-space work 1 dc, then in corner space work 6 dtr, 2 ch, 6 dtr and in next small ch-space work 1 dc, in dc at the top of leaf work 3 dtr, 2 ch, 3 dtr *, repeat from *-* 3 times in total, 1 dc in next small ch-space, then in corner space work 6 dtr, 2 ch, 6 dtr, work 1 dc in next small ch-space and 1 sl st in 4th ch at beg of round. Turn piece. ROUND 5 (= WS): Work 3 ch, continue to work tr the entire round. NOTE! In dtr and dc from previous round work in st, in ch from previous round work around ch. In corner space work 2 tr, 2 ch and 2 tr and in 2 ch work 1 tr. Finish with 1 sl st in 3rd ch at beg of round = 100 tr in total and 2 ch in each corner. Fasten off. Turn piece. ROUND 6: Switch to Fabel. Work 3 ch, then work as follows: 1 tr in every tr, 2 tr, 2 ch and 2 tr in every corner space. Finish with 1 sl st in 3rd ch at beg of round = 116 tr in total and 2 ch in each corner. Fasten off. REMEMBER THE CROCHET TENSION! ASSEMBLY: READ CROCHET INFO! Place the squares with 6-8 squares in width and 10-12 rows in height. Sew tog squares with Fabel edge to edge, stripe for stripe. CROCHET BORDER: Work a final border around the entire blanket on hook size 4 mm with Fabel - start in one corner and work from RS as follows: Work 1 sl st in 1st sl st, 3 ch, then work as follows: 1 tr in every tr, 2 tr, 2 ch and 2 tr in every corner space. Finish with 1 sl st in 3rd ch from beg of round. |
||||||||||||||||||||||||||||
Diagram explanations |
||||||||||||||||||||||||||||
|
||||||||||||||||||||||||||||
|
||||||||||||||||||||||||||||
|
Have you made this or any other of our designs? Tag your pictures in social media with #dropsdesign so we can see them! Do you need help with this pattern?You'll find tutorial videos, a Comments/Questions area and more by visiting the pattern on garnstudio.com. © 1982-2024 DROPS Design A/S. We reserve all rights. This document, including all its sub-sections, has copyrights. Read more about what you can do with our patterns at the bottom of each pattern on our site. |
||||||||||||||||||||||||||||


With over 40 years in knitting and crochet design, DROPS Design offers one of the most extensive collections of free patterns on the internet - translated to 17 languages. As of today we count 304 catalogues and 11422 patterns - 11422 of which are translated into English (UK/cm).
We work hard to bring you the best knitting and crochet have to offer, inspiration and advice as well as great quality yarns at incredible prices! Would you like to use our patterns for other than personal use? You can read what you are allowed to do in the Copyright text at the bottom of all our patterns. Happy crafting!
Comments / Questions (35)
Bonjour, Je souhaite faire le grand modèle et j'ai donc commandé les 16 pelotes préconisées. Avec 1 pelote, j'obtiens tout juste 4 carrés. Comment pourrais-je atteindre les 96 carrés que je suis sensée obtenir pour le grand modèle ?? Merci. GW
01.02.2022 - 14:43DROPS Design answered:
Bonjour Geneviève, avez-vous bien la bonne tension/les bonnes mesures? 1 carré = 13,5 x 13,5 cm et le dernier tour doit être crocheté en Fabel. Pensez à adapter la taille du crochet si besoin. Bonne continuation!
01.02.2022 - 16:38Skal denne ruten vere litt sånn boblete? Om du forstår meg rett, altså ikke helt flat men litt opp og ned i mønsteret? Hvis ikke vet jeg ikke hva jeg gjør feil. Bruker nål 4
02.04.2020 - 00:07DROPS Design answered:
Hej Linda, Nej... Hækler du i DROPS Delight? Har du set videoen? Hvordan hekle bestemorruten til teppet i DROPS 158-53
16.04.2020 - 16:11Hej Det er et super flot tæppe, men jeg synes kanten om hele tæppet virker lidt kedelig. Er det sådan at I kunne komme med en ide til en anden lidt mere spændende kant ? Har selv kig på The Meadow - Ledetråd #16 ... kunne det evt blive godt ? Vh Dorte
21.05.2019 - 10:47DROPS Design answered:
Hei Dorte. Ja det er bare å velge den kanten du selv syntes er fin - her er det ingen fasit. Ville tro the Meadow-kanten helt fint kan passe her. God fornøyelse
21.05.2019 - 14:50Ik heb wol besteld voor het grootste deken en heb nu al 7 vierkantjes gehaakt maar ik merk dat ik geen wol genoeg zal hebben. Het klopt niet wat aangegeven is want uit 1 bol kan ik bijna 6 vierkantjes haken maar van paars/groen bv heb je er al 39 nodig en er stond bij dat je 300gr nodig had dus ik heb 6 bollen besteld maar daar kunnen nog geen 36 vierkantjes uit dus heb ik te weinig gekocht en ik lees nu pas dat nog mensen dit voor hebben dus waarom is dit niet aangepast?
16.10.2018 - 18:47Bonjour Je ne comprends pas sur le rang 2 : 2 fois 5 mailles en l’air et maille coulée dans l’arceau. ( ce qui forme 2 arceaux) .Sur le diagramme, on ne voit qu’une fois 5 mailles en l’air et une maille coulée pour former un seul arceau... je n’arrive pas à voir sur la vidéo comment faire. Les laines sont magnifiques et le modèle très beau, alors je ne voudrais pas être si vite arrêtée ! Merci d’avance
23.04.2018 - 22:37DROPS Design answered:
Bonjour Sylvie, les 5 ml après les 6 DB écoulées ensemble sont faites pour "atteindre" l'arceau suivant, elles ne vont pas réellement former un arceau, crochetez ensuite 1 mc dans l'arceau, 5 ml et 1 mc dans le même arceau (= vous avez 1 arceau de 5 ml où vous crochèterez au tour suivant (3 DB, 1 ml, 3DB, 2 ml, 3DB, 1 ml, 3DB), puis vous crochetez de nouveau 5 ml (= pour être à la bonne hauteur pour les DB) et 6 DB écoulées ensemble, 5 ml, 1 mc dans l'arceau suivant. Ces 5 ml, 6DB, 5ml vont former un groupe de DB au sommet duquel vous crochèterez 1 ms au tour suivant. Bon crochet!
24.04.2018 - 09:01Die 6. RD ergibt am Schluss 116 Stäbchen und je 2 Lm in jeder Ecke. (Nicht 145).
21.10.2016 - 20:56Sur le modèle 158-53, il est indiqué dans les explications au tour 5 et 6: crocheter en B. Dans la video correspondante, le tour 5 et 6 sont crochetés en DB. Question: faut-il crocheter en B ou DB les tours 5 et 6?
20.07.2016 - 08:43DROPS Design answered:
Bonjour Mme Carter, on doit effectivement crocheter des brides aux 2 derniers tours, comme indiqué dans les explications et le diagramme - une correction sera ajoutée à la vidéo. Merci, bon crochet!
20.07.2016 - 11:56Jeg er i tvivl om, om der i 5. omgang og 6. omgang skal hækles dbl stangmasker eller alm stangmasker? Jeg undrer mig over at man ender med 145 stm efter 6. omgang, når man kun har øget med 4 m i hver hjørne, så ender man da kun med 116 m
13.06.2016 - 13:03DROPS Design answered:
Hej Merete. Du hekler stangmasker i baade 5. og 6. omg. Og du har ret i det skal vaere 116 m. Det er en fejl i mönstret som skal rettes. Fölg diagrammet - det er i orden.
13.06.2016 - 14:08Bonjour, dans la section "couleur des carrés", vous indiquez "13-21 carrés violet/vert, (...) et 16-26 carrés violet/vert". Deux fois violet/vert et pas de mauve/violet. Après déduction (je fais la grande couverture) je pense que je dois réaliser 21 carrés mauve/vert, non? Merci pour votre aide.
07.04.2016 - 09:36DROPS Design answered:
Bonjour Marion, il faut 13-21 carrés mauve/vert (couleur 14) et 16-20 en violet/vert (couleur 11) - les couleurs ont été corrigées, merci. Bon crochet!
07.04.2016 - 11:52I just started the Heartland blanket drops 158-53 and on the 5th round of square you end up w/100 dc. Round six says you end up with 145 dc. How is this possible when previous round was 100 and you added 4 new dc per corner which added up to 116?
29.03.2016 - 20:56DROPS Design answered:
Dear Linda, thank you for your feedback and information has been forwarded to our Design Team. Happy crocheting!
30.03.2016 - 09:18