
Popular categories
Looking for a yarn?


Comments / Questions (83)
![]() Stephanie wrote:
Stephanie wrote:
Bonjour il est dit pour 'biaiser les épaules glisser 3 fois 5 m en attente et glisser 1 fois 33-35-37-39-43-45 m de chaque côté en attente' puis lors de l'assemblage, de 'Reprendre les 48-50-52-54-58-60 m d'une épaule ...' . quel est l’intérêt de 'diviser' la mise en attente si c'est pour reprendre au total les 48-50-52-54-58-60 m d'une épaule , pourquoi ne pas avoir mis directement 48-50-52-54-58-60 m en attente ?
20.03.2017 - 11:43DROPS Design answered:
Bonjour Stéphanie, on forme le biais de l'épaule en tricotant des rangs raccourcis puis on tricote ensuite 1 rang endroit sur toutes les mailles et on rabat sur l'envers (cf assemblage), vous pouvez faire ceci à la fin de chaque épaule si vous ne voulez pas mettre les mailles en attente, au choix. Bon tricot!
20.03.2017 - 13:27
![]() Stephanie wrote:
Stephanie wrote:
Ok, mais si je regarde la suite, ces 37 m je suis sensé les mettre en attente pour biaiser les manches et donc il ne me reste plus de maille pour continuer mon epaule
01.03.2017 - 09:33DROPS Design answered:
Bonjour Stéphanie, les 37 m en attente sont les mêmes que celles que vous avez pour le dos + les 3 x 5 m mises en attente = 52 m comme pour chaque épaule/manche du dos, ces 52 m de chaque épaule seront ensuite reprises l'une après l'autre, cf ASSEMBLAGE. Bon tricot!
01.03.2017 - 10:06
![]() Stéphanie wrote:
Stéphanie wrote:
Bonjour, Je fait actuellement le devant droit du gilet. Après les augmentations j'ai bien mes 68 m ( L). A 23 cm je dois glisser 8m en attente (Reste 60m). Ensuite je dois rabattre pour l'encolure 3 fois 2m et 2 fois 1m. Faut-il faire ça à chaque rang, ou le premier rang 2 m puis le rang suivant 2 m etc. De plus faut-il biaiser les épaules comme le dos c'est à dire 3 * 5 mailles + 37 m, ça ne fait plus beaucoup de m arrivé en haut de l'épaule . Merci pour les infos.
28.02.2017 - 20:20DROPS Design answered:
Bonjour Stéphanie, vous avez 68 m, mettez 8 m en attente pour l'encolure et rabattez pour l'encolure (3 x 2 m + 2 x 1 m = 8 m), il reste 52 m. Pour l'épaule, mettez en attente 3 x 5 m = 15 m. Il reste 52-15 = 37 m pour l'épaule.
01.03.2017 - 08:38
![]() Stéphanie wrote:
Stéphanie wrote:
Bonjour, il est écrit "Tricoter maintenant une bordure de finitions composée de demi-cercles pour que cette bordure soit droite – on relève ensuite les mailles de l'empiècement le long de cette bordure." Est-il possible d'avoir plus d'infos ou peut-être une video de cette bordure de finitions composée de demi-cercles ? Merci.
01.12.2016 - 12:08DROPS Design answered:
Bonjour Stéphanie, ces demi-cercles sont décrits juste en dessous cette phrase soit pour les demi-cercles 1G,2G,3G, etc + demi-cercle 1H + 2 H. Suivez bien les explications écrites en même temps que la position de chacun de ces demi-cercles sur le schéma. Bon tricot!
01.12.2016 - 13:09
![]() Sylvia Karlsson wrote:
Sylvia Karlsson wrote:
Fråga. Jag förstår inte hur jag skall sticka ihop solfjädrarna visa hu jag skall göra Tack
28.01.2016 - 09:23DROPS Design answered:
Hej Sylvia, Jo det gør du ved at følge VIFTE 1C. God fornøjelse!
09.03.2016 - 15:37
![]() Angelica wrote:
Angelica wrote:
Jag fattar inte. Ska jag bara lägga upp 5 maskor på framst? Det blir ju jättekonstigt. 5 maskor på 21cm? Är det något som är fel?
04.04.2014 - 12:41DROPS Design answered:
Hur långt har du kommit i beskrivningen? Det är bara på kanten du stickar på till sist, att du skall lägga upp 5 m, som du stickar ihop med framst.
08.04.2014 - 09:51
![]() Angelica wrote:
Angelica wrote:
Jag fattar inte. Ska jag bara lägga upp 5 maskor på framst? Det blir ju jättekonstigt. 5 maskor på 21cm? Är det något som är fel?
04.04.2014 - 12:40DROPS Design answered:
Hej Angelica. Dette er et ret langt mönster, saa kan du sige hvor du praecis er i mönstret, saa skal jeg pröve at hjaelpe dig videre. Tak ;-)
08.04.2014 - 13:17Roz wrote:
زیباوجالب: اماسخت برای بافتن
10.04.2013 - 08:03
![]() Ilvajoh wrote:
Ilvajoh wrote:
Dank je wel, weer wat geleerd!
15.03.2013 - 10:42
![]() Ilvajoh wrote:
Ilvajoh wrote:
Hallo, een vraagje over de schoudernaad: "zet 5 steken op een hulpnaald doe dit 3 keer maar brei de steken eerst om de draad niet te hoeven knippen zet daarna 35 steken op een hulpnaald dan afkanten voor de hals" waarom kan ik de 50 steken niet in een keer op een hulpnaald zetten nadat ik ze heb gebreid??? Alvast bedankt.
12.03.2013 - 10:28DROPS Design answered:
Omdat u zo een schuine schouder/mouw krijgt. U zet 5 st op een hulpdraad, breit heen en weer, zet weer 5 st op een hulpdraad, breit heen en weer... enz. Zo wordt de zijkant minder hoog.
15.03.2013 - 09:19
|
|||||||||||||
Evelyn#evelynjacket |
|||||||||||||
 |
 |
||||||||||||
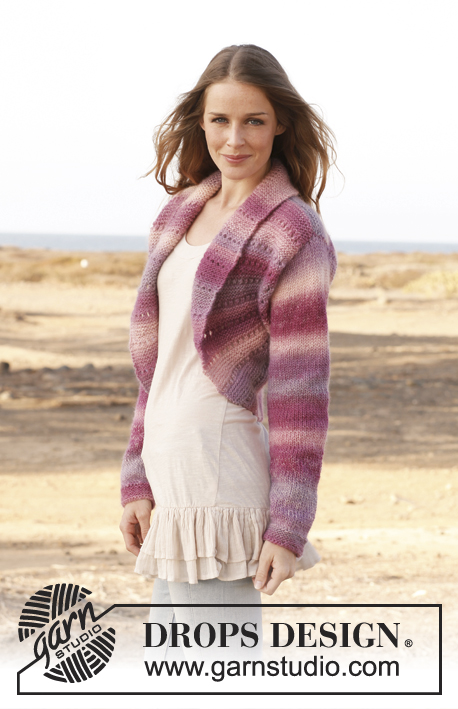
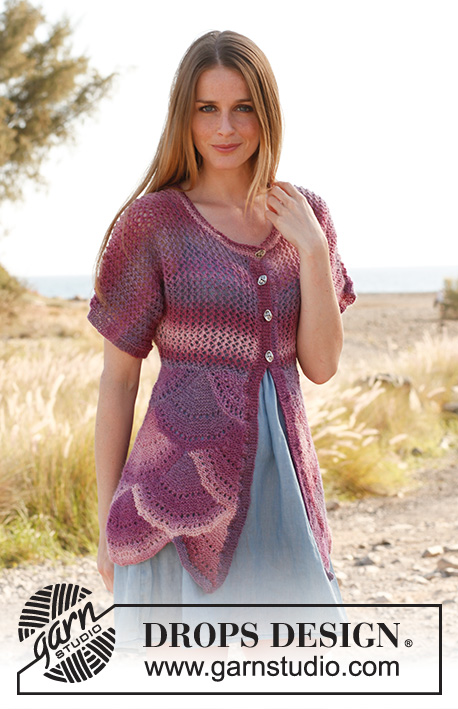
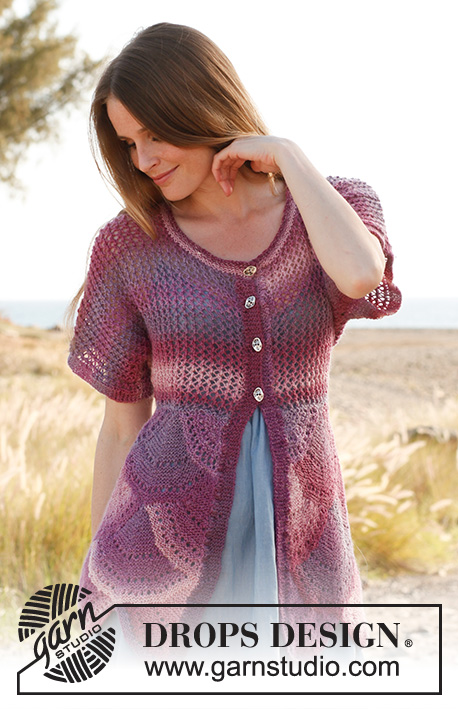
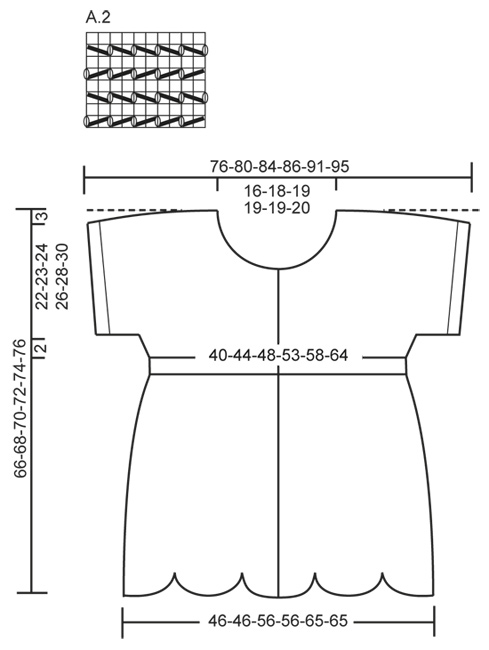
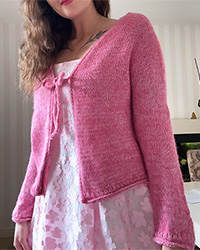
Knitted DROPS jacket with short sleeves, lace pattern and fans in ”Delight”. Size: S - XXXL.
DROPS 148-37 |
|||||||||||||
|
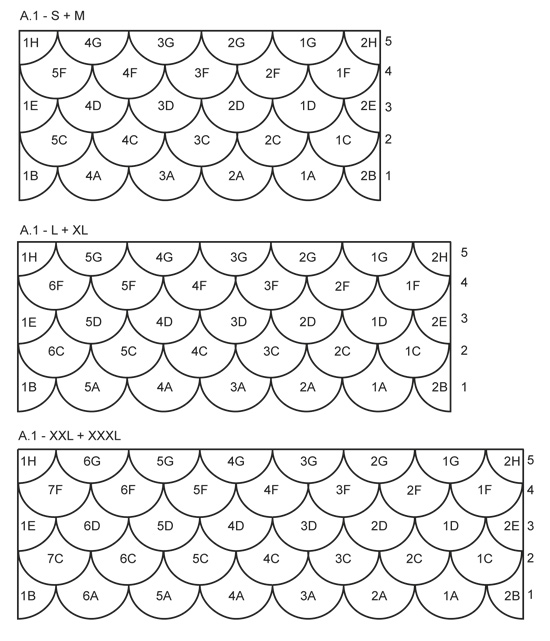
GARTER ST (back and forth on needle): K all rows. 1 ridge = 2 rows K. PATTERN: See diagram A.2. Diagram shows all rows in pattern seen from RS. Diagram A.1 (choose diagram for correct size) shows the entire bottom part of jacket with fan pattern seen from RS. ---------------------------------------------------------- JACKET: The bottom part of jacket consists of several "fans" knitted together along the way. Beg at the bottom of jacket in the order the fans have been numbered – see A.1 (choose diagram for correct size). Always knit up new sts from RS. FAN 1A: Cast on 61 sts on circular needle size 4 mm with Delight and work as follows: Row 1 (= RS): K all sts. Row 2 (= WS): K all sts. Row 3: K 2 tog, K 9, * slip 1 st as if to K, K 2 tog, psso, K 6 *, repeat from *-* 5 times in total, K 3, K 2 tog = 49 sts. Row 4-7: K all sts. Row 8 (= WS): K 1, * 1 YO, P 2 tog *, repeat from *-* the entire row = 49 sts. Row 9-10: K all sts. Row 11: K 2 tog, K 7, * slip 1 st as if to K, K 2 tog, psso, K 4 *, repeat from *-* 5 times in total, K 3, K 2 tog = 37 sts. Row 12-15: K all sts. Row 16 (= WS): K 1, * 1 YO, P 2 tog *, repeat from *-* the entire row = 37 sts. Row 17-18: K all sts. Row 19: K 2 tog, K 5, * slip 1 st as if to K, K 2 tog, psso, K 7 *, repeat from *-* 2 times in total, slip 1 st as if to K, K 2 tog, psso, K 5, K 2 tog = 29 sts. Row 20-26: K all sts. Row 27: K 2 tog, K 3, * slip 1 st as if to K, K 2 tog, psso, K 5 *, repeat from *-* 2 times in total, slip 1 st as if to K, K 2 tog, psso, K 3, K 2 tog = 21 sts. Row 28-29: K all sts. Row 30 (= WS): K 1, * 1 YO, P 2 tog *, repeat from *-* the entire row = 21 sts. Row 31-34: K all sts. Row 35: K 2 tog, K 7, slip 1 st as if to K, K 2 tog, psso, K 7, K 2 tog = 17 sts. Row 36-42: K all sts. Row 43: K 2 tog, K 5, slip 1 st as if to K, K 2 tog, psso, K 5, K 2 tog = 13 sts. Row 44-48: K all sts. Row 49: K 2 tog, K 3, slip 1 st as if to K, K 2 tog, psso, K 3, K 2 tog = 9 sts. Row 50-54: K all sts. Row 55: K 2 tog, K 1, slip 1 st as if to K, K 2 tog, psso, K 1, K 2 tog = 5 sts. Row 56-58: K all sts. Row 59: K 1, slip 1 st as if to K, K 2 tog, psso, K 1 = 3 sts. Row 60: Knit all sts. Row 61: Slip 1 st as if to K, K 2 tog, psso = 1 st. Cut the thread and pull it through the remaining st and fasten. Work FAN 2A, 3A etc. on 1st row the same way. HALF FAN IN LEFT SIDE OF FRONT PIECE – FAN 1B: Cast on 31 sts on needle and work as follows: Row 1 (= RS): K all sts. Row 2 (= WS): K all sts. Row 3: K 2 tog, K 9, * slip 1 st as if to K, K 2 tog, psso, K 6 *, repeat from *-* 2 times in total, slip 1 st as if to K, K 1, psso = 25 sts. Row 4-7: K all sts. Row 8 (= WS): K 1, * 1 YO, P 2 tog *, repeat from *-* the entire row = 25 sts. Row 9-10: K all sts. Row 11: K 2 tog, K 7, * slip 1 st as if to K, K 2 tog, psso, K 4 *, repeat from *-* 2 times in total, slip 1 st as if to K, K 1, psso = 19 sts. Row 12-15: K all sts. Row 16 (= WS): K 1, * 1 YO, P 2 tog *, repeat from *-* the entire row = 19 sts. Row 17-18: K all sts. Row 19: K 2 tog, K 5, slip 1 st as if to K, K 2 tog, psso, K 7, slip 1 st as if to K, K 1, psso = 15 sts. Row 20-26: K all sts. Row 27: K 2 tog, K 3, slip 1 st as if to K, K 2 tog, psso, K 5, slip 1 st as if to K, K 1, psso = 11 sts. Row 28-29: K all sts. Row 30 (= WS): K 1, * 1 YO, P 2 tog *, repeat from *-* the entire row = 11 sts. Row 31-34: K all sts. Row 35: K 2 tog, K 7, slip 1 st as if to K, K 1, psso = 9 sts. Row 36-42: K all sts. Row 43: K 2 tog, K 5, slip 1 st as if to K, K 1, psso = 7 sts. Row 44-48: K all sts. Row 49: K 2 tog, K 3, slip 1 st as if to K, K 1, psso = 5 sts. Row 50-54: K all sts. Row 55: K 2 tog, K 1, slip 1 st as if to K, K 1, psso = 3 sts. Row 56-60: K all sts. Row 61: Slip 1 st as if to K, K 2 tog, psso = 1 st. Cut the thread and pull it through the remaining st and fasten. HALF FAN IN RIGHT SIDE OF FRONT PIECE – FAN 2B: Cast on 31 sts and work as fan 1B but reversed, i.e. on 3rd-11th-27th-35th-43rd-49th-55th and 61th row read the sentence backwards but beg with K 2 tog and finish with slip 1 st as if to K, K 1, psso – For example work 3rd row as follows: K 2 tog, * K 6, slip 1 st as if to K, K 2 tog, psso *, repeat from *-* 2 times in total, K 9, slip 1 st as if to K, K 1, psso = 25 sts. First row with fans has now been worked. FAN 1C: Knit up 30 sts along the left edge of FAN 2B (seen from RS) – i.e. knit up 1 st in every ridge (= 2 rows K) and approx. 1 st in every row with holes, and then knit up 31 sts along the right edge of FAN 1A (seen from RS) = 61 sts on needle. Then work as FAN 1A but from 2nd row (i.e. beg with K from WS). Work FAN 2C, 3C, 4C etc. on 2nd row the same way – see placement in diagram A.1 (remember correct diagram for your size). Second row with fans has now been worked. Work FAN 1D, 2D, 3D etc. on 3rd row the same way - see placement in diagram A.1 but when knitting up sts, do as follows (example explains fan 1D): Knit up 30 sts along the left edge on FAN 1C (seen from RS), knit up 1 st at the tip at the top on FAN 1A and knit up 30 sts along the right edge on FAN 2C (seen from RS) = 61 sts. FAN 1E: Knit up 30 sts along the left edge (seen from RS) on last fan on 2nd row, knit in addition up 1 st at the tip at the top of FAN 1B = 31 sts on needle. Then work as FAN 1B but from 2nd row (i.e. beg with K from WS). FAN 2E: Knit up 1 st at the tip at the top on FAN 2B, then knit up 30 sts along the right edge on FAN 1C (seen from RS) = 31 sts on needle. Then work as FAN 2B but from 2nd row (i.e. beg with K from WS). Third row with fans has now been worked. FAN 1F: Knit up 30 sts along the left edge on FAN 2E (seen from RS), knit up 1 st at the tip at the top on FAN 1C and knit up 30 sts along the right edge on FAN 1D (seen from RS) = 61 sts. Then work as FAN 1A but from 2nd row (i.e. beg with K from WS). Work FAN 2F, 3F, 4F etc. the same way – see placement in diagram A.1. Fourth row with fans has now been worked. Now work a finishing edge with half circles to even out the line at the top – knit up for yoke along this edge later. HALF CIRCLE BETWEEN EVERY FAN (FAN 1G, 2G, 3G, etc.): Knit up from RS 61 sts along the edge between 2 fans – i.e. knit up 1 st in every ridge and approx. 1 st in every row with holes + 1 st between two fans at the tip at the top of fan from the row below. Then work as follows: Row 1 (= WS): K all sts. Row 2 (= RS): K all sts. Row 3: Knit all sts. Row 4: * K 3, K 2 tog *, repeat from *-* until 1 st remains and finish with K 1 = 49 sts. Row 5: K 1, * 1 YO, P 2 tog *, repeat from *-* the entire row = 49 sts. Row 6: Knit all sts. Row 7 (= WS): K 1, * 1 YO, P 2 tog *, repeat from *-* the entire row = 49 sts. Row 8-14: K all sts. Row 15 (= WS): K 1, * 1 YO, P 2 tog *, repeat from *-* the entire row = 49 sts. Row 16-17: K all sts. Row 18: K all sts tog 2 by 2 until 1 st remains, finish with K 1 = 25 sts. Row 19-25: K all sts. Row 26: K all sts tog 2 by 2 until 1 st remains, finish with K 1 = 13 sts. Row 27: Knit all sts. Row 28: K all sts tog 2 by 2 until 1 st remains, finish with K 1 = 7 sts. Row 29: Knit all sts. Row 30: K all sts tog 2 by 2 until 1 st remains, finish with K 1 = 4 sts. Row 31: Knit all sts. Row 32: Slip 1 st as if to K, K 3 tog and psso = 1 st. Cut the thread and pull it through the remaining st and fasten. HALF CIRCLE AT THE EDGE IN LEFT SIDE OF FRONT PIECE – FAN 1H: Knit up 30 sts along the left edge (seen from RS) on last fan on 4th row, knit in addition up 1 st at the tip at the top of FAN 1E = 31 sts on needle. Then work as follows: Row 1 (= WS): K all sts. Row 2 (= RS): K all sts. Row 3: Knit all sts. Row 4: * K 3, K 2 tog *, repeat from *-* until 1 st remains and finish with K 1 = 25 sts. Row 5: K 1, * 1 YO, P 2 tog *, repeat from *-* the entire row = 25 sts. Row 6: Knit all sts. Row 7 (= WS): K 1, * 1 YO, P 2 tog *, repeat from *-* the entire row = 25 sts. Row 8-14: K all sts. Row 15 (= WS): K 1, * 1 YO, P 2 tog *, repeat from *-* the entire row = 25 sts. Row 16-17: K all sts. Row 18: K all sts tog 2 by 2 until 1 st remains, finish with K 1 = 13 sts. Row 19-25: K all sts. Row 26: K all sts tog 2 by 2 until 1 st remains, finish with K 1 = 7 sts. Row 27-29: K all sts. Row 30: K all sts tog 2 by 2 until 1 st remains, finish with K 1 = 4 sts. Row 31: Knit all sts. Row 32: Slip 1 st as if to K, K 3 tog and psso = 1 st. Cut the thread and pull it through the remaining st and fasten. HALF CIRCLE AT THE EDGE IN RIGHT SIDE OF FRONT PIECE – FAN 2H: Knit up 1 st at the tip at the top on FAN 2E, then knit up 30 sts along the right edge on FAN 1F (seen from RS) = 31 sts on needle. Then work as FAN 1H. Fifth and last row with fans and half circles has now been worked. Jacket now measures approx. 93-93-111-111-130-130 cm along the straight edge at the top and approx. 38 cm from bottom edge and up on the longest. YOKE: Knit up from RS 194-194-236-236-274-274 sts on circular needle size 4 mm with Delight, along the straight edge at the top of piece with fans - knit up approx. 1 st in every st (if more or fewer sts have been knitted up, inc/dec to correct no of sts on 1st row from WS). K 1 row from WS. K 1 row from RS while AT THE SAME TIME dec 26-10-34-14-30-6 sts evenly = 168-184-202-222-244-268 sts. Work in GARTER ST back and forth on needle - see explanation above, until 2-4-6-6-6-6 ridges in total have been worked after fans (piece now measures approx. 39-40-41-41-41-41 cm from bottom edge on the longest). K 1 row from RS while AT THE SAME TIME dec 38-44-48-52-58-64 sts evenly = 130-140-154-170-186-204 sts. P 1 row from WS. Insert 1 marker 33-35-39-43-47-51 sts in from each side (= 64-70-76-84-92-102 sts between markers on back piece). Now divide the piece at both markers and work front and back piece separately. BACK PIECE: = 64-70-76-84-92-102 sts. READ ALL OF THE FOLLOWING SECTION BEFORE CONTINUING: Then work pattern according to diagram A.2 (1st row = RS) while AT THE SAME TIME on 1st row casting on 1 new st in each side (= edge st for seam) = 66-72-78-86-94-104 sts (work edge st in garter st). On next row from RS, beg inc for sleeves and cast on 2 new sts at the end of the next 2 rows. Repeat inc with 2 sts at the end of every row in each side 3 more times (= 4 inc in total in each side), then cast on 20-20-20-18-18-16 sts at the end of the next 2 rows = 122-128-134-138-146-152 sts – NOTE: Work the inc sts in the pattern. After last inc continue pattern as before but work the outermost 5 sts in each side in garter st (= sleeve edges). When piece measures 24-25-26-28-30-32 cm from marker where piece was divided, slip sts at beg of every row in each side on 1 stitch holder for diagonal shoulder as follows: Slip 5 sts on to holder 3 times in total (work sts before slipping them on holder to avoid cutting the thread) and slip 33-35-37-39-43-45 sts on to holder 1 time in each side – NOTE: Slip 1st st on left needle after the sts that have been slipped on 1 stitch holder, tighten thread, and continue to work. This is done to avoid big holes in the transitions. AT THE SAME TIME when piece measures 25-26-27-29-31-33 cm from where piece was divided, cast off the middle 22-24-26-26-26-28 sts for neck and finish each shoulder/sleeve separately. Then cast off 2 sts on next row from neck. When all sts have been cast off for neck and slipped on 1 stitch holder for diagonal shoulder, piece measures approx. 27-28-29-31-33-35 cm from marker where piece was divided and up to shoulder on the longest and approx. 66-68-70-72-74-76 cm from bottom edge on the longest. RIGHT FRONT PIECE: = 33-35-39-43-47-51 sts. READ ALL OF THE FOLLOWING SECTION BEFORE CONTINUING! Then work pattern according to diagram A.2 (1st row = RS) with 1 edge st in garter st in each side while AT THE SAME TIME on 1st row casting on 1 new st at the end of row towards the side (= edge st for seam) = 34-36-40-44-48-52 sts. On next row from RS beg inc for sleeve and cast on new sts at the end of every row from RS as on back piece = 62-64-68-70-74-76 sts. Continue pattern as before with 1 edge st in garter st towards mid front and 5 edge sts in garter st towards the side (= sleeve edge). When piece measures 21-22-23-24-26-28 cm from marker where piece was divided (jacket measures approx. 60-62-64-65-67-69 cm from bottom edge on the longest), slip the outermost 6-6-8-8-8-8 sts on 1 stitch holder for neck (work the sts before slipping them on the stitch holder). Continue to cast off for neck at the beg of every row from mid front as follows: 2 sts 3 times and 1 st 2 times. AT THE SAME TIME when piece measures approx. 24-25-26-28-30-32 cm – adjust according to back piece, slip sts on 1 stitch holder for diagonal shoulder from the side as on back piece. When all sts have been cast off for neck and slipped on 1 stitch holder, piece measures approx. 27-28-29-31-33-35 cm from marker where piece was divided and up to shoulder and approx. 66-68-70-72-74-76 cm from bottom edge on the longest. LEFT FRONT PIECE: Work as right but reversed, i.e. work 1st row from RS but cast on 1 new st at beg of 1st row (instead of end of 1st row = edge st for seam). And cast on new sts for sleeve at the end of every row from WS (instead of every row from RS). ASSEMBLY: Slip the 48-50-52-54-58-60 sts from stitch holder on one shoulder on circular needle size 4 mm and work as follows: K 1 row from RS - NOTE: To avoid holes in every transition where sts were slipped on stitch holder, pick up the thread between the 2 sts in the transition and K tog with 1st st on left needle. On next row loosely cast off all sts with K from WS. Repeat the same way along the 3 other shoulders. Sew shoulder seams inside cast off edge - make sure the seam is not tight. Sew underarm and side seams in one inside 1 edge st. LEFT BAND: Cast on 5 sts on needle size 3.5 mm with Delight. K 1 row (= RS) and turn piece. Work next row as follows (from WS): Pick up the outermost st in garter st at the neck line on left front piece (with WS towards you), work first st on left needle, pass the new st from left front piece over this st and K the rest of row, turn piece, K 1 row over all sts, turn piece. Then work as follows: * Pick up next st in garter st at the edge of left front piece (with WS towards you), work first st on left needle, pass the new st over and K the rest of row, turn piece, K 1 row over all sts, turn piece *, repeat these 2 rows from *-* until 1 st has been knitted up in approx. every st in garter st along the entire front edge on jacket. RIGHT BAND: Work as left but beg at the bottom of right front piece (with WS towards you). Dec in addition for 3-3-3-3-4-4 buttonholes on right band (dec for last buttonhole on neck edge). 1 buttonhole = K tog third and fourth st from edge and make 1 YO. Place bottom buttonhole in the transition between fans and lace pattern and upper buttonhole approx. 7-7-8-8-7-7 cm from neck line. Distribute the 1-1-1-1-2-2 remaining buttonholes evenly between upper and bottom buttonhole. NECK EDGE: Knit up from RS approx. 94 to 116 sts around the neck (incl sts on stitch holders at the front and also knit up sts over bands) on circular needle size 3.5 mm with Delight. Work in GARTER ST back and forth on needle. When 2 ridges have been worked, dec for last buttonhole over the other buttonholes on right band. Continue to work until neck edge measures approx. 2 cm and then loosely cast off with K from WS. Sew the buttons on to left front piece. |
|||||||||||||
Diagram explanations |
|||||||||||||
|
|||||||||||||
 |
|||||||||||||
 |
|||||||||||||
Have you finished this pattern?Tag your pictures with #dropspattern #evelynjacket or submit them to the #dropsfan gallery. Do you need help with this pattern?You'll find 15 tutorial videos, a Comments/Questions area and more by visiting the pattern on garnstudio.com. © 1982-2026 DROPS Design A/S. We reserve all rights. This document, including all its sub-sections, has copyrights. Read more about what you can do with our patterns at the bottom of each pattern on our site. |
|||||||||||||


With over 40 years in knitting and crochet design, DROPS Design offers one of the most extensive collections of free patterns on the internet - translated to 17 languages. As of today we count 324 catalogues and 12232 patterns translated into English (UK/cm).
We work hard to bring you the best knitting and crochet have to offer, inspiration and advice as well as great quality yarns at incredible prices! Would you like to use our patterns for other than personal use? You can read what you are allowed to do in the Copyright text at the bottom of all our patterns. Happy crafting!
Post a comment to pattern DROPS 148-37
We would love to hear what you have to say about this pattern!
If you want to leave a question, please make sure you select the correct category in the form below, to speed up the answering process. Required fields are marked *.