
Popular categories
Looking for a yarn?


|
|||||||||||||
Rubin |
|||||||||||||
 |
 |
||||||||||||
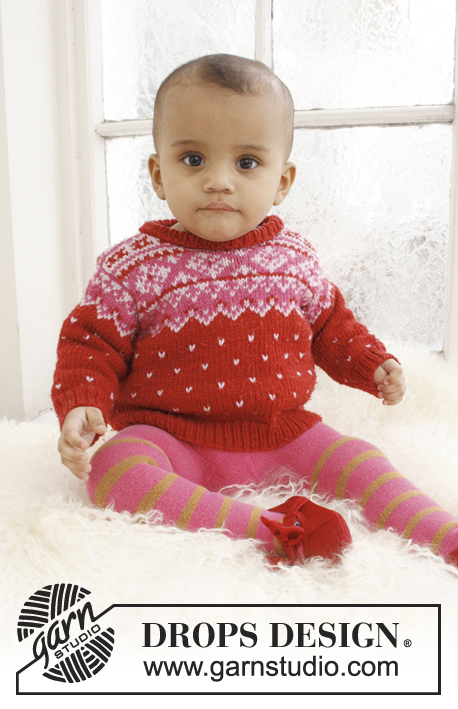
Knitted jumper with Nordic pattern for baby and children in DROPS Merino Extra Fine
DROPS Baby 21-18 |
|||||||||||||
|
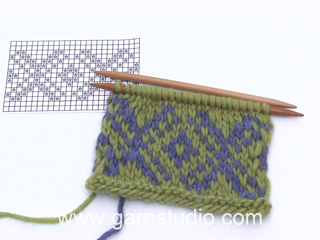
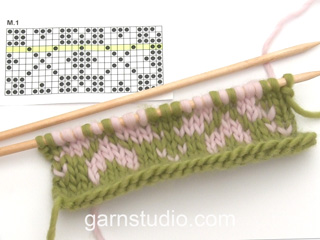
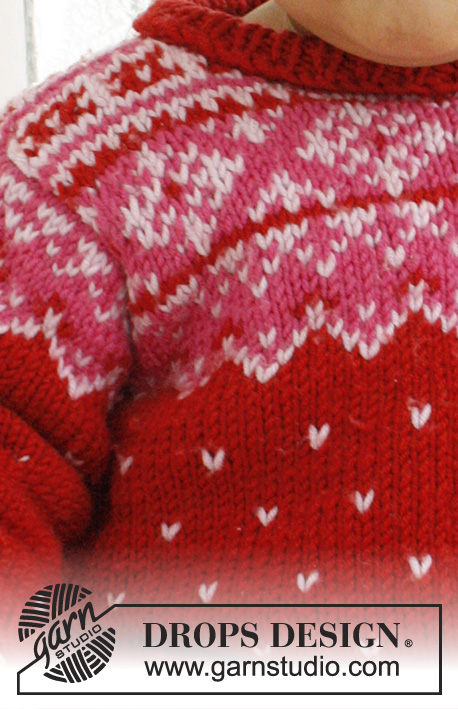
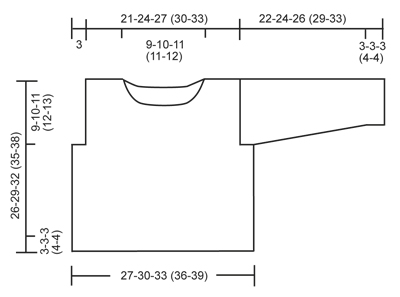
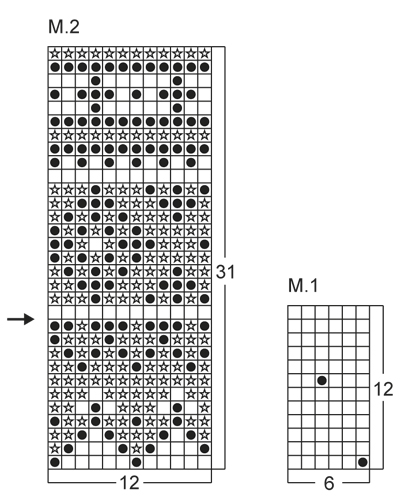
PATTERN: See diagrams M.1 and M.2. GARTER ST (back and forth on needle): K all rows. INCREASE TIP: Inc 1 st by making 1 YO, on next round K YO twisted (i.e. work in back loop of st instead front) to avoid holes. ---------------------------------------------------------- BODY: Worked in the round on circular needle. Cast on 108-120-132 (144-156) sts with red on circular needle size 4 mm. Continue to work rib as follows: * K 1, P 1 *, repeat from *-* for 3-3-3 (4-4) cm. Then switch to circular needle size 4.5 mm and continue in stocking st until finished measurements. When piece measures 4-6-4 (6-6) cm, insert a marker at beg of round and a marker after 54-60-66 (72-78) sts (= sides), and move the marker upwards. REMEMBER THE KNITTING TENSION! Then work diagram M.1 a total of 2-2-3 (3-4) times vertically. Then work rounds 1-6 in diagram M.1 1-1-1 (1-0) times, and rounds 1-3 in diagram M.2 (piece measures approx. 17-19-21 (23-25) cm). On next round (= 4th round in diagram M.2), cast off 10 sts in each side (i.e. 5 sts on each side of every marker), now divide the piece and finish each part separately. BACK PIECE: = 44-50-56 (62-68) sts. Now measure piece from here. Work next row (= RS) as follows: Work 1 st in garter st (= edge st), work 5th row in diagram M.2 until 1 st remains, finish with 1 st in garter st. Continue with diagram M.2 with 1 st in garter st in each side until piece measures 7-8-9 (10-11) cm (NOTE: Continue in stocking st with cerise after last row in diagram M.2 until finished measurements.) Cast off the middle 16-18-20 (20-22) sts for neck and finish each part separately. Cast off 1 st on next row from neck = 13-15-17 (20-22) sts remain on shoulder. When piece measures 9-10-11 (12-13) cm, cast off all sts (back piece measures approx. 26-29-32 (35-38) cm in length). FRONT PIECE: = 44-50-56 (62-68) sts. Now measure piece from here. Then continue in diagram M.2 with 1 st in garter st in each side as on back piece. When piece measures 5-6-7 (7-8) cm, cast off the middle 14-14-16 (16-18) sts for neck and finish each part separately. Then cast off on next row from neck as follows: Cast off 1 st 2-3-3 (3-3) times = 13-15-17 (20-22) sts remain on shoulder. When piece measures 9-10-11 (12-13) cm, cast off all sts. SLEEVE: Worked in the round on double pointed needles. Cast on 28-30-32 (34-36) sts with red on double pointed needles size 4 mm. Continue to work rib as follows: * K 1, P 1 *, repeat from *-* for 3-3-3 (4-4) cm. Now switch to double pointed needles size 4.5 mm. K next round while at the same time inc 2-0-4 (2-0) sts evenly = 30-30-36 (36-36) sts. READ ALL OF THE FOLLOWING SECTION BEFORE CONTINUING! Continue in stocking st until piece measures 4-4-6 (7-6) cm. Insert a marker at beg of round (= mid under sleeve) and move the marker upwards. Then work diagram M.1 upwards. When piece measures 5-5-7 (8-7) cm, inc 1 st on each side of marker - Read INCREASE TIP above = 2 new sts worked gradually in pattern. Repeat inc every 8½-5-6½ (4-3½) cm a total of 2-4-3 (5-7) times = 34-38-42 (46-50) sts. Work diagram M.1 a total of 3-3-3 (4-5) times vertically. Then work rounds 1-6 in diagram M.1 0-1-1 (0-0) times, and rounds 1-3 in diagram M.2. Now switch to circular needle size 4.5 mm while at the same time working 4th row in diagram M.2, then divide the piece at the marker and continue working back and forth on needle. On next row, inc 1 st in each side of piece (= 1 edge st in garter st), continue with diagram M.2 between edge sts up to and including the 11th row in diagram M.2 (marked with arrow on chart). With cerise cast off all sts on next row (piece measures approx. 22-24-26 (29-33) cm). ASSEMBLY: Sew shoulder seams and sew in sleeves. Knit up along neck edge approx. 60-70 sts with red on double pointed needles size 4 mm. K next round while at the same time adjusting no of sts to 60-62-66 (70-74). Continue to work rib as follows: * K 1, P 1 *, repeat from *-* for 3-3-3 (4-4) cm, then cast off all sts with K over K and P over P. Fold the rib double with the seam on in towards WS and fasten it on the back. |
|||||||||||||
Diagram explanations |
|||||||||||||
|
|||||||||||||
|
|||||||||||||
|
|||||||||||||
|
Have you made this or any other of our designs? Tag your pictures in social media with #dropsdesign so we can see them! Do you need help with this pattern?You'll find tutorial videos, a Comments/Questions area and more by visiting the pattern on garnstudio.com. © 1982-2024 DROPS Design A/S. We reserve all rights. This document, including all its sub-sections, has copyrights. Read more about what you can do with our patterns at the bottom of each pattern on our site. |
|||||||||||||


With over 40 years in knitting and crochet design, DROPS Design offers one of the most extensive collections of free patterns on the internet - translated to 17 languages. As of today we count 304 catalogues and 11422 patterns - 11422 of which are translated into English (UK/cm).
We work hard to bring you the best knitting and crochet have to offer, inspiration and advice as well as great quality yarns at incredible prices! Would you like to use our patterns for other than personal use? You can read what you are allowed to do in the Copyright text at the bottom of all our patterns. Happy crafting!
Comments / Questions (36)
Firstly thank you for sharing your beautiful free patterns. I am knitting size 2 and have a probem with the sleeve. With the back I made the armhole 12cm per the pattern. When I knitted the sleeve I worked up to row 11 of the pattern but the length of the sleeve from when its worked back and forth is only 5cm. I just can't figure out where I have gone wrong. Any assistance would be really appreciated. Regards Jeanette
21.04.2024 - 06:24DROPS Design answered:
Dear Jeanette, if you work according to the pattern it should all be correct. The part of the sleeve worked back and forth is sewn over the 10 sts cast off in the body in each side. The width of the top of the sleeve should have a circunference of 24cm to join it to the 12 cm armhole. Happy knitting!
22.04.2024 - 01:08Hva mener dere med går over 6 masker i M2… synes det er ufattelig dårlig forklart i både oppskrift og kommentarfeltet… Strikker 12/18 mnd . Og er i M2 bakstykket med 66 masker .. kan dere forklare med teskje ? 😅 Og hvilken farge skal kantmaskene i rille strikkes i?
23.01.2024 - 00:45DROPS Design answered:
Hej Kjerstin, vi kan slet ikke finde hvor du er i opskriften, hvor skriver vi går over 6 masker?
02.02.2024 - 13:37Stickarbaby21-18 får inte mönstret att stämma efter 12 varv varvar från höger o vanster sida vartannat varv men får inte mönstret att stämma har stickat om så många gångerär ingen nybörjare på att sticka men....snart ger jag upp
16.09.2023 - 11:56DROPS Design answered:
Hei Gun. Når du har felt til ermhull og har xx antall masker i den str du strikker, så pass på at mønstret stemmer overens og at det strikkes 1 masker i riller i hver side. I f.eks 1/3 mnd har du felt de første 5 maskene og starter da med 1 maske rille i 6. maske i diagram M.2. Så strikker du de neste 6 maskene i M.1 + M.1+M.1+M.1 + 1 maske i rille = 44 masker. mvh DROPS Design
26.09.2023 - 11:35Hej! Jag stickar tröjan i storlek 12/18 månader. Enligt mönstret ska det räcka med 100 g i det röda, men för mig gick det garnet åt till fram- och bakstycke. Mvh Annica
24.02.2023 - 11:18Jeg strikker str. 12/18 mrd. Jeg er igang med at strikket ryg & forstyr og skal til at strikke M2, men der er 66 masker på både ryg og forstyr og diagrammet har 12 masker og det går ikke op. Hvad skal man gøre?
01.09.2022 - 20:09DROPS Design answered:
Hej Pia, jo men de første omgange i M.2 går mønsterrapporten kun over 6 masker :)
02.09.2022 - 14:41When I divide the jumper to do the back and front separately do I continue to use a circular needle or change to straight needles doing knit and purl rows as right side is mentioned. It doesn’t mention a needle change . Also do I put the front stitches on a holder whilst doing the back?
03.07.2021 - 20:16DROPS Design answered:
Dear Avril, actually it is up to you. You can leave half of the stitches on the needle, and keep knitting on the other half. If you find this uncomfortable, you can put half of the stitches on a stitch-holder, a piece of therad, or another circular needle. Happy Knitting!
04.07.2021 - 00:42Hello, I am a little bit confused, I got to the part where I cast off and then the piece is divided into front and back. Im making the size12-18month. How to follow M2 as I have 56sts and the pattern is a repeat of 12sts I have 8 stst left the design won't be even? Even with the garter stich its not even, and is the garter stitch knitted with the main colour?
15.04.2021 - 14:02DROPS Design answered:
Dear Nora, contine M.é so that the first stitch xorked in M.2 is lined up over the previous stitvh in M.2 that shouldn't be the 1st one anymore; ie start 1st repat frm that st to the left, repeat deiagram as before over the next sts; note the last st on row worked in M.2; this will be the first st to work from WS (reading diagram from the left towards the right). Happy knitting!
15.04.2021 - 15:22Hei, jeg ser at i oppskriften for 6/9 mnd. Så skal en starte med 30 m vrangbord og avslutte med 24 m. Dette får jeg ikke til å stemme, håndleddet er jo ikke mindre enn selve skulderen, det er motsatt. Den er ikke kompatibel med bolen der en ifølge oppskriften skal avslutte skulderen med 60 m, som siden skal monteres fast til 24 m. Fint om dere kan ta en ny gjennomgang av oppskriften. Mvh Paula
30.08.2020 - 11:24DROPS Design answered:
Hej Paula, jo men det stemmer, du må tælle hele omkredsen på ærmet med. Ærmet er strikket med en lille ærmekuppel, så siderne på ærmekuplen skal sidde rundt i ærmegabet. Husk at du skal lukke løst af. God fornøjelse!
02.09.2020 - 14:32Varför ska man dela på ärmen mitt under? Och hur är tanken att man ska man fästa ärmarna i oket?
26.03.2020 - 15:16DROPS Design answered:
Hei Johanna. Man deler ermene mitt under, slik at det blir en bedre passform på ermene /genseren, se evnt målskissen hvordan det er tenkt. Ermene sys fast i bolen med pene sting. Se gjerne på hjelpevideoene til oppskriften. God Fornøyelse!
30.03.2020 - 14:02Nu har jag stickat bakstycket och höger axel,. Hur är tanken att man ska få över garntrådarna till vänster axel? Måste man klippa av trådarna och "börja om" på vänster axel? Eller finns det något smidigare sätt?
22.03.2020 - 08:19DROPS Design answered:
Hej Ja efter att du stickat höger axel färdig får du klippa av tråden och sticka den andra axeln. Mvh DROPS Design
25.03.2020 - 11:36