DROPS SS24

Monaco

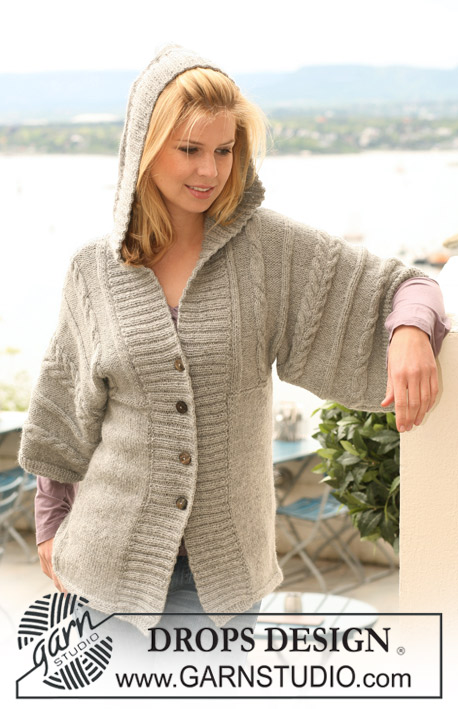
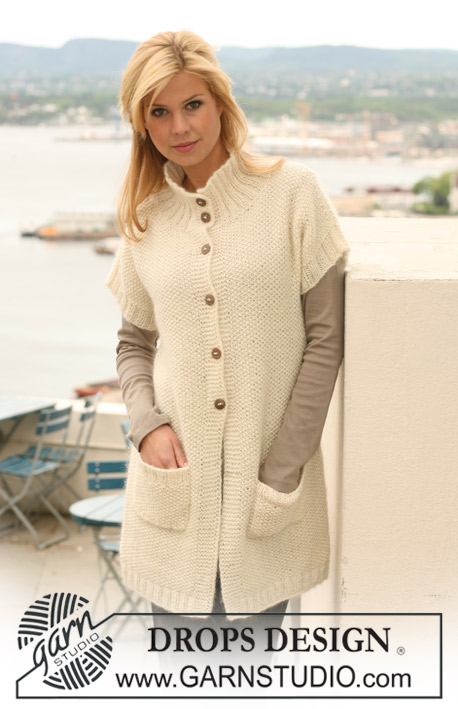
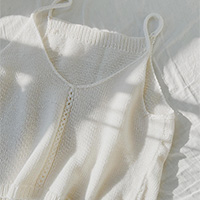
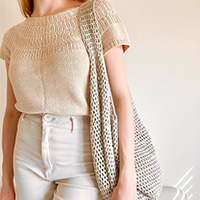
Knitted DROPS jacket with short sleeves and lace pattern in ”Classic Alpaca” or "Puna". Size S - XXXL.

DROPS 125-28
DROPS design: Pattern no AC-018
--------------------------------------------------------
Size: S - M - L - XL - XXL - XXXL
Materials: DROPS CLASSIC ALPACA from Garnstudio
450-500-550-600-700-750 g colour no 0517m, eco medium grey mix

Or use:
DROPS PUNA from Garnstudio
400-450-450-500-600-650 g colour no 06, grey

DROPS CIRCULAR NEEDLE (80 cm) size 4 mm - or size needed to get 21 sts x 28 rows in stocking st = 10 x 10 cm.
DROPS CIRCULAR NEEDLE size 6 mm - for neckline.
DROPS SHELL BUTTON, no 525:
6-6-6-6-7-7 pcs.
1 press button for neckline.

-------------------------------------------------------

Alternative Yarn – See how to change yarns here
Yarn Groups A to F – Use the same pattern and change the yarn here
Yarn usage using an alternative yarn – Use our yarn converter here

-------------------------------------------------------

Pattern instructions

NOTE: This pattern is written in British English. All measurements in charts are in cm. For conversion from cm to inches - click here. There are different terms for crocheting in British and American English. If this pattern includes crochet, click for "crochet terms" here. For this pattern in American English, please click here.
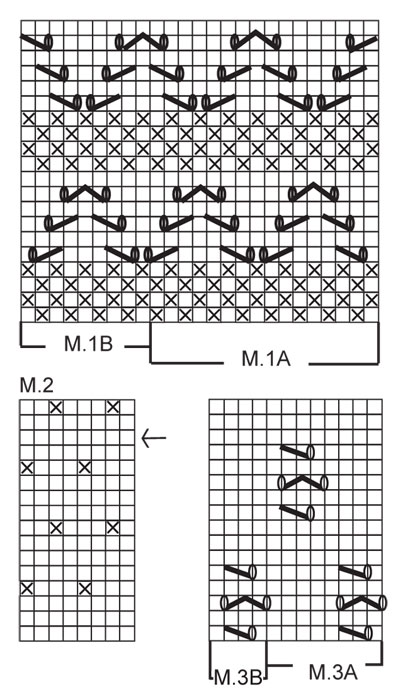
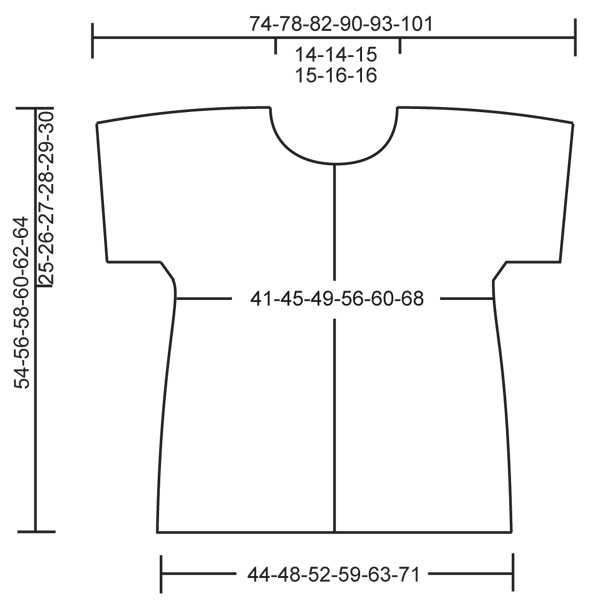
GARTER ST (back and forth on needle): K all rows.

PATTERN:
See diagram M.1 to M.3. Diagram shows the pattern from RS and row 1 in diagram = RS.

BUTTONHOLES:
Make buttonholes on right front band.
1 buttonhole = K tog second and third st from the edge and make 1 YO.
Make buttonholes when piece measures:
SIZE S: 8, 15, 22, 29, 36 and 43 cm
SIZE M: 8, 15, 23, 30, 38 and 45 cm
SIZE L: 9, 17, 24, 32, 39 and 47 cm
SIZE XL: 9, 17, 25, 33, 41 and 49 cm
SIZE XXL: 9, 16, 23, 30, 37, 44 and 51 cm
SIZE XXXL: 11, 18, 25, 32, 39, 46 and 53 cm
--------------------------------------------------------

BODY PIECE:
Worked back and forth on circular needle from mid front – REMEMBER BUTTONHOLES ON RIGHT FRONT BAND – see above.
Cast on 195-211-227-259-275-307 sts (includes 5 front band sts each side towards front edge) on circular needle size 4 mm with Classic Alpaca or Puna. Work 10 rows GARTER ST – see above (row 1 = RS). Work next row as follows from RS: 5 front band sts in garter st, M.1A until 14 sts remain, work M.1B (= 9 sts) and finish with 5 front band sts in garter st. Continue in pattern like this. REMEMBER THE KNITTING TENSION! When piece measures approx 23 cm - finish after a full vertical repeat of M.1 – K 4 rows with front bands in garter st (row 1 = RS) AT THE SAME TIME dec 3 sts evenly on first and 3rd row (do not dec on front bands) = 189-205-221-253-269-301 sts. Now work M.2 with 5 front band sts in garter st each side. When you have knitted row marked with arrow in M.2 in diagram work 4 rows garter st on all sts (row 1 = RS) – AT THE SAME TIME on row 1 dec 4 sts evenly and on row 3 dec 3 sts evenly (do not dec on front bands) = 182-198-214-246-262-294 sts. After the garter st rows slip the 49-53-57-65-69-77 sts each side towards mid front on separate stitch holders = 84-92-100-116-124-140 sts left on needle for back piece.

BACK PIECE:
= 84-92-100-116-124-140 sts. READ ALL OF THE FOLLOWING SECTION BEFORE CONTINUING!
Cast on 1 new st each side (= for seam) = 86-94-102-118-126-142 sts. AT THE SAME TIME work next row as follows from RS: 1 edge st, M.3A until 5 sts remain, M.3B (= 4 sts) and finish with 1 edge st.
AT THE SAME TIME cast on 1 new st at the end of the first 2 rows in M.3. Repeat the inc at the end of every row each side a total of 4-4-4-6-6-7 times, then cast on 31-31-31-29-29-28 sts at the end of the next 2 rows = 156-164-172-188-196-212 sts – NOTE: work inc sts in stocking st until all inc are complete. Now continue as follows: 4 garter sts (= sleeve edge), M.3A until 8 sts remain, M.3B (= 4 sts) and finish with 4 garter sts (= sleeve edge).
When piece measures 42-44-46-48-50-52 cm – adjust to after 1 or 3 rows stocking st after a row with hole – work 4 rows garter st on all sts (row 1 = RS). Now work M.2 with 4 garter sts each side until finished measurements.
READ ALL OF THE FOLLOWING SECTION BEFORE CONTINUING!
AT THE SAME TIME when piece measures 51-53-55-57-59-61 cm slip sts at the beg of every row each side on a stitch holder for shaped shoulder as follows: 10-10-11-13-14-15 sts 4-3-3-4-3-3 times (work sts before slipping them on stitch holder to avoid having to cut the thread), 0-13-12-0-13-16 sts 1 time and then 23-24-25-26-26-28 sts 1 time – NOTE: when slipping sts on stitch holder, slip the first st on next row and tighten thread before continuing to avoid holes in transition. AT THE SAME TIME when piece measures 52-54-56-58-60-62 cm cast off the middle 26-26-28-28-30-30 sts for neck and complete each shoulder/sleeve separately. Cast off 2 sts on next row from neck. When all sts have been slipped on stitch holder and dec for neck are complete piece measures approx 54-56-58-60-62-64 cm from bottom edge to shoulder.

RIGHT FRONT PIECE:
= 49-53-57-65-69-77 sts. READ ALL OF THE FOLLOWING SECTION BEFORE CONTINUING!
Cast on 1 new st towards the side (= for seam) = 50-54-58-66-70-78 sts.
Work next row as follows from RS: 5 front band sts in garter st, M.3A (IN SIZE S + L + XL repeat M.3A until 5 sts remain, finish with M.3B (= 4 sts) and 1 edge st. IN SIZE M + XXL + XXXL repeat M.3A until 1 st remain, finish with 1 edge st).
AT THE SAME TIME cast on new sts at the end of every row towards the side as described for back piece = 85-89-93-101-105-113 sts. Continue pattern with 5 front band sts in garter st towards front edge and 4 garter sts towards the side (= sleeve edge).
When piece measures approx 42-44-46-48-50-52 cm – adjust to back piece - work 4 rows garter st on all sts, then work M.2 with 5 front band sts in garter st towards front edge and 4 garter sts towards the side.
AT THE SAME TIME when piece measures 48-50-52-54-56-58 cm slip the 12-12-13-13-14-14 sts towards mid front on a stitch holder for neck. Cast off to shape the neckline at the beg of every row from mid front as follows: 3 sts 1 time, 2 sts 2 times and 1 st 3 times.
AT THE SAME TIME when piece measures 51-53-55-57-59-61 cm slip sts on a stitch holder for shaped shoulder from the side as described for back piece. When all sts have been slipped on stitch holder and dec for neck are complete piece measures approx 54-56-58-60-62-64 cm from bottom edge to shoulder.

LEFT FRONT PIECE:
Like right front piece but mirrored. NOTE: Do not make buttonholes!

ASSEMBLY:
Slip the 63-67-70-78-81-89 sts from stitch holder on one shoulder on circular needle size 4 mm and work back and forth as follows: K 1 row from RS – NOTE: To avoid a hole in transition pick up 1 st between the 2 sts in transitions and K this tog with first st on left needle. Cast off loosely on next row with K sts from WS. Repeat in the same way along the 3 other shoulder pieces. Sew shoulder seams inside cast off row – make sure seam isn’t too tight. Sew under arm seams inside 1 edge st. Sew buttons on left front piece.

NECKLINE:
Pick up from RS approx 70 to 85 sts round neck (includes sts from stitch holders at front) on circular needle size 6 mm with 2 strands Classic Alpaca or Puna. Work GARTER ST back and forth on needle until neckline measures approx 7-7-8-8-9-9 cm, then cast off loosely with K from WS. Sew the press button at the top of neckline to keep it in place.

Diagram

symbols = K from RS, P from WS
symbols = P from RS, K from WS
symbols = 1 YO between 2 sts
symbols = slip 1 st as if to K, K1, psso
symbols = K2 tog
symbols = slip 1 st as if to K, K2 tog, psso
diagram
diagram

Each of our patterns has specific tutorial videos to help you.

Do you have a question? See a list of frequently asked questions (FAQ)

Knitting tension is what determines the final measurements of your work, and is usually measured per 10 x 10 cm. It is provided like so: number of stitches in width x number of rows in height - eg: 19 stitches x 26 rows = 10 x 10 cm.

The knitting tension is very individual; some people knit/crochet loosely while others work tightly. You adjust the knitting tension with the needle size, which is why the suggested needle size is only meant as a guide! You need to adjust this (up or down) to ensure that YOUR knitting tension matches the knitting tension provided in the pattern. If you work with a different knitting tension than provided you will have a different yarn consumption, and your work will have different measurements than what the pattern suggests.

The knitting tension also determines which yarns can replace each other. As long as you achieve the same knitting tension you can replace one yarn with another.

See DROPS lesson: How to measure your tension/gauge

See DROPS video: How to make a gauge tension swatch

The required amount of yarn is provided in grams, eg: 450 g. To calculate how many balls you’ll need you first need to know how many grams are in 1 ball (25g, 50g or 100g). This information is available if you click on the individual yarn quality on our pages. Divide the amount required with the amount of each ball. For example, if each ball is 50g (the most common amount), the calculation will be as follows: 450 / 50 = 9 balls.

The important thing when changing from one yarn to another is that the knitting/crochet tension remains the same. This is so that the measurements of the finished piece will be the same as on the sketch provided. It is easier to achieve the same knitting tension using yarns from the same yarn group. It is also possible to work with multiple strands of a thinner yarn to achieve the knitting tension of a thicker one. Please try our yarn converter. We recommend you to always work a test swatch.

Please NOTE: when changing yarn the garment might have a different look and feel to the garment in the photo, due to individual properties and qualities of each yarn.

See DROPS lesson: Can I use a different yarn than the one mentioned in the pattern?

All our yarns are categorised into yarn groups (from A to F) according to thickness and knitting tension – group A contains the thinnest yarns and group F the thickest. This makes it easier for you to find alternative yarns to our patterns, should you wish to switch yarn. All yarns within the same group have a similar knitting tension and can easily replace each other. However, different yarn qualities have different structures and properties which will give the finished work a unique look and feel.

Click here for an overview of the yarns in each yarn group

At the top of all our patterns you’ll find a link to our yarn calculator, which is a helpful tool should you wish to use a different yarn than suggested. By filling in the yarn quality you wish to replace, the amount (in your size) and number of strands, the calculator will present good alternative yarns with the same knitting tension. Additionally it will tell you how much you’ll require in the new qualities and whether you’ll need to work with multiple strands. Most skeins are 50g (some are 25g or 100g).

If the pattern is worked with multiple colours, every colour will have to be calculated separately. Similarly, if the pattern is worked with several strands of different yarns (for example 1 strand Alpaca and 1 strand Kid-Silk) you will have to find alternatives for each, individually.

Click here to see our yarn calculator

Since different yarns have different qualities and textures we have chosen to keep the original yarn in our patterns. However, you can easily find options among our available qualities by using our yarn calculator, or simply pick a yarn from the same yarn group.

It is possible that some retailers still have discontinued yarns in stock, or that someone has a few skeins at home that they would like to find patterns for.

The yarn calculator will provide both alternative yarn as well as required amount in the new quality.

If you think it's hard to decide what size to make, it can be a good idea to measure a garment you own already and like the size of. Then you can pick the size by comparing those measures with the ones available in the pattern's size chart.

You'll find the size chart at the bottom of the pattern.

See DROPS lesson: How to read size chart

The needle size provided in the pattern serves only as a guide, the important thing is to follow the knitting tension. And since knitting tension is very individual, you will have to adjust the needle size to ensure that YOUR tension is the same as in the pattern – maybe you’ll have to adjust 1, or even 2 needle sizes, up or down to achieve the correct tension. For this, we recommend that you work test swatches.

Should you work with a different knitting tension than the one provided, the measurements of the finished garment might deviate from the measurement sketch.

See DROPS lesson: How to measure your tension/gauge

See DROPS video: How to make a tension/gauge swatch

Working a garment top-down provides more flexibility and room for personal adjustment. For example it is easier to try the garment on while working, as well as making adjustments to length of yoke and shoulder caps.

The instructions are carefully explaining every step, in the correct order. Diagrams are adjusted to the knitting direction and are worked as usual.

The diagram depicts all rows/rounds, and every stitch seen from the right side. It is read from bottom to top, from right to left. 1 square = 1 stitch.

When working back and forth, every other row is worked from the right side and every other row is worked from the wrong side. When working from the wrong side, the diagram will have to be worked reversed: from left to right, knit stitches are purled, purl stitches are knit etc.

When working in the round every round is worked from the right side and the diagram are worked from right to left on all rounds.

See DROPS lesson: How to read knitting diagrams

The diagram depicts all rows/rounds, and every stitch seen from the right side. It is worked from bottom to top, from right to left.

When working back and forth every other row is worked from the right side: from right to left and every other row is worked from the wrong side: from left to right.

When working in the round, every row in the diagram are worked from the right side, from right to left.

When working a circular diagram you start in the middle and work your way outwards, counter clockwise, row by row.

The rows usually start with a given number of chain stitches (equivalent to the height of the following stitch), this will either be depicted in the diagram or explained in the pattern.

See DROPS lesson: How to read crochet diagrams

Instructions for working several diagrams after each other on the same row/round, will often be written like so: “work A.1, A.2, A.3 a total of 0-0-2-3-4 times". This means you work A.1 once, then A.2 is worked once, and A.3 is repeated (in width) the number of times provided for your size – in this case like so: S = 0 times, M = 0 times, L=2 times, XL= 3 times and XXL = 4 times.

The diagrams are worked as usual: begin with the first row in A.1, then work the first row in A.2 etc.

See DROPS lesson: How to read knitting diagrams

See DROPS lesson: How to read crochet diagrams

The total width of the garment (from wrist-to-wrist) will be larger in the larger sizes, despite the actual sleeves being shorter. The larger sizes have longer sleeve caps and wider shoulders, so there will be a good fit in all sizes.

The measurement sketch/schematic drawing provides information regarding the full length of the garment. If it’s a jumper or a jacket the length is measured from the highest point on the shoulder closest to the neckline, and straight down to the bottom of the garment. It is NOT measured from the tip of shoulder. Similarly, the length of yoke is measured from the highest point on the shoulder and down to where yoke is split into body and sleeves.

On a jacket measures are never taken along bands, unless specifically stated. Always measure inside band stitches when measuring the length.

See DROPS lesson: How to read a schematic drawing

Diagrams are often repeated on the round or in height. 1 repeat is the diagram the way it appears in the pattern. If it says to work 5 repeats of A.1 in the round, then you work A.1 a total of 5 times after/next to each other in the round. If it says to work 2 repeats of A.1 vertically/in height you work the entire diagram once, then begin again at the start and work the entire diagram one more time.

Chain stitches are slightly narrower than other stitches and to avoid working the cast-on edge too tight, we simply chain more stitches to begin with. The stitch count will be adjusted on the following row to fit the pattern and measurement sketch.

The rib edge is more elastic and will contract slightly compared to, for example, stocking stitch. By increasing before the rib edge, you avoid a visible difference in width between the rib edge and the rest of the body.

It’s very easy to cast off too tightly, and by making yarn overs while casting off (and simultaneously casting these off) you avoid a too tight cast off edge.

See DROPS video: How to bind off with yarn overs (yo)

To achieve an even increase (or decrease) you can increase on, for example: every 3rd and 4th row alternately, like so: work 2 rows and increase on the 3rd row, work 3 rows and increase on the 4th. Repeat this until the increase is complete.

See DROPS lesson: Increase or decrease 1 st on every 3rd and 4th row alternately

Should you prefer to work in the round instead of back and forth, you may of course adjust the pattern. You’ll need to add steeks mid-front (usually 5 stitches), and follow the instructions. When you would normally turn and work from the wrong side, simply work across the steek and continue in the round. At the end you’ll cut the piece open, pick up stitches to work bands, and cover the cut edges.

See DROPS video: How to knit steeks and cut open

Should you prefer to work back and forth instead of in the round, you may of course adjust the pattern so you work the pieces separately and then assemble them at the end. Divide the stitches for the body in 2, add 1 edge stitch in each side (for sewing) and work the front and back pieces separately.

See DROPS lesson: Can I adapt a pattern for circular needles into straight needles?

Pattern repeats can vary slightly in the different sizes, in order to get the correct proportions. If you’re not working the exact same size as the garment in the photo, yours might deviate slightly. This has been carefully developed and adjusted so that the complete impression of the garment is the same in all sizes.

Make sure to follow instructions and diagrams for your size!

If you have found a pattern you like which is available in women’s size it’s not very difficult to convert it to men’s size. The biggest difference will be the length of sleeves and body. Start working on the women size that you think would fit across the chest. The additional length will be worked right before you cast off for the armhole/sleeve cap. If the pattern is worked top-down you can add the length right after the armhole or before the first decrease on sleeve.

Regarding additional yarn amount, this will depend on how much length you add, but it is better with a skein too many than too few.

All yarns will have excess fibres (from production) that might come off as lint or shedding. Brushed yarns (ie hairier yarns) have more of these loose, excess fibres, causing more shedding.

Shedding also depends on what is worn under or over the garment, and whether this pulls at the yarn fibres. It’s therefore not possible to guarantee that there will be no shedding

Below are some tips on how to get the best result when working with hairier yarns:

1. When the garment is finished (before you wash it) shake it vigorously so the looser hairs come off. NOTE: do NOT use a lint roller, brush or any method that pulls at the yarn.

2. Place the garment in a plastic bag and put it in your freezer - the temperature will cause the fibres to become less attached to each other, and excess fibres will come off easier.

3. Leave in the freezer for a few hours before taking it out and shaking it again.

4. Wash the garment according to the instructions on the yarn label.

Pilling is a natural process that happens to even the most exclusive of fibers. It's a natural sign of wear and tear that is hard to avoid, and that is most visible in high friction areas of your garment like a sweater's arms and cuffs.

You can make your garment look as new by removing the pilling, using a fabric comb or a pill/lint remover.

Still can't find the answer you need? Then scroll down and leave your question so one of our experts can try to help you. This will be done normally within 5 to 10 working days.
In the meantime, you can read the questions and answers that others have left to this pattern or join the DROPS Workshop on Facebook to get help from fellow knitters/crocheters!

You might also like...

Post a comment to pattern DROPS 125-28

We would love to hear what you have to say about this pattern!

If you want to leave a question, please make sure you select the correct category in the form below, to speed up the answering process. Required fields are marked *.

Comments / Questions (76)

country flag Ruth wrote:

Liebes Drops-Team Ich komme bei Rückenteil ab 55cm (GrößeL) nicht weiter. Muss ich Hin-Reihe 11M stricken und dann diese auf HilfsFaden(HF). R zu Ende Stricken, wenden. Rückreihe 11M stricken, auf HF, Stricken bis zu den M auf HF und davor wenden. Hin-R 11M Stricken, auf HF (= 3x11M auf HF), R bis zu den M auf HF zu Ende stricken, wenden. Rück-R 12M str, auf HF, R zu Ende str, wenden. Hin-R 25M str, auf HF. Muss ich das so stricken??? Danke für Ihre Hilfe!

05.06.2021 - 20:13

DROPS Design answered:

Liebe Ruth, so sollen Sie stricken: *Hin-Reihe 11M stricken und dann diese auf HilfsFaden(HF). R zu Ende Stricken, wenden. Rückreihe 11M stricken, auf HF, Stricken bis zu den M auf HF und davor wenden.* und von *-* noch 2 Mal stricken (= es sind 3 Mal 11 Maschen auf der Hilfsfaden beidseitig und nächstes Mal noch 12 M am Anfang beide Reihen - beachten Sie, daß den Halsausschnitt auch gleichzeitig gestrickt wird. Viel Spaß beim stricken!

07.06.2021 - 08:24

country flag Anna Marie wrote:

I'd like to make this with long sleeves, just as Gunilla asked in Swedish. Google translate didn't quite give me what I needed to know. Could you explain again in English, please? Thanks!

16.07.2018 - 16:03

DROPS Design answered:

Dear Anna Marie, you can adjust the length of the sleeves as you'd like to - adjust the number of sts to cast on on sleeve depending on how long you'd like the sleeve to. For any individual assistance you are welcome to contact your DROPS store, even per mail or telephone. Happy knitting!

16.07.2018 - 16:15

country flag Gunilla wrote:

Jättefin kofta, men jag vill sticka den med långa ärmar. Kan man det?

16.03.2013 - 10:06

DROPS Design answered:

Ja, det kan du godt. Du skal da saette flere masker op til aerme. Du kan beregne din laengde med stickfastheten (masker per 10 cm).

30.05.2013 - 12:24

country flag DROPS Deutsch wrote:

In diesem Rapport werden die 3 letzten Reihen in M2 nicht gestrickt. Weiter oben strickt man dann alle Reihen in M2.

08.09.2011 - 08:18

country flag Gabi wrote:

Wenn ich in der Anleitung beim Muster M2 nur bis Pfeil stricken soll, wozu sind dann noch die 3 weiteren Reihen. Hinterher noch dran stricken ??? Wäre schön wenn ihr mir das erklären könnt. Danke

07.09.2011 - 18:38

country flag DROPS Design wrote:

Lo celebramos contigo Angeles, y nos encantaría verlo. Cuando quieras puedes subir una foto en nuestra página de Facebook. Saludos cariñosos! :)

31.03.2011 - 00:43

country flag Angeles wrote:

Lo he hecho con la misma lana recomendada y he seguido el patron tal cual , me ha quedado perfecto encuanto ha medidas como forma. Muchas gracias por todo las eplicaciones muy facil de seguir y de entender

30.03.2011 - 12:38

country flag DROPS Design wrote:

Gorgana, it just says that the inc sts each side are for the sleeves, and that the inc sts are worked in stockinette. For further help please contact the shop where you bought the yarn.

15.03.2011 - 16:45

country flag DROPS Design wrote:

It deepens on which size you are knitting.

15.03.2011 - 12:32

Gorgana wrote:

Can someone please explain in english.I'm having problems that the lady Tanne have but can't understand german can someone help please

15.03.2011 - 07:22