
Popular categories
Looking for a yarn?


|
|
Ruby Dear |
|
 |
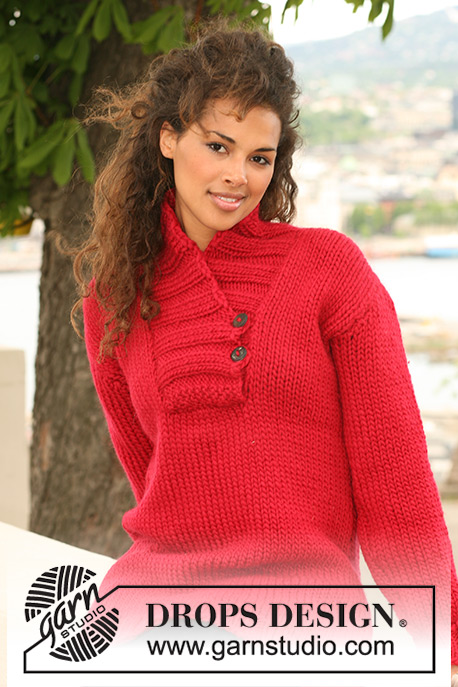 |
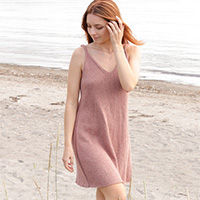
DROPS jumper in ”Snow”. Sizes S - XXXL
DROPS 122-5 |
|
|
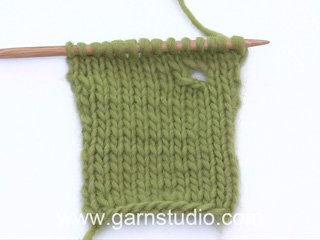
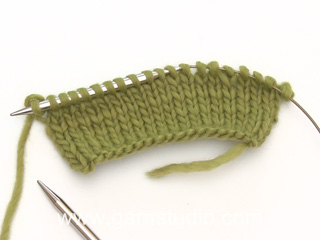
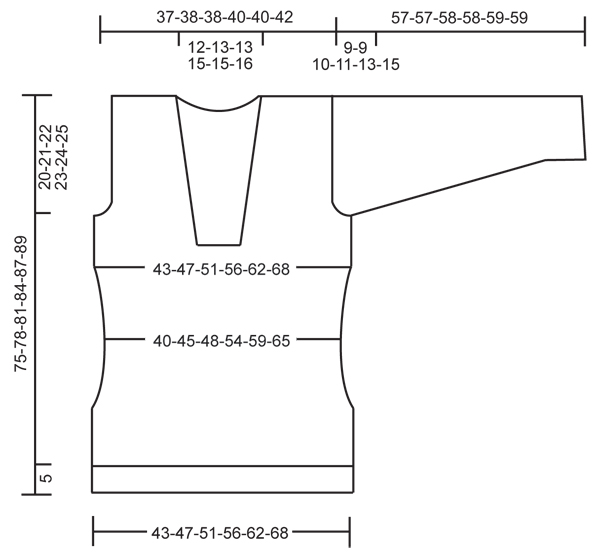
INCREASING TIP: Inc by making 1 YO. On next row K YO into back of loop to avoid a hole. -------------------------------------------------------- BODY PIECE: Worked in the round. Cast on 114-126-138-150-168-186 sts on circular needle size 7 mm with Snow. Work rib K3/P3 until piece measures 5 cm. K 1 round, AT THE SAME TIME dec 20-22-26-26-32-36 sts evenly = 94-104-112-124-136-150 sts. Change to circular needle size 8 mm. Insert a marker at beg of round and 1 marker after 47-52-56-62-68-75 sts (= to mark the sides).Continue in stocking st in the round. REMEMBER THE KNITTING TENSION! When piece measures approx 23-24-25-26-27-27 cm dec 1 st BEFORE each marker = 92-102-110-122-134-148 sts. Continue until piece measures 42-44-45-47-48-49 cm. Now dec 1 st AFTER each marker = 90-100-108-120-132-146 sts. Continue until piece measures 47-48-49-50-51-52 cm. Now cast off the middle 11-12-12-14-14-15 sts on front piece and continue back and forth on needle. AT THE SAME TIME when piece measures 48-50-51-53-54-55 cm inc 1 st BEFORE each marker – See INCREASING TIP - and when piece measures 51-53-55-57-58-59 cm inc 1 st AFTER each marker = 83-92-100-110-122-135 sts. When piece measures 55-57-59-61-63-64 cm cast off 6 sts each side for armhole (i.e. 3 sts each side of marker) and complete each piece separately. BACK PIECE: = 41-46-50-56-62-69 sts. Continue in stocking st back and forth on needle, AT THE SAME TIME cast off for armhole at beg of every row each side: 2 sts 0-1-1-2-4-5 times and 1 st 0-0-2-2-1-2 times = 41-42-42-44-44-45 sts. Continue back and forth until piece measures 73-76-79-82-85-87 cm. Now cast off the middle 13-14-14-16-16-17 sts for neck and complete each shoulder separately = 14 sts left on shoulder. Continue until piece measures 75-78-81-84-87-89 cm. Cast off. LEFT FRONT PIECE: = 15-17-19-21-24-27 sts. Continue back and forth on needle and cast off for armhole at the side as described for back piece = 15 sts. Continue until piece measures approx 67-70-73-76-79-81 cm. Now cast off 1 st towards neck = 14 sts left on shoulder. Continue until piece measures 75-78-81-84-87-89 cm. Cast off. RIGHT FRONT PIECE: Like left front piece, but mirrored. SLEEVE: Worked in the round. Cast on 30-30-36-36-36-36 sts on double pointed needles size 7 mm with Snow. Work rib K3/P3. When rib measures 7 cm K 1 round, AT THE SAME TIME dec 4-4-7-7-7-5 sts evenly = 26-26-29-29-29-31 sts. Insert a marker in the first st at beg of round = mid under sleeve. Change to double pointed needles size 8 mm. Continue in the round in stocking st. When piece measures 9 cm inc 2 sts mid under sleeve (= 1 st each side of st with marker). Repeat the inc on every 6.5-5-5-4-3-3 cm a total of 6-8-8-9-11-11 times = 38-42-45-47-51-53 sts. Continue until piece measures 48-48-48-47-46-44 cm (NOTE! less for the larger sizes because of longer sleeve cap and wider shoulder). Now cast off 6 sts mid under sleeve and complete piece back and forth on needle. AT THE SAME TIME cast off for sleeve cap at beg of every row each side: 2 sts 1-2-2-2-2-2 times and 1 st 3-2-1-2-4-5 times, then 2 sts each side until piece measures 56-56-57-57-58-58 cm. Now cast off 3 sts 1 time each side and cast off remaining sts. ASSEMBLY: Sew shoulder seams. Set in sleeves. COLLAR: Beg mid front to the right of sts cast off on front piece. Pick up 95 to 135 sts from RS on circular needle size 7 mm. Pick up sts up to shoulder, round neck on back piece and down along left side to where sts were cast off. K 1 row from WS and K 1 row from RS, AT THE SAME TIME adjust no of sts to 99-105-111-117-123-129. Continue in rib as follows (from WS): 3 garter sts (= K on every row), P3, * K3, P3 *, repeat from *-* and finish with 3 garter sts. Continue like this until rib measures approx 8-8-8-9-9-9 cm. Now inc (from RS) 1 st in each of the middle 6-6-6-7-7-7 K-sections (i.e. along neckline on back piece) = 105-111-117-124-130-136 sts. Continue until rib measures approx 12-13-13-15-15-16 cm. On next row from RS make 2 buttonhole loops at the bottom on right side of collar as follows: work 3 garter sts, K3, P3, cast on 3 new sts, K3, P3, cast on 3 new sts, continue with K over K and P over P as before to end. Work 1 row from WS (K the new sts). Now cast off all sts with K over K and P over P. Place the 2 sides of collar over each other (right over left) at the bottom of neck opening and fasten through both layers. Sew buttons on left side of collar. |
|
|
|
|
Have you made this or any other of our designs? Tag your pictures in social media with #dropsdesign so we can see them! Do you need help with this pattern?You'll find tutorial videos, a Comments/Questions area and more by visiting the pattern on garnstudio.com. © 1982-2024 DROPS Design A/S. We reserve all rights. This document, including all its sub-sections, has copyrights. Read more about what you can do with our patterns at the bottom of each pattern on our site. |
|


With over 40 years in knitting and crochet design, DROPS Design offers one of the most extensive collections of free patterns on the internet - translated to 17 languages. As of today we count 304 catalogues and 11422 patterns - 11422 of which are translated into English (UK/cm).
We work hard to bring you the best knitting and crochet have to offer, inspiration and advice as well as great quality yarns at incredible prices! Would you like to use our patterns for other than personal use? You can read what you are allowed to do in the Copyright text at the bottom of all our patterns. Happy crafting!
Comments / Questions (12)
Je m'excuse , j'ai trouvé comment imprimer la photo du chandail, merci quand même
17.01.2020 - 19:17Pourquoi je ne peux pas imprimer la photo du gilet quand j'imprime le patron????
17.01.2020 - 19:06DROPS Design answered:
Bonjour Mme Delisle, la photo du modèle doit apparaître en haut à droite des explications lorsque vous les imprimez. Pour imprimer la photo en grand, choisissez "Imprimer/photo". Bon tricot!
20.01.2020 - 08:05Kan model 122-5 drops, ook op gewone breinaalden gebreid worden? Hoe maak ik dan de verdeling?
14.09.2017 - 21:06DROPS Design answered:
Hallo Joke, Ja dat kan. Je moet de op te zetten steken in tweeën verdelen en aan beide kanten een kantsteek toevoegen. Voor meer informatie over het aanpassen van een patroon naar rechte naalden, kijk hier>
18.09.2017 - 10:15Bonjour, Au niveau du col, "augmenter 1 m dans chacune des 6-6-6-7-7-7 section endroit du milieu" signifie-t-il qu'on va avoir des cotes 4-3 sur l'encolure du dos et des cotes 3-3 sur les devants? Merci
26.03.2014 - 11:28DROPS Design answered:
Bonjour Mme Txix, c'est tout à fait exact. Bon tricot!
26.03.2014 - 13:39When making the back piece, it says " cast off 2 sts 0-1-1-2-4-5 times and 1 sts 0-0-2-2-1-2 times." it sounds like the same thing. Can you clarify?
10.10.2012 - 23:26DROPS Design answered:
Dear Sarah, for armhole on back piece, you will cast off every other round : first 2 sts 0-1-1-2-4-5 times then 1 st 0-0-2-2-1-2 times. No sts are bind off for first size. Happy Knitting!
14.11.2012 - 16:16Hallo. U kunt dit altijd berekenen met hulp van de looplengte van beidegarens. Looplengte Eskimo is 50m per bol en Ice 45m. Voor maat M: 14 bollen Eskimo: 50 x 14 = 700m / 45m = 15,55 = ongeveer 16 bollen Ice. Altijd goed om te weten en erg belangrijk om te berekenen ;o). Succes. Tine
13.10.2010 - 09:42Leuke trui moi patroon. Maar brei hem met ICE kunt U me zeggen hoeveel bollen ik nodig ben?? Maat M naald 7 en 8 Kom nu hopeloos tekort heb 14 bol, moet de mouwen en de kraag nog met 3 bolletjes over? Vriendelijke groet Erna
12.10.2010 - 19:17Love the length and the collar
02.07.2010 - 16:48Ana Galhard wrote:
I PODERIAM TRADUZI-LO PARA O PORTUQUES DO BRASIL?OBRIGADO
23.06.2010 - 23:32Bonito e confortável.
18.06.2010 - 16:42