DROPS Fabel
DROPS Fabel
75% Wool, 25% Polyamide
from 2.30 £ /50g
DROPS Vivaldi
DROPS Vivaldi
56% Mohair, 30% Polyamide, 14% Wool
Discontinued
find alternatives
DROPS Alpaca
DROPS Alpaca
100% Alpaca
from 3.40 £ /50g
DROPS SS24

Midnight Snowflake

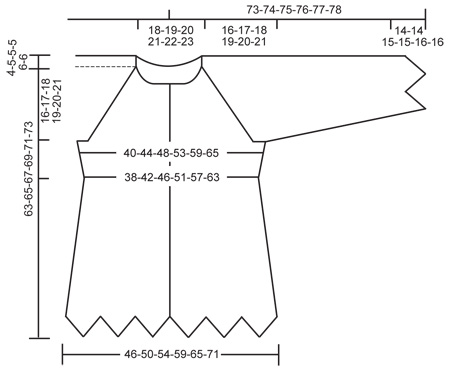
DROPS jacket with zigzag and star pattern in ”Fabel”, ”Vivaldi” and ”Alpaca”. Size S - XXXL.

DROPS 115-7
DROPS design: Pattern no FA-089

Size: S - M - L - XL - XXL - XXXL
Materials: DROPS VIVALDI
150-150-200-200-200-250 g colour no 04, steel blue
And use: DROPS FABEL
150-150-150-200-200-200 g colour no 522, turquoise/blue mix
And use: DROPS ALPACA
150-150-150-150-200-200 g colour no 6790, dark blue
50-50-100-100-100-100 g colour no 8105, light steel blue
50 g for all sizes colour no 0100, off-white

DROPS DOUBLE POINTED NEEDLES and CIRCULAR NEEDLE (40 and 80 cm) size 5.5 mm – or size needed to get 16 sts x 20 rows in stocking st and 21 sts x 22 rows in zigzag pattern with 1 thread Vivaldi + 1 thread Fabel = 10 x 10 cm.
DROPS DOUBLE POINTED NEEDLES and CIRCULAR NEEDLE (40 and 80 cm) size 5 mm – or size needed to get 17 sts x 22 rows in stocking st with 1 thread Vivaldi + 1 thread Alpaca = 10 x 10 cm.
DROPS silver buttons, no 534: 7-7-8-9-9-9 pcs.

-------------------------------------------------------

Alternative Yarn – See how to change yarns here
Yarn Groups A to F – Use the same pattern and change the yarn here
Yarn usage using an alternative yarn – Use our yarn converter here

-------------------------------------------------------

DROPS Fabel
DROPS Fabel
75% Wool, 25% Polyamide
from 2.30 £ /50g
DROPS Vivaldi
DROPS Vivaldi
56% Mohair, 30% Polyamide, 14% Wool
Discontinued
find alternatives
DROPS Alpaca
DROPS Alpaca
100% Alpaca
from 3.40 £ /50g

Pattern instructions

NOTE: This pattern is written in British English. All measurements in charts are in cm. For conversion from cm to inches - click here. There are different terms for crocheting in British and American English. If this pattern includes crochet, click for "crochet terms" here. For this pattern in American English, please click here.
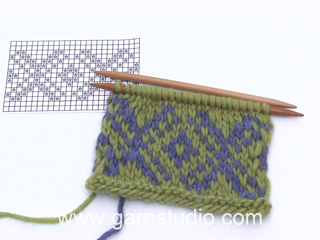
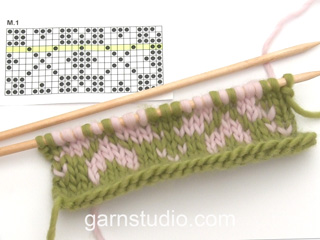
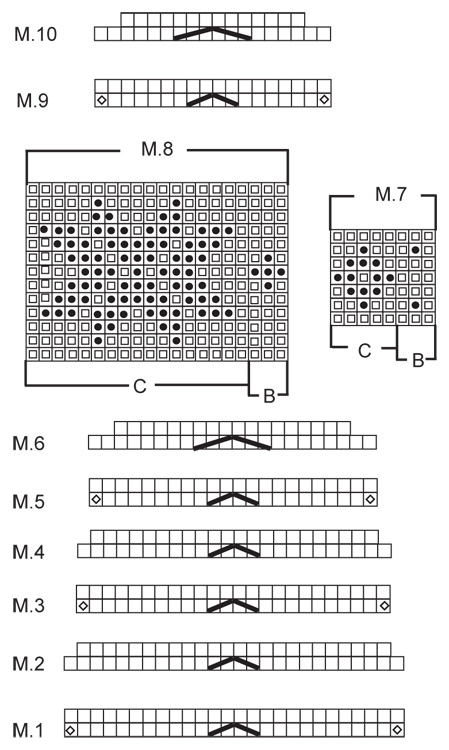
PATTERN:
See diagram M.1 to M.10. Diagrams show the pattern from RS. All patterns worked in stocking st.
KNITTING TIP:
When working M.8 make 3 small balls with 2 threads off-white Alpaca and use one ball for each piece, i.e. 1 ball for right front piece, 1 ball for back piece and 1 ball for left front piece = 3 balls (to avoid too long threads on WS and because pattern hasn’t been completed when casting off for sleeves). DECREASING TIP:
Make all dec from RS.
Beg 3 sts before marker, K2 tog, K2 (marker sits between these 2 sts), slip 1 st as if to K, K1, psso.
BUTTONHOLES:
Make buttonholes on right front band.
1 buttonhole = K tog 3rd and 4th st from mid front and make 1 YO.
Make buttonholes when piece measures (NOTE! all measurements made from bottom point):
SIZE S: 8, 16, 24, 32, 40, 48 and 56 cm.
SIZE M: 9, 17, 25, 33, 41, 49 and 57 cm.
SIZE L: 9, 16, 23, 30, 37, 44, 51 and 58 cm.
SIZE XL:
3, 10, 17, 24, 31, 38, 45, 52 and 59 cm.
SIZE XXL:
5, 12, 19, 26, 33, 40, 47, 54 and 61 cm.
SIZE XXXL:
7, 14, 21, 28, 35, 42, 49, 56 and 63 cm.
--------------------------------------------------------

BODY PIECE:
Worked back and forth on circular needle from mid front.
Cast on 222-222-274-274-274-326 sts (includes 7 front band sts each side towards mid front) on circular needle size 5.5 mm with 2 threads light steel blue Alpaca. K 2 rows on all sts. Change to 1 thread Vivaldi + 1 thread Fabel (= 2 threads) and continue as follows (first row = RS): 7 front band sts in garter st, M.1 (= 26 sts) on the next 208-208-260-260-260-312 sts (= 8-8-10-10-10-12 repeats) and 7 front band sts in garter st. Remember BUTTONHOLES on right front band – see above.
REMEMBER THE KNITTING TENSION!
Continue like this until piece measures 15 cm from bottom point. Now work M.2 instead of M.1 (i.e. dec 2 sts per repeat) = 206-206-254-254-254-302 sts. After M.2 continue in M.3 instead of M.2.
When piece measures 30 cm work M.4 instead of M.3 (i.e. dec 2 sts per repeat) = 190-190-234-234-234-278 sts. Now continue in M.5 instead of M.4. When piece measures 35 cm work M.6 instead of M.5 (i.e. dec 4 sts per repeat) = 158-158-194-194-194-230 sts. After 1 vertical repeat of M.6, K 2 rows with light steel blue Alpaca on all sts.
Insert 1 marker after 43-43-52-52-52-61 sts and 1 marker after 115-115-142-142-142-169 sts (= the sides, back piece = 72-72-90-90-90-108 sts). Now measure piece from here. Change to circular needle size 5 mm and continue in stocking st with 1 thread dark blue Alpaca + 1 thread Vivaldi (= 2 threads).
AT THE SAME TIME on first row from RS adjust no of sts on back piece to 67-71-79-87-95-107 sts and on each front piece to 41-43-47-51-55-61 sts (= 149-157-173-189-205-229 sts in total).
When piece measures approx 2 cm from marker inc 1 st each side of both markers at the sides (= 4 inc) = 153-161-177-193-209-233 sts.
When piece measures 3 cm from marker continue as follows (from RS): 7 front band sts in garter st as before, M.7 (= 8 sts) on the next 136-144-160-176-192-216 sts, M.7B (= 3 sts) and 7 front band sts in garter st. Work 1 vertical repeat of M.7 like this. Now continue in stocking st with 1 thread dark blue Alpaca + 1 thread Vivaldi (= 2 threads).
When piece measures 7 cm from marker inc 1 st each side of both markers at the sides (= 4 inc) = 157-165-181-197-213-237 sts. When piece measures 8-9-10-11-12-13 cm inc 1 st at the side on each front piece (= 2 inc) = 159-167-183-199-215-239 sts (each front piece = 44-46-50-54-58-64 sts, back piece = 71-75-83-91-99-111 sts).
READ ALL OF THE FOLLOWING SECTION BEFORE CONTINUING!
Work next row from RS as follows – see KNITTING TIP:
SIZE S:
7 front band sts as before, 5 stocking sts, M.8 (= 20 sts), M.8B (= 3 sts) and 9 stocking sts (marker at the side sits here), 7 stocking sts, M.8C (= 17 sts), M.8 on the next 40 sts, 7 stocking sts, (marker at the side sits here), 9 stocking sts, M.8, M.8B, 5 stocking sts and 7 front band sts as before.
SIZE M:
7 front band sts as before, 6 stocking sts, M.8 (= 20 sts), M.8B (= 3 sts) and 10 stocking sts (marker at the side sits here), 6 stocking sts, M.8 on the next 60 sts, M.8B, 6 stocking sts, (marker at the side sits here), 10 stocking sts, M.8, M.8B, 6 stocking sts and 7 front band sts as before.
SIZE L:
7 front band sts as before, M.8C (= 17 sts), M.8 (= 20 sts), 6 stocking sts (marker at the side sits here), 10 stocking sts, M.8 on the next 60 sts, M.8B (= 3 sts), 10 stocking sts, (marker at the side sits here), 6 stocking sts, M.8C, M.8 and 7 front band sts as before.
SIZE XL:
7 front band st as before, M.8 (= 20 sts) on the next 40 sts, 7 stocking sts, (marker at the side sits here), 7 stocking sts, M.8C (= 17 sts), M.8 on the next 60 sts, 7 stocking sts, (marker at the side sits here), 7 stocking sts, M.8C, M.8, M.8B (= 3 sts) and 7 front band sts as before.
SIZE XXL:
7 front band sts as before, 1 stocking st, M.8 (= 20 sts) on the next 40 sts, M.8B (= 3 sts), 7 stocking sts, (marker at the side sits here), 8 stocking sts, M.8 on the next 80 sts, M.8B, 8 stocking sts, (marker at the side sits here), 7 stocking sts, M.8 on the next 40 sts, M.8B, 1 stocking st and 7 front band sts as before.
SIZE XXXL:
7 front band sts as before, 5 stocking sts, M.8 (= 20 sts) on the next 40 sts, M.8B (= 3 sts), 9 stocking sts, (marker at the side sits here), 7 stocking sts, M.8C (= 17 sts), M.8 on the next 80 sts, 7 stocking sts, (marker at the side sits here), 9 stocking sts, M.8 on the next 40 sts, M.8B, 5 stocking sts and 7 front band sts as before.

AT THE SAME TIME when piece measures 11-12-13-14-15-16 cm from makers cast off 8 sts each side on next row from RS (i.e. 4 sts each side of marker) = 143-151-167-183-199-223 sts (each front piece = 40-42-46-50-54-60 sts, back piece = 63-67-75-83-91-103 sts). Put piece aside and knit the sleeves.
NOTE! M.8 is NOT finished.

SLEEVE:
Cast on 54-54-54-72-72-72 sts on double pointed needles size 5.5 mm with 2 threads light steel blue Alpaca. K 1 round and P 1 round. Change to 1 thread Vivaldi + 1 thread Fabel (= 2 threads). Insert a marker at beg of round (= mid under sleeve). Continue as follows: M.9 (= 18 sts) repeated on all sts (= 3-3-3-4-4-4 repeats) until piece measures approx 13-13-14-14-15-15 cm from bottom point. Now work M.10 instead of M.9 (i.e. dec 4 sts per repeat). After 1 vertical repeat of M.10 there are 42-42-42-56-56-56 sts on needle. Change to 2 threads light steel blue Alpaca. K 1 round, AT THE SAME TIME inc 2-2-2-4-4-4 sts evenly = 44-44-44-60-60-60 sts. P 1 round. Change to double pointed needles size 5 mm and continue with 1 thread dark blue Alpaca + 1 thread Vivaldi (= 2 threads) in stocking st. AT THE SAME TIME when piece measures 16-16-17-17-18-18 cm from bottom point inc 2 sts mid under sleeve (i.e. 1 st each side of marker) on every 4.5-3.5-3-8-5-4 cm a total of 7-9-10-4-6-7 times = 58-62-64-68-72-74 sts. Continue until piece measures 48-48-47-46-46-45 cm (less for the larger sizes because of longer sleeve cap and wider shoulder) and now cast off 8 sts mid under sleeve (i.e. 4 sts each side of marker) = 50-54-56-60-64-66 sts. Put piece aside and knit the other sleeve.

YOKE:
Slip sleeves on the same circular needle as body pieces where cast off for armhole = 243-259-279-303-327-355 sts. Insert a marker in all transitions between body pieces and sleeves = 4 markers.

Work 1 row from WS (continue in M.8 on front and back pieces, and work stocking st on sleeves). AT THE SAME TIME on next row from RS dec for Raglan as follows: 1 st each side of all markers (= 8 dec) - see DECREASING TIP! - on every other row a total of 18-19-20-22-23-24 times.
AT THE SAME TIME after 6-6-7-7-8-9 raglan dec (= 195-211-223-247-263-283 sts on needle) work next row from RS in pattern on all sts as follows (NOTE! continue to dec (8 sts) for raglan):
7 front band sts, M.7 2-3-3-4-4-5 times, M.7B 1-0-1-0-1-0 time, 8-5-5-4-4-4 stocking sts, (marker between front piece and sleeve), 6-8-7-6-7-7 stocking sts, M.7C 0-0-1-0-0-0 time, M.7 3-3-3-4-4-4 times, M.7B 1-1-0-1-1-1 time, 5-7-6-5-6-6 stocking sts, (marker between sleeve and back piece), 4-6-4-5-4-4 stocking sts, M.7C 0-0-1-0-0-1 time, M.7 5-5-6-7-8-9 times, M.7B 1-1-0-1-1-0 time, 4-6-4-5-4-4 stocking sts, (marker between back piece and sleeve), 5-7-6-5-6-6 stocking sts, M.7C 0-0-1-0-0-0 time, M.7 3-3-3-4-4-4 times, M.7B 1-1-0-1-1-1 time, 6-8-7-6-7-7 stocking sts, (marker between sleeve and front piece), 8-5-5-4-4-4 stocking sts, M.7C 0-1-0-1-0-1 time, M.7 2-2-3-3-4-4 times, M.7B 1-1-1-1-1-1 time and 7 front band sts.

Work 1 vertical repeat of M.7 like this (because of raglan dec number of stocking sts each side of markers dec).
Now continue in stocking st and continue to dec for raglan. Work 3 rows. On next row from RS slip 12-12-12-12-12-14 sts each side towards mid front on a stitch holder for neck. Cast off to shape the neckline at the beg of every row from mid front: 2 sts 2-2-5-5-8-10 times and 1 st 4-5-2-4-1-0 times. Continue dec for raglan as before. When all dec for raglan and neck are complete there are 59-65-71-75-85-95 sts on needle. Cut the thread. Leave sts on needle.

NECK:
Pick up sts for neck with 1 thread dark blue Alpaca + 1 thread Vivaldi (= 2 threads) on circular needle size 5 mm.
Beg mid front on right front piece and pick up (from RS) 22 to 30 sts (includes sts on stitch holder) along neckline on front piece up to sts on needle, K all sts on needle and pick up 22 to 30 sts (includes sts on stitch holder) along neckline on left front piece. K 1 row from WS on all sts, AT THE SAME TIME adjust no of sts to 88-92-96-98-102-106. Change to 2 threads light steel blue Alpaca and K 2 rows. Change to 1 thread Fabel + 1 thread Vivaldi (= 2 threads), K 4 rows, and cast off loosely.

ASSEMBLY:
Sew seam under sleeves. Sew on buttons.

Diagram

symbols = K from RS, P from WS
symbols = work 2 sts in 1 st
symbols = slip 1 st as if to K, K1, psso
symbols = K2 tog
symbols = slip 1 st as if to K, K2 tog, psso
symbols = K3 tog
symbols = 1 thread light steel blue Alpaca + 1 thread Vivaldi
symbols = 2 threads off-white Alpaca
diagram
diagram

Each of our patterns has specific tutorial videos to help you.

Do you have a question? See a list of frequently asked questions (FAQ)

Knitting tension is what determines the final measurements of your work, and is usually measured per 10 x 10 cm. It is provided like so: number of stitches in width x number of rows in height - eg: 19 stitches x 26 rows = 10 x 10 cm.

The knitting tension is very individual; some people knit/crochet loosely while others work tightly. You adjust the knitting tension with the needle size, which is why the suggested needle size is only meant as a guide! You need to adjust this (up or down) to ensure that YOUR knitting tension matches the knitting tension provided in the pattern. If you work with a different knitting tension than provided you will have a different yarn consumption, and your work will have different measurements than what the pattern suggests.

The knitting tension also determines which yarns can replace each other. As long as you achieve the same knitting tension you can replace one yarn with another.

See DROPS lesson: How to measure your tension/gauge

See DROPS video: How to make a gauge tension swatch

The required amount of yarn is provided in grams, eg: 450 g. To calculate how many balls you’ll need you first need to know how many grams are in 1 ball (25g, 50g or 100g). This information is available if you click on the individual yarn quality on our pages. Divide the amount required with the amount of each ball. For example, if each ball is 50g (the most common amount), the calculation will be as follows: 450 / 50 = 9 balls.

The important thing when changing from one yarn to another is that the knitting/crochet tension remains the same. This is so that the measurements of the finished piece will be the same as on the sketch provided. It is easier to achieve the same knitting tension using yarns from the same yarn group. It is also possible to work with multiple strands of a thinner yarn to achieve the knitting tension of a thicker one. Please try our yarn converter. We recommend you to always work a test swatch.

Please NOTE: when changing yarn the garment might have a different look and feel to the garment in the photo, due to individual properties and qualities of each yarn.

See DROPS lesson: Can I use a different yarn than the one mentioned in the pattern?

All our yarns are categorised into yarn groups (from A to F) according to thickness and knitting tension – group A contains the thinnest yarns and group F the thickest. This makes it easier for you to find alternative yarns to our patterns, should you wish to switch yarn. All yarns within the same group have a similar knitting tension and can easily replace each other. However, different yarn qualities have different structures and properties which will give the finished work a unique look and feel.

Click here for an overview of the yarns in each yarn group

At the top of all our patterns you’ll find a link to our yarn calculator, which is a helpful tool should you wish to use a different yarn than suggested. By filling in the yarn quality you wish to replace, the amount (in your size) and number of strands, the calculator will present good alternative yarns with the same knitting tension. Additionally it will tell you how much you’ll require in the new qualities and whether you’ll need to work with multiple strands. Most skeins are 50g (some are 25g or 100g).

If the pattern is worked with multiple colours, every colour will have to be calculated separately. Similarly, if the pattern is worked with several strands of different yarns (for example 1 strand Alpaca and 1 strand Kid-Silk) you will have to find alternatives for each, individually.

Click here to see our yarn calculator

Since different yarns have different qualities and textures we have chosen to keep the original yarn in our patterns. However, you can easily find options among our available qualities by using our yarn calculator, or simply pick a yarn from the same yarn group.

It is possible that some retailers still have discontinued yarns in stock, or that someone has a few skeins at home that they would like to find patterns for.

The yarn calculator will provide both alternative yarn as well as required amount in the new quality.

If you think it's hard to decide what size to make, it can be a good idea to measure a garment you own already and like the size of. Then you can pick the size by comparing those measures with the ones available in the pattern's size chart.

You'll find the size chart at the bottom of the pattern.

See DROPS lesson: How to read size chart

The needle size provided in the pattern serves only as a guide, the important thing is to follow the knitting tension. And since knitting tension is very individual, you will have to adjust the needle size to ensure that YOUR tension is the same as in the pattern – maybe you’ll have to adjust 1, or even 2 needle sizes, up or down to achieve the correct tension. For this, we recommend that you work test swatches.

Should you work with a different knitting tension than the one provided, the measurements of the finished garment might deviate from the measurement sketch.

See DROPS lesson: How to measure your tension/gauge

See DROPS video: How to make a tension/gauge swatch

Working a garment top-down provides more flexibility and room for personal adjustment. For example it is easier to try the garment on while working, as well as making adjustments to length of yoke and shoulder caps.

The instructions are carefully explaining every step, in the correct order. Diagrams are adjusted to the knitting direction and are worked as usual.

The diagram depicts all rows/rounds, and every stitch seen from the right side. It is read from bottom to top, from right to left. 1 square = 1 stitch.

When working back and forth, every other row is worked from the right side and every other row is worked from the wrong side. When working from the wrong side, the diagram will have to be worked reversed: from left to right, knit stitches are purled, purl stitches are knit etc.

When working in the round every round is worked from the right side and the diagram are worked from right to left on all rounds.

See DROPS lesson: How to read knitting diagrams

The diagram depicts all rows/rounds, and every stitch seen from the right side. It is worked from bottom to top, from right to left.

When working back and forth every other row is worked from the right side: from right to left and every other row is worked from the wrong side: from left to right.

When working in the round, every row in the diagram are worked from the right side, from right to left.

When working a circular diagram you start in the middle and work your way outwards, counter clockwise, row by row.

The rows usually start with a given number of chain stitches (equivalent to the height of the following stitch), this will either be depicted in the diagram or explained in the pattern.

See DROPS lesson: How to read crochet diagrams

Instructions for working several diagrams after each other on the same row/round, will often be written like so: “work A.1, A.2, A.3 a total of 0-0-2-3-4 times". This means you work A.1 once, then A.2 is worked once, and A.3 is repeated (in width) the number of times provided for your size – in this case like so: S = 0 times, M = 0 times, L=2 times, XL= 3 times and XXL = 4 times.

The diagrams are worked as usual: begin with the first row in A.1, then work the first row in A.2 etc.

See DROPS lesson: How to read knitting diagrams

See DROPS lesson: How to read crochet diagrams

The total width of the garment (from wrist-to-wrist) will be larger in the larger sizes, despite the actual sleeves being shorter. The larger sizes have longer sleeve caps and wider shoulders, so there will be a good fit in all sizes.

The measurement sketch/schematic drawing provides information regarding the full length of the garment. If it’s a jumper or a jacket the length is measured from the highest point on the shoulder closest to the neckline, and straight down to the bottom of the garment. It is NOT measured from the tip of shoulder. Similarly, the length of yoke is measured from the highest point on the shoulder and down to where yoke is split into body and sleeves.

On a jacket measures are never taken along bands, unless specifically stated. Always measure inside band stitches when measuring the length.

See DROPS lesson: How to read a schematic drawing

Diagrams are often repeated on the round or in height. 1 repeat is the diagram the way it appears in the pattern. If it says to work 5 repeats of A.1 in the round, then you work A.1 a total of 5 times after/next to each other in the round. If it says to work 2 repeats of A.1 vertically/in height you work the entire diagram once, then begin again at the start and work the entire diagram one more time.

Chain stitches are slightly narrower than other stitches and to avoid working the cast-on edge too tight, we simply chain more stitches to begin with. The stitch count will be adjusted on the following row to fit the pattern and measurement sketch.

The rib edge is more elastic and will contract slightly compared to, for example, stocking stitch. By increasing before the rib edge, you avoid a visible difference in width between the rib edge and the rest of the body.

It’s very easy to cast off too tightly, and by making yarn overs while casting off (and simultaneously casting these off) you avoid a too tight cast off edge.

See DROPS video: How to bind off with yarn overs (yo)

To achieve an even increase (or decrease) you can increase on, for example: every 3rd and 4th row alternately, like so: work 2 rows and increase on the 3rd row, work 3 rows and increase on the 4th. Repeat this until the increase is complete.

See DROPS lesson: Increase or decrease 1 st on every 3rd and 4th row alternately

Should you prefer to work in the round instead of back and forth, you may of course adjust the pattern. You’ll need to add steeks mid-front (usually 5 stitches), and follow the instructions. When you would normally turn and work from the wrong side, simply work across the steek and continue in the round. At the end you’ll cut the piece open, pick up stitches to work bands, and cover the cut edges.

See DROPS video: How to knit steeks and cut open

Should you prefer to work back and forth instead of in the round, you may of course adjust the pattern so you work the pieces separately and then assemble them at the end. Divide the stitches for the body in 2, add 1 edge stitch in each side (for sewing) and work the front and back pieces separately.

See DROPS lesson: Can I adapt a pattern for circular needles into straight needles?

Pattern repeats can vary slightly in the different sizes, in order to get the correct proportions. If you’re not working the exact same size as the garment in the photo, yours might deviate slightly. This has been carefully developed and adjusted so that the complete impression of the garment is the same in all sizes.

Make sure to follow instructions and diagrams for your size!

If you have found a pattern you like which is available in women’s size it’s not very difficult to convert it to men’s size. The biggest difference will be the length of sleeves and body. Start working on the women size that you think would fit across the chest. The additional length will be worked right before you cast off for the armhole/sleeve cap. If the pattern is worked top-down you can add the length right after the armhole or before the first decrease on sleeve.

Regarding additional yarn amount, this will depend on how much length you add, but it is better with a skein too many than too few.

All yarns will have excess fibres (from production) that might come off as lint or shedding. Brushed yarns (ie hairier yarns) have more of these loose, excess fibres, causing more shedding.

Shedding also depends on what is worn under or over the garment, and whether this pulls at the yarn fibres. It’s therefore not possible to guarantee that there will be no shedding

Below are some tips on how to get the best result when working with hairier yarns:

1. When the garment is finished (before you wash it) shake it vigorously so the looser hairs come off. NOTE: do NOT use a lint roller, brush or any method that pulls at the yarn.

2. Place the garment in a plastic bag and put it in your freezer - the temperature will cause the fibres to become less attached to each other, and excess fibres will come off easier.

3. Leave in the freezer for a few hours before taking it out and shaking it again.

4. Wash the garment according to the instructions on the yarn label.

Pilling is a natural process that happens to even the most exclusive of fibers. It's a natural sign of wear and tear that is hard to avoid, and that is most visible in high friction areas of your garment like a sweater's arms and cuffs.

You can make your garment look as new by removing the pilling, using a fabric comb or a pill/lint remover.

Still can't find the answer you need? Then scroll down and leave your question so one of our experts can try to help you. This will be done normally within 5 to 10 working days.
In the meantime, you can read the questions and answers that others have left to this pattern or join the DROPS Workshop on Facebook to get help from fellow knitters/crocheters!

Post a comment to pattern DROPS 115-7

We would love to hear what you have to say about this pattern!

If you want to leave a question, please make sure you select the correct category in the form below, to speed up the answering process. Required fields are marked *.

Comments / Questions (51)

country flag Päivi wrote:

I found Vivaldi 04 in a shop- and begin to knit this beautiful blue jacket - I love this pattern in blue

29.09.2015 - 12:16

country flag Tina wrote:

Welche Garnalternative gibt es zu Vivaldi 04? Oder wird diese Farbe wieder erhältlich sein?

30.05.2015 - 08:01

DROPS Design answered:

Vivaldi wird komplett aus dem Programm genommen. Als gute Alternative mit einem ähnlichen Flauschcharakter eignet sich Brushed Alpaca Silk aus derselben Garngruppe. Allerdings gibt es bisher keinen dunklen Blauton, sondern nur das hellere Jeansblau. Ich würde daher auch bei Alpaca einen helleren Blauton wählen und farblich etwas "umdesignen": z.B. den Rand unten + den „Mustertrennstreifen“ in einem Dunkelblau, ebenso die Sterne des Norwegermusters, dafür den oberen Teil in einem helleren Blau/Eisblau. Letztlich ist das Geschmacksache und soll nur eine Anregung für andere Möglichkeiten sein. :-) Die Garnmenge von Brushed Alpaca Silk ist identisch mit Vivaldi.

30.05.2015 - 11:01

country flag Tina R. wrote:

Hallo, würde diese Jacke gern in grün Tönen stricken, würden Fabel340, brushed Alpaka Silk 15 zusammenpassen? Welche Farbe von Alpaka ( 7240,2919,6309)würde harmonieren?

29.05.2015 - 14:28

DROPS Design answered:

Im Prinzip kommt es, wie oben schon angedeutet, darauf an, welche Akzente Sie setzen möchten. Ihre beiden gewünschten Farben von Fabel + Brushed Alpaca Silk passen gut zusammen. Da Sie Brushed Alpaca Silk auch bei Alpaca mitlaufen lassen, würde ich mich daran orientieren. D.h. wenn Sie für die Grundfarbe des oberen Teils eine dunklere Farbe von Alpaca wählen (6309), würde ich eher auch das dunklere Grün von Brushed Alpaca Silk nehmen (11), das passt auch zu Fabel. Wenn Sie eher hell bleiben und das Muster/die Ränder dunkel stricken wollen, nehmen Sie 6309 (dunkel) für die Ränder/Muster und viell. 2918 (wirkt statt 2919 frischer) für den oberen Teil.

30.05.2015 - 11:29

country flag Abalain Francoise wrote:

Je le trouve superbe et en plus ce sont mes couleurs

14.02.2015 - 09:56

country flag DROPS Design NL wrote:

Hoi Lia. Neem contact op met één van onze verkooppunten. Zij helpen u graag verder met deze soort vragen. Succes en veel breiplezier.

16.05.2011 - 12:47

country flag Lia wrote:

Considering to knit it in red with: fabel 543, vivaldi 31, baby alpaca silk red 3609 and alpaca 2923 (or 8903 black), would that work?

09.05.2011 - 14:31

Roberta wrote:

[Italy] I knitted this in a heather/purple version: easy to follow pattern, very enjoyable and quick knit, great fit, light and warm - a real pleasure both to knit it and wear it!

24.06.2010 - 14:53

country flag Mary wrote:

Stunning.

14.11.2009 - 04:04

country flag Drops Design wrote:

Roberta, sounds like a very very nice alternative making a heather/purple version.

05.10.2009 - 18:48

Roberta wrote:

What other color combinations could work well for this pattern, using Fabel 674 Heather Mix instead of 522 Turquoise/Blue Mix? Would it work with Alpaca 4440 dark purple + 3720 violet (intead of 6790 dark blue and 8105 light steel blue) and Vivaldi 32 Heather (instead of 04 steel blue)?

04.10.2009 - 08:10