
Popular categories
Looking for a yarn?


|
|||||||||||||||||||
DROPS 116-18 |
|||||||||||||||||||
|
|
|||||||||||||||||||
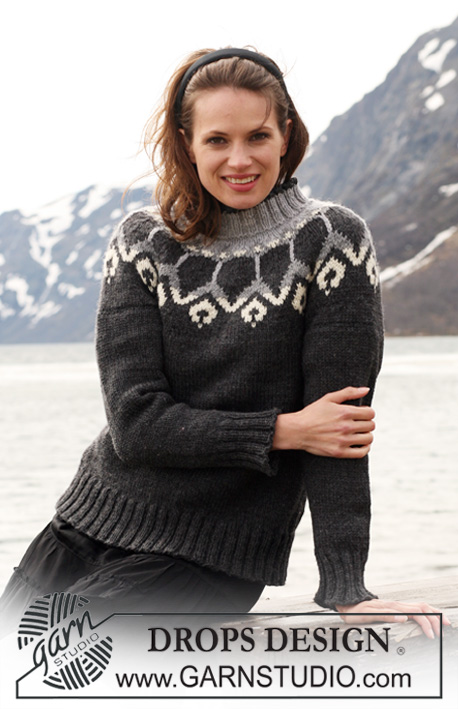
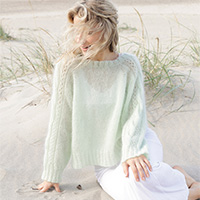
DROPS jacket in ”Alaska” with Norwegian pattern. Size S - XXXL.
DROPS 116-18 |
|||||||||||||||||||
|
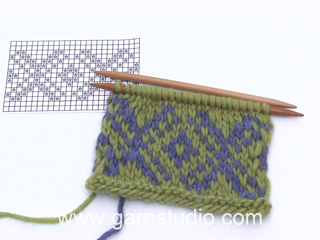
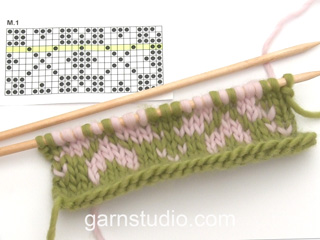
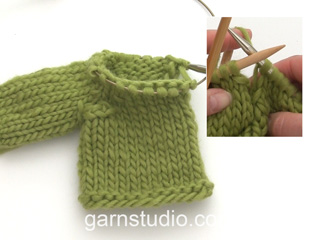
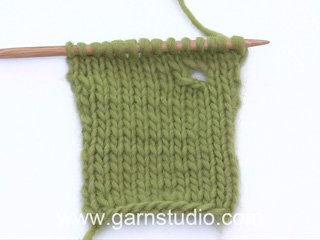
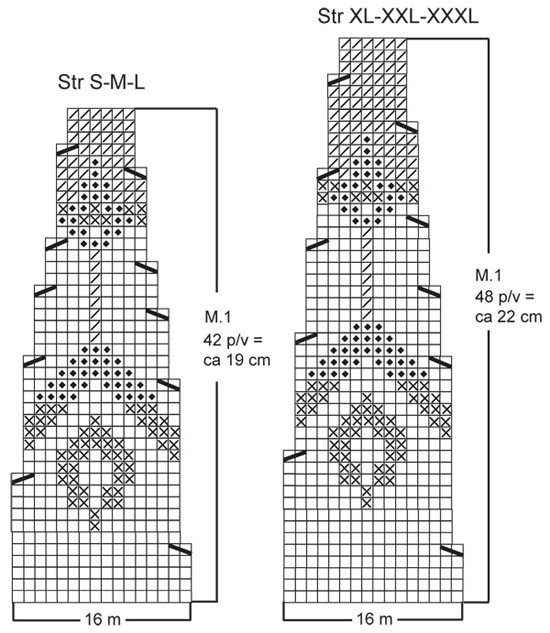
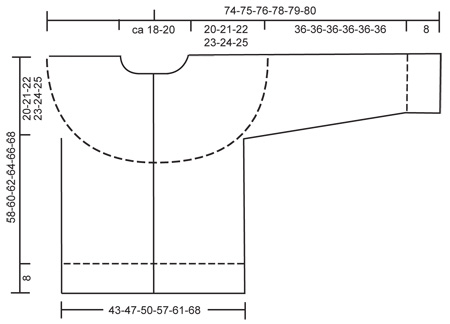
GARTER ST (back and forth on needle): K all rows. PATTERN: See diagram M.1. Diagram shows 1 pattern repeat. Pattern is worked in stocking st. BUTTONHOLES: Make buttonholes on right front band. 1 BUTTONHOLE = cast off 4th and 5th st from mid front and cast on 2 new sts on return row. Make buttonholes when piece measures: SIZE S: 11, 21, 31, 41 and 51 cm. SIZE M: 11, 22, 32, 43 and 53 cm. SIZE L: 11, 20, 29, 38, 47 and 56 cm. SIZE XL: 11, 21, 31, 40, 49 and 58 cm. SIZE XXL: 11, 21, 31, 41, 50 and 59 cm. SIZE XXXL: 11, 21, 31, 41, 51 and 61 cm. NOTE: The last buttonhole is made on neckline. ------------------------------------------------------------------ BODY PIECE: Worked back and forth on circular needle from mid front. Cast on 208-224-240-272-288-320 sts (includes 7 front band sts each side towards mid front) on circular needle size 4 mm with dark grey. Continue as follows (first row = RS): 7 front band sts in GARTER ST – see above, * K2, P2 *, repeat from *-*, finish with K2 and 7 front band sts in garter st. When piece measures 8 cm change to circular needle size 5 mm and work next row as follows from RS: 7 garter sts, K2 tog,* K2, K2 tog *, repeat from *-* and finish with 7 garter sts = 159-171-183-207-219-243 sts. Continue in stocking st with front bands in garter st. REMEMBER THE KNITTING TENSION! AT THE SAME TIME when piece measures 11 cm make the first BUTTONHOLE – see above! When piece measures 38-39-40-41-42-43 cm work next row from RS as follows: 39-42-45-51-54-60 sts (= right front piece), cast off 8 sts for armhole, 65-71-77-89-95-107 sts (= back piece), cast off 8 sts for armhole and work the remaining 39-42-45-51-54-60 sts (= left front piece). Put piece aside and knit the sleeves. SLEEVE: Worked in the round on double pointed needles. Cast on 44-48-48-52-52-56 sts on double pointed needles size 4 mm with dark grey. Work rib K2/P2 for 8 cm. Change to double pointed needles size 5 mm, and continue in stocking st, AT THE SAME TIME on first round dec 8-10-8-10-8-10 sts evenly = 36-38-40-42-44-46 sts. Insert a marker at beg of round (= mid under sleeve). When piece measures 9 cm inc 1 st each side of marker, and repeat the inc on every 3-3-3-2.5-2.5-2.5 cm a total of 11-12-12-13-14-14 times = 58-62-64-68-72-74 sts. When piece measures 44 cm for all sizes cast off 8 sts mid under sleeve = 50-54-56-60-64-66 sts. Put piece aside and knit the other sleeve. YOKE: Slip sleeves on the same circular needle size 5 mm as body pieces = 243-263-279-311-331-359 sts. P 1 row from WS, AT THE SAME TIME dec 4-8-8-8-12-8 sts evenly (do not dec on front bands) = 239-255-271-303-319-351 sts. Work 0-2-4-2-4-6 rows stocking st and work next row from RS as follows: 7 front band sts in garter st, M.1 (= 14-15-16-18-19-21 repeats across the row) – see diagram for your size – then work first st in M.1 to make pattern identical both sides mid front, and finish with 7 front band sts in garter st. Continue like this – work front bands in garter st with the base colour in diagram. After M.1 there are 99-105-111-123-129-141 sts on needle. Continue in light grey, work 1 row from RS, AT THE SAME TIME dec evenly to 84-86-88-90-92-94 sts (do not dec on front bands). Now work shortened rows mid back as follows: P 52-53-54-55-56 sts, turn and K 20 sts, turn and P 30 sts, turn and K 40 sts, turn and P 50 sts, turn and K 60 sts turn and P all sts on row, then K 1 row from RS on all sts. NECK: Change to small circular needle size 4 mm, and continue in light grey. K 1 row from RS, AT THE SAME TIME on last row inc evenly to 96-100-104-108-112-116 sts. Work next row as follows from WS: 7 front band sts in garter st, * P2, K2 *, repeat from *-*, finish with P2 and 7 front band sts in garter st. Continue with K over K, P over P and front bands in garter st, AT THE SAME TIME when neck measures 2 cm make 1 buttonhole in line with the others on front band. When neck measures 5 cm change to dark grey, work 1 row rib, and cast off with K over K and P over P. ASSEMBLY: Sew tog openings under sleeves and sew on buttons. |
|||||||||||||||||||
Diagram explanations |
|||||||||||||||||||
|
|||||||||||||||||||
|
|||||||||||||||||||
|
|||||||||||||||||||
|
Have you made this or any other of our designs? Tag your pictures in social media with #dropsdesign so we can see them! Do you need help with this pattern?You'll find tutorial videos, a Comments/Questions area and more by visiting the pattern on garnstudio.com. © 1982-2024 DROPS Design A/S. We reserve all rights. This document, including all its sub-sections, has copyrights. Read more about what you can do with our patterns at the bottom of each pattern on our site. |
|||||||||||||||||||


With over 40 years in knitting and crochet design, DROPS Design offers one of the most extensive collections of free patterns on the internet - translated to 17 languages. As of today we count 304 catalogues and 11422 patterns - 11422 of which are translated into English (UK/cm).
We work hard to bring you the best knitting and crochet have to offer, inspiration and advice as well as great quality yarns at incredible prices! Would you like to use our patterns for other than personal use? You can read what you are allowed to do in the Copyright text at the bottom of all our patterns. Happy crafting!
Comments / Questions (17)
Bonjour, "Tricoter ensuite le milieu dos en rangs raccourcis ainsi : 52-53-54-55-56 m envers, tourner et tricoter 20 m end, tourner et tricoter 30 m env, tourner et tricoter 40 m end, tourner et tricoter 50 m env, tourner et tricoter 60 m end, tourner et tricoter toutes les mailles du rang à l'envers, puis 1 rang end sur toutes les mailles." Pourriez vous svp m'expliquer + en détail cette fin de consigne dans le ch: Empiècement.
16.01.2024 - 18:10DROPS Design answered:
Bonjour Mme Letienne, vous allez tricoter ici des rangs raccourcis pour former une rehausse pour que l'encolure dos soit légèrement plus haute, tricotez le nombre de mailles indiqué (en commençant par celui pour votre taille au 1er rang sur l'envers): au 1er rang, on tricote à partir du début du rang jusqu'à 10mailles après le milieu dos, puis tricotez 20 m end (10 de chaque côté du milieu dos), puis 30 m env, puis 40 m end (20 m de chaque côté du milieu dos), puis 50 m env, puis 50 m end (25 m de chaque côté du milieu dos), tournez et tricotez le rang envers jusqu'à la fin, tournez encore 1 fois et tricotez toutes les mailles à l'endroit sur l'endroit. Bon tricot!
17.01.2024 - 09:03På bilden av koftan ser man att framkanterna en bit upp på oket byter färg till grått, samma som i oket. I beskrivningen för oket står det = urklipp: "Fortsätt sedan på samma sätt – framkanterna stickas hela tiden i rätst med bottenfärg på varje varv i diagr. " Är bilden "rätt" och mönstret fel? mvh Beatrix
06.05.2020 - 15:28DROPS Design answered:
Hej Framkanten ska stickas i den bottenfärg som är i diagrammet, så när du börjar sticka ljusgrått i diagrammet som bottenfärg så ska du även sticka med ljusgrått på framkanterna. Det blir då som på bilden. Mvh DROPS Design
07.05.2020 - 09:25Vilken storlek skall man välja på knapparna? Önskar beställa ett mönster medskickat vid beställning av garn, var hittar jag hur man får beställt det?
25.02.2020 - 15:47DROPS Design answered:
Hej Beatrix, vores knapper er 20 mm. Du kan skrive mønsteret ud direkte fra vores hjemmside. Klik på "Skriv ut". Lycka till :)
26.02.2020 - 10:28Hello! This is a lovely pattern, and it deserves a name! Will you choose one from the suggestions? Even if it isn't my suggestion! ;-) Thanks!
31.01.2018 - 17:00I made this and it turned out beautifully. One of my favorite sweaters. :-)
06.04.2016 - 00:29Ik kan nergens in het patroon vanaf M1 vinden wat ik doe met de gekleurde draad die ik niet brei: een lichte draad 16 steken achterlangs meevoeren (bv elke drie steken weven) lijkt mij niet mooi te worden; je ziet het er door heen.....ook in de instructie video's vind ik dat niet terug. Wat is de mooiste manier om de draad mee te voeren?
24.12.2015 - 12:40DROPS Design answered:
Hoi Bep. Ik zou altijd de draad meeweven. Mijn ervaring is dat de meegeweven draad niet zichtbaar is - en als het zo is, dan wordt het altijd netjes na de eerste keer wassen.
06.01.2016 - 17:06Ik ben begonnen dit prachtige vest te breien in de maat L. Wat ik niet goed begrijp is waarom het eerste knoopsgat pas op 11 cm van het begin gemaakt wordt....ik vraag mij af of het vest dan nog wel mooi sluit? Kan ik ook op 6 cm starten met het 1e knoopsgat en dan elke 9 cm een nieuw knoopsgat maken, of kom ik dan niet uit?
19.04.2015 - 18:22DROPS Design answered:
Hoi Marian. Het patroon is gemaakt met eerste knoopsgat op 11 cm - zoals ook te zien is op de foto. Ben je hier niet mee tevreden mag je altijd de knoopsgaten opnieuw indelen - of maak 1 extra op 1 cm hoogte. Let wel op dat het laatste knoopsgat op de halsrand wordt gemaakt.
20.04.2015 - 13:10Leslie wrote:
I am asking a question about the sizing of the pattern... How many inches around the chest is the XXX large in the finished sweater..... I don't want to make it too large and don't know if I should make it XX large instead ..... I hope someone can help me...
17.01.2015 - 09:43DROPS Design answered:
Dear Leslie, measure a similar garment you have and like the shape and compare these measurements to the chart (in cm - please convert here) to find out the matching size. Happy knitting!
19.01.2015 - 11:20I am little confused about the yoke finishing. I finished the pattern, but the next part is confusing with turning of work. This makes me think that only one side of the sweater is going to be longer than the other. From my understanding it is supposed to be for the neck increase, but with turning it makes it confusing. If possible, it would be great if someone could help me with the pattern.
18.12.2012 - 15:40DROPS Design answered:
Dear Anna, when you continue in light grey dec evenly to the stated number of st, you will then work shortened rows to shape the neckline for back piece so that it will be higher on back piece than on front piece. Just start first row as usual from the edge and work 52-56 sts, then turn and K 20 sts only, turn, P 30 sts, turn, etc... until you have worked 60 sts, then work return row, K1 row from RS on all sts and continue with neck. Happy knitting !
18.12.2012 - 21:05Denne likte jeg!
03.09.2009 - 13:57