
Popular categories
Looking for a yarn?


|
|||||||||||||||||||||||||||||||||||||
Ivy Trails |
|||||||||||||||||||||||||||||||||||||
|
|
|||||||||||||||||||||||||||||||||||||
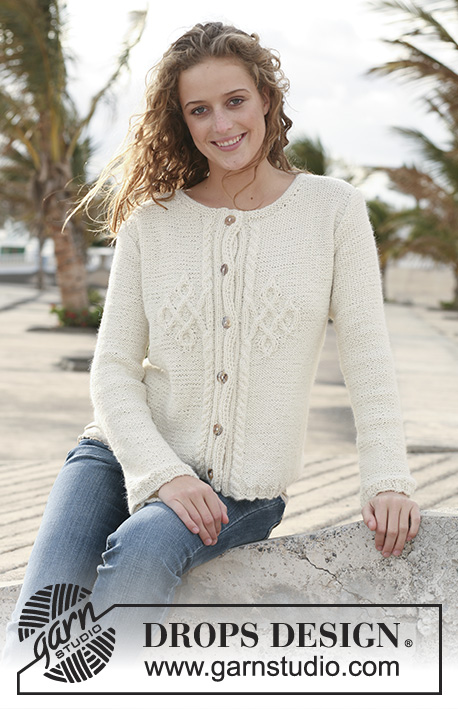
Knitted DROPS jacket with cables in “Bomull-Lin”. Size S - XXXL.
DROPS 112-20 |
|||||||||||||||||||||||||||||||||||||
|
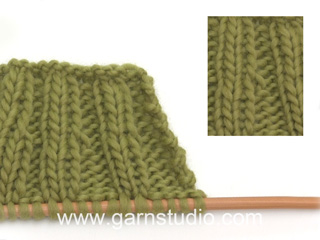
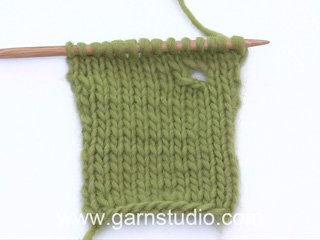
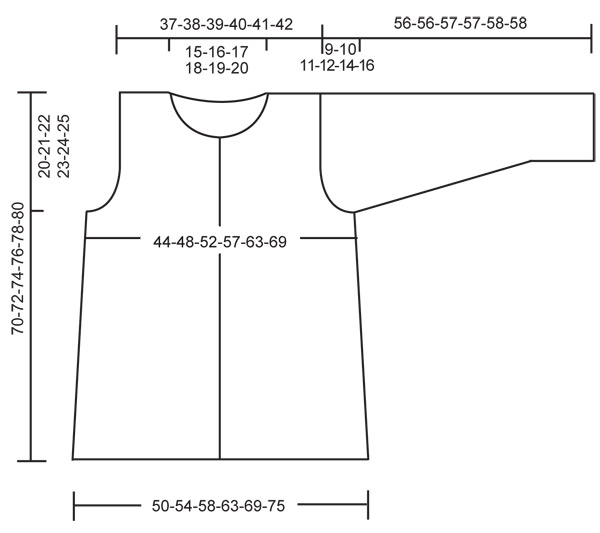
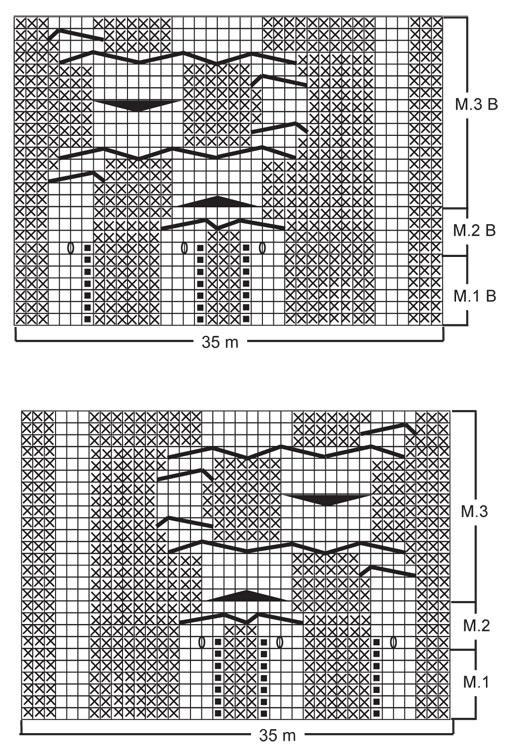
GARTER ST (back and forth on needle): K all rows. PATTERN: See diagram M.1 to M.3. The diagrams show the pattern from the RS. BUTTONHOLES: Make buttonholes on right front piece. 1 buttonhole = cast off 4th st from mid front and cast on 1 new st on return row. Make buttonholes when piece measures: SIZE S: 27, 35, 43, 51 and 59 cm. SIZE M: 29, 37, 45, 53 and 61 cm. SIZE L: 31, 39, 47, 55 and 63 cm. SIZE XL: 33, 41, 49, 57 and 65 cm. SIZE XXL: 35, 43, 51, 59 and 67 cm. SIZE XXXL: 37, 45, 53, 61 and 69 cm. --------------------------------------------------------- BACK PIECE: Worked back and forth on needle. Cast on 90-98-104-112-124-134 sts (includes 1 edge st each side) on needle size 5 mm with Bomull-Lin. P 1 row from WS and continue as follows from RS: 1 edge st, K 22-26-29-33-39-44 sts, P3, K3, P3, M.1 (= 35 sts), K 22-26-29-33-39-44 sts, 1 edge st. Continue in pattern like this until piece measures 8 cm. Now work M.2 over M.1 with remaining sts as before. After 1 vertical repeat of M.2 there are 93-101-107-115-127-137 sts on row. Now work M.3 over M.2. AT THE SAME TIME when piece measures 12 cm dec 1 st each side on every 9-9-9.5-9.5-10-10 cm a total of 5 times = 83-91-97-105-117-127 sts. When piece measures 50-51-52-53-54-55 cm cast off for armhole each side at the beg of every row: 3 sts 1-1-1-1-1-1 times, 2 sts 1-2-3-4-6-7 times and 1 st 2-3-3-4-5-7 times = 69-71-73-75-77-79 sts. When piece measures 67-69-71-73-75-77 cm dec 7 sts evenly on M.3 = 62-64-66-68-70-72 sts. When piece measures 68-70-72-74-76-78 cm cast off the middle 24-26-26-28-30-32 sts for neck and cast off 1 st on neckline on next row = 18-18-19-19-19-19 sts left on each shoulder. Cast off when piece measures 70-72-74-76-78-80 cm. RIGHT FRONT PIECE: Worked back and forth on needle. Cast on 54-57-60-64-70-75 sts (includes 1 edge st at the side and 10 front band sts towards mid front) with Bomull-Lin. P 1 row from WS and continue as follows from RS: 10 garter sts (= front band), M.1 (= 35 sts), K 8-11-14-18-24-29 sts, 1 edge st. Continue in pattern like this until piece measures 8 cm. Now work M.2 over M.1 with remaining sts as before. After 1 vertical repeat of M.2 there are 57-60-63-67-73-78 sts on row. Now work M.3 over M.2. AT THE SAME TIME when piece measures 12 cm dec at the side as described for back piece = 52-55-58-62-68-73 sts. Remember BUTTONHOLES – see above. When piece measures 50-51-52-53-54-55 cm cast off for armhole at the side as described for back piece = 45-45-46-47-48-49 sts. When piece measures 60-62-64-65-67-69 cm slip 10-10-10-11-12-12 sts towards mid front on a stitch holder. Cast off to shape the neckline towards mid front on every other row: 2 sts 3 times and 1 st 4-4-4-4-4-5 times. AT THE SAME TIME when piece measures 68-70-72-74-76-78 cm dec 7 sts evenly on M.3. After all dec are complete there are 18-18-19-19-19-19 sts left on shoulder. Cast off when piece measures 70-72-74-76-78-80 cm. LEFT FRONT PIECE: Cast on as described for right front piece. P 1 row from WS and continue as follows from RS: 1 edge st, K 8-11-14-18-24-29 sts, M.1B (= 35 sts), 10 garter sts (= front band). Continue as described for right front piece, but mirrored. Work M.1B, M.2B and M.3B instead of M.1, M.2 and M.3. Do not make buttonholes. SLEEVE: Worked in the round on double pointed needles. Cast on 45-45-54-54-54-54 sts on double pointed needles size 4.5 mm with Bomull-Lin. P 1 round and continue in rib, K3/P6. When piece measures 12 cm change to needle size 5 mm, K 1 round, AT THE SAME TIME dec 5-5-12-10-8-6 sts evenly = 40-40-42-44-46-48 sts. Insert a marker at beg of round (= mid under arm). Continue in stocking st, AT THE SAME TIME inc 1 st on each side of marker and repeat the inc on every 4-3-2.5-2-2-1.5 cm a total of 9-11-13-14-15-16 times = 58-62-68-72-76-80 sts. When piece measures 47-46-46-45-44-42 cm – less for the larger sizes because of longer sleeve cap and wider shoulder – cast off 3 sts on each side of marker and complete piece back and forth on needle. Cast off to shape the sleeve cap each side at the beg of every row: 2 sts 3 times, 1 st 2-3-4-5-7-10 times, then 2 sts each side until piece measures 55-55-56-56-57-57 cm, now cast off 3 sts each side 1 time and cast off remaining sts. Piece measures approx 56-56-57-57-58-58 cm. ASSEMBLY: Sew shoulder seams. Sew side seams inside 1 edge st. Set in sleeves and sew on buttons. NECKLINE: Pick up 68 to 88 sts (incl sts on stitch holders) round neck on needle size 5 mm with Bomull-Lin and K 4 rows, cast off. |
|||||||||||||||||||||||||||||||||||||
Diagram explanations |
|||||||||||||||||||||||||||||||||||||
|
|||||||||||||||||||||||||||||||||||||
|
|||||||||||||||||||||||||||||||||||||
|
|||||||||||||||||||||||||||||||||||||
|
Have you made this or any other of our designs? Tag your pictures in social media with #dropsdesign so we can see them! Do you need help with this pattern?You'll find tutorial videos, a Comments/Questions area and more by visiting the pattern on garnstudio.com. © 1982-2024 DROPS Design A/S. We reserve all rights. This document, including all its sub-sections, has copyrights. Read more about what you can do with our patterns at the bottom of each pattern on our site. |
|||||||||||||||||||||||||||||||||||||


With over 40 years in knitting and crochet design, DROPS Design offers one of the most extensive collections of free patterns on the internet - translated to 17 languages. As of today we count 304 catalogues and 11422 patterns - 11422 of which are translated into English (UK/cm).
We work hard to bring you the best knitting and crochet have to offer, inspiration and advice as well as great quality yarns at incredible prices! Would you like to use our patterns for other than personal use? You can read what you are allowed to do in the Copyright text at the bottom of all our patterns. Happy crafting!
Comments / Questions (59)
Hej! Jag har börjat bakst. och har stickat enlig beskrivning M1, M2 och M3. Min fråga är när jag har stickat färdig M3 ska jag börja med M1 igen och så vidare. Tack på för hand Denise
05.02.2023 - 08:48DROPS Design answered:
Hei Denise. Når du har strikket M.1, M.2 og M.3 1 gang i høyden, fortsetter du bare å strikke M.3. Om du ser på M.1 og bildet av jakken, ser du at det bare er rett og vrangmasker = vrangborden (som strikkes til arbeidet måler 8 cm). Når du strikker M.2 økes det masker (det økes kun den ene gangen når M.2 strikkes, samt at M.2 passer med vrangborden. Så når M.1 og M.2 er ferdigs strikkes, er det kun M.3 som skal gjentas oppover. mvh DROPS Design
06.02.2023 - 11:18Hallo, ich habe mit dem rechten Vorderteil angefangen und möchte gern wissen, wie oft ich den Mustersatz M1,M2,M3 stricken muß, bis ich gleichzeitig für die Ärmel abnehmen muß? Vielen Dank für eine Antwort
01.07.2020 - 22:48DROPS Design answered:
Liebe Sabine, M.1 stricken Sie nur einmal in der Höhe, dann stricken Sie M.2 einmal in der Höhe und nach M.1/M.2 stricken Sie M.3 bis zur Ende (nur M.3 wird in der Höhe wiederholt) - gleichzeitig nehmen Sie zuerst auf beiden Seiten und später für die Ärmel ab - je nach der Größe und Maschenprobe in der Höhe wird die Anzahl vom M.3 in der Höhe unterschiedlich ist, das wichtigste ist hier die Höhe. Viel Spaß beim stricken!
02.07.2020 - 08:40Hallo! Ich habe gerade mit dem Rückenteil angefangen. Werden die ersten und letzten 39 Maschen (also die vor und nach M1) glatt oder kraus rechts gestrickt? Vielen Dank für die Antwort!
08.05.2020 - 23:07DROPS Design answered:
Liebe Catherine, die 39 Maschen (5. Grösse) werden glatt rechts gestrickt. Viel Spaß beim stricken!
11.05.2020 - 08:41I'm working on the back right now and am at the point of decreasing the 7 stitches in the M3 chart. I understand it's to bring the back in a bit, but I'm not sure the best way to do it because don't you need those stitches for the cabling?
12.03.2020 - 15:00DROPS Design answered:
Dear Aubrey, you have to decrease the number of stitches in M.3 so that there will be less stitches (but still same width) when casting off the middle stitches for neck. Decrease for example by knitting the stitches of the cables 2 by 2 until 7 stitches in total have been decreased. Happy knitting!
12.03.2020 - 15:15Bonjour. Pour le dos après M3 on reprend ou ? Je fais la taille XXXL et à la fin de M3 mon tricot mesure 20 cm de hauteur . Chaque ligne du diagramme représente 1 rang ou 1 aller-retour ? Merci pour votre réponse Cordialement Josiane
23.05.2017 - 15:47DROPS Design answered:
Bonjour Mme Roux, répétez simplement M.3 en le reprenant au 1er rang. Chaque case du diagramme = 1 m x 1 rang. Bon tricot!
23.05.2017 - 16:30Bonjour quel diagramme dois je prendre pour le dos car il y'a deux diagramme le 1er ou le 2ème merci d'avance pour votre réponse
27.02.2017 - 18:58DROPS Design answered:
Bonjour Mme Lemaire, pour le dos, on tricote M.1 puis M.2 et M.3. Bon tricot!
28.02.2017 - 08:38Anna wrote:
Hello. I started knitting this pattern and I got confused in the second row already. What does it mean to skip the square in the diagram? I read it literally and I ignored these squares it but now I have two extra stitches on the needle. What do I do? Thank you!
19.08.2016 - 19:50DROPS Design answered:
Dear Anna, the black square in diagram is not a st when you are working M.1, ie you will have only K3 in each K section. On 1st row in M.2 you will work a YO which create the extra st (K4 in 2nd row in M.2) but this st doesn't exist yet in M.1. Happy knitting!
22.08.2016 - 08:44Pourrais-je avoir une photo du dos ? Merci par avance
24.04.2016 - 11:07DROPS Design answered:
Bonjour Mme Dutay, nous n'avons pas de photos du dos, mais il se tricote avec les torsades indiquées - 1 seule au milieu dos. Bon tricot!
25.04.2016 - 09:47Rebonjour j'ai 4 mailles en plus sur les devants A quel moment puis je les ajouter dans mes déductions je fais la taille xl j e pensais faire à l'encolure 12 m en attente puis 4 fois 2 mailles 5 fois 1 m et 8 diminutions au lieu de 11 m, 3 fois 2 mailles, 4 fois 1m, et 7 diminutions qu'en pensez vous merci d'avance
04.02.2016 - 17:51Bonjour pour les devants il est noté de rabattre pour l'encolure tous les rangs en début de rang mais si c'est tous les rangs c'est début sur devant et fin de rang sur dos !! comment dois je faire sur devant et dos ou seulement sur devant merci pour votre réponse
04.02.2016 - 17:50DROPS Design answered:
Bonjour Marie Christine, pour le devant droit, on rabat les mailles en début de rang qui commence côté encolure (correction faite). Pour le dos, on rabat les mailles de l'encolure en début de rang qui commence côté encolure. Bon tricot!
04.02.2016 - 18:47