
Popular categories
Looking for a yarn?


Comments / Questions (79)
![]() Anja HENSCHEL wrote:
Anja HENSCHEL wrote:
Hallo, Wie den jetzt ? In der Anleitung steht M1 sind Hin und Rückseiten gezeichnet , beim weiterlesen steht M1 ist Diag. zeigt das Muster von der Hinr.getzeichnet ??? Dann müßte ich ja die Rückreihe noch zufügen , Die ist ja links bis auf die Bordüre am Rand? HILFE ....
09.05.2025 - 10:29
![]() Lise Gunn wrote:
Lise Gunn wrote:
Jeg får ikke mønsteret til å gå opp. Når jeg kommer til andre rettpinne og skal strikke hull over de første, blir det skjevt. Hva søren gjør jeg feil. Strikker 9 masker lager første hull rett på 2 sammen og nytt kart på første pinne. På andre rettpinne 7 masker så lager jeg 2 rett sammen kast 3 rett 1 kast tar av 1 maske strikker en og løfter over forrige maske. Så er jeg helt skjevt ute. Hjelp
07.04.2025 - 12:08DROPS Design answered:
Hej Lise, du strikker 2 ret sammen og løfter den løse maske over, så du tager ind fra 3 masker til 1 maske med 1 omslag på hver side :)
10.04.2025 - 08:27
![]() Jennifer Haxter wrote:
Jennifer Haxter wrote:
Fange ich das Muster in jeder Reihe neu an, oder stricke ich da weiter wo es in der hin Reihe geendet hat? Somit in meinem Fall 12 mal ganz und ein mal halb. Dann wieder mit halb anfangen? Was bedeuten die Kreise im M1? Danke für die Antwort.
05.04.2025 - 23:45DROPS Design answered:
Liebe Frau Haxter. die Diagramme zeigen alle Reihen, die Hin sowie die Rückreihen; das Muster wiederholen Sie so: M.1 wiederholen dann (in Ihrem Fall), mit den letzten 7 Maschen die Hinreihen enden; so ist das Lochmuster symmetrisch; die Kreisen sind die Umschläge, siehe die 3 letzten Symbole; hier lesen Sie mehr über Diagramme. Viel Spaß beim Stricken!
07.04.2025 - 08:19
![]() Gema wrote:
Gema wrote:
Hola se puede tejer completo con agujas rectas? Son necesarias las circulares?
28.01.2025 - 21:20
![]() Gery wrote:
Gery wrote:
Dat had ik wel begrepen alleen kom je dan niet gelijk uit met de voorpanden .. Met het patroo n Dat zie je niet op de foto . Ik vind dat persoonlijk niet mooi.
27.01.2025 - 06:32
![]() Gery Mol-kok wrote:
Gery Mol-kok wrote:
Graag reactie ik kan niet verder zie onderstaande berichten
25.01.2025 - 06:59
![]() Gery Mol-kok wrote:
Gery Mol-kok wrote:
Als alle panden met m 1 morten kom ik meg de 2 voorpanden niet gelijk uit met het patroon ik brei de kleinste maat het m1 patroon is over 14 steken . Dus herhasl ik dat telkens wat doe ik fout
24.01.2025 - 08:10DROPS Design answered:
Dag Gery,
Je breit waan weerszijden 4 steken in ribbelsteek en daar tussen herhaal je steeds patroon M.1. Dit komt neer op 8,5 herhalingen in de breedte. Dus 8 volledige herhalingen en dan nog een halve herhaling van M.1.
26.01.2025 - 18:48
![]() Gery wrote:
Gery wrote:
Zie vraag hieronder
22.01.2025 - 22:10
![]() Gery wrote:
Gery wrote:
Als het op het achterpand ook moet kom ik niet uit . Met 127 steken 8 dusvoor de biezen . Dan komt het linkerpand en het rechterpand niet het zelfde uit met het patroon,?
21.01.2025 - 21:01
![]() Gery wrote:
Gery wrote:
Is het achterpand ook met dat m1 patroon
21.01.2025 - 19:53DROPS Design answered:
Dag Gery,
Ja, het achterpand is ook met het kantpatroon.
21.01.2025 - 20:31
|
|||||||||||||
Verine#verinejacket |
|||||||||||||
 |
 |
||||||||||||
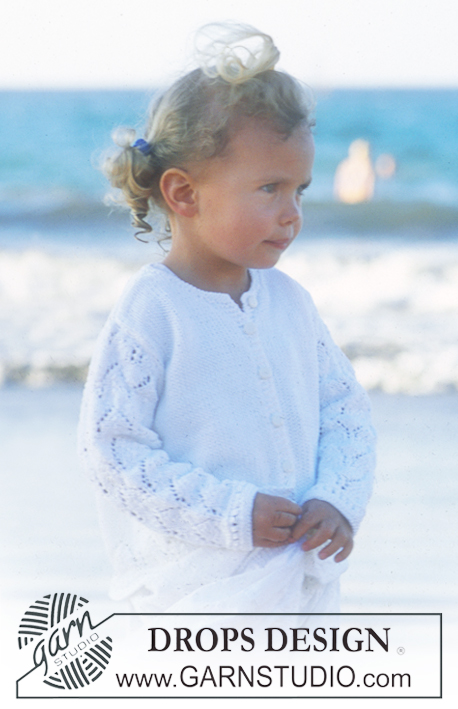
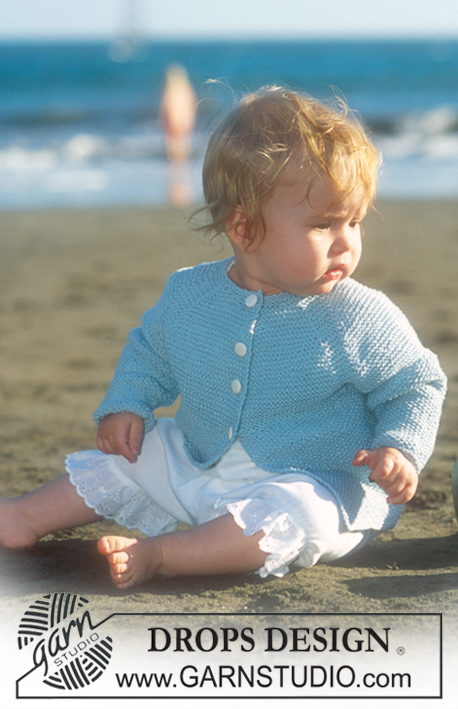
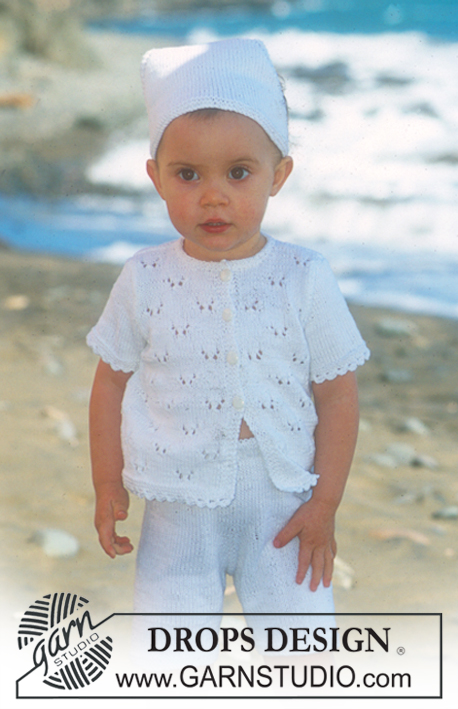
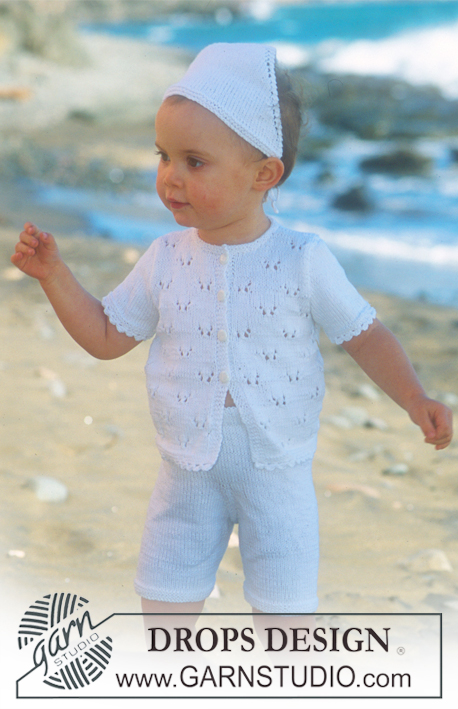
Jacket with short sleeves, shorts and scarf in Safran
DROPS Baby 10-6 |
|||||||||||||
|
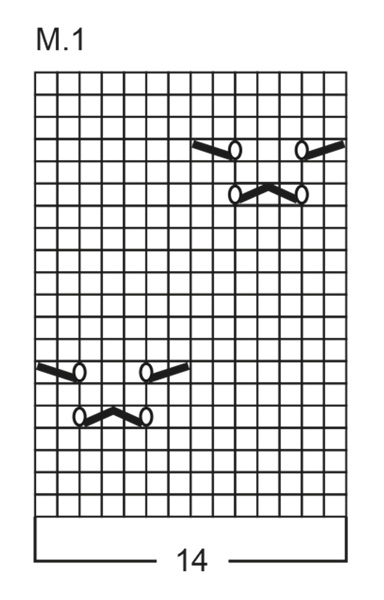
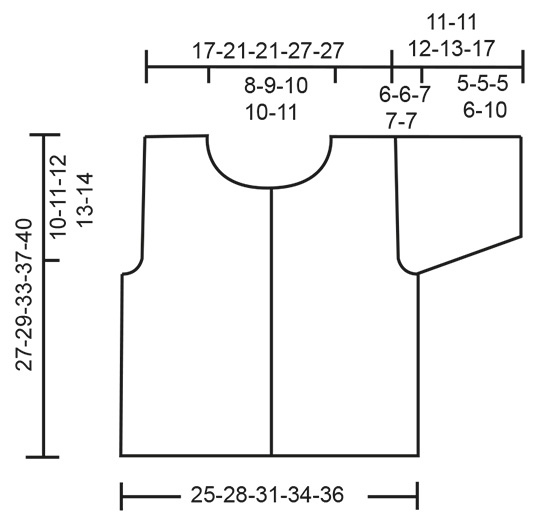
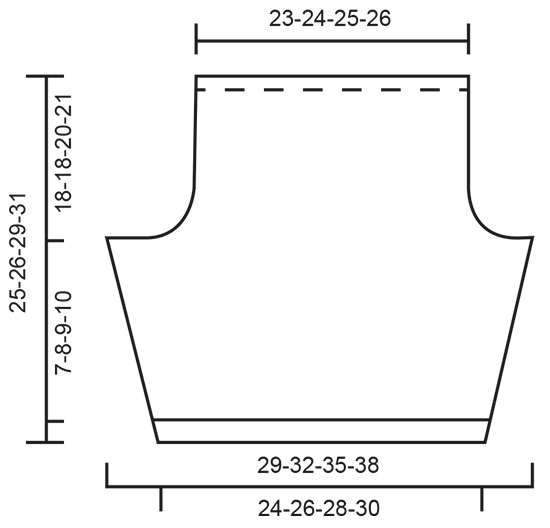
JACKET: Knitting tension: 24 sts x 32 rows on needles size 3 mm in stocking st = 10 x 10 cm. Garter sts (back and forth): Knit all rows Garter sts (on circular needle): K 1 round, P 1 round Pattern: See diagram M.1. The diagram shows the pattern from the right side. Buttonhole: Make buttonholes on right front band from RS as follows: cast off 3rd st from edge and make a yo over cast off st on the return row. Make buttonholes as follows: Size 1/3 months: 3, 8, 13, 18 and 22.5 cm Size 6/9 months: 4, 9, 14, 19 and 23.5 cm Size 12/18 months: 4, 10, 16, 22 and 27.5 cm Size 2 years: 3, 9, 15, 20, 25 and 30.5 cm Size 3/4 years: 4, 10, 16, 22, 28 and 33.5 cm Back and front piece: knit back and forth on circular needle from mid front. Cast on 127-141-155-169-183 sts (incl 4 edge sts each side = mid front, knitted in garter sts throughout) on needle size 3 mm and knit 4 rows garter sts. Continue in M.1. When piece measures 17-18-21-24-26 cm – adjust to whole repeat of pattern - knit next row as follows: 31-34-38-41-45 sts (= front piece), cast off 6 sts for armhole, knit 53-61-67-75-81 sts (= back piece), cast off 6 sts for armhole, and knit remaining 31-34-38-41-45 sts (= front piece). Now complete each piece separately. Left front piece: = 31-34-38-41-45 sts. Cast off for armhole at side on every other row: 2 sts 1-1-2-1-2 times and 1 st 4-3-4-3-4 times = 25-29-30-36-37 sts. Continue in pattern, but do not knit the whole pattern towards neck and armhole if you cannot fit in a full repeat. When piece measures 23-24-28-31-34 cm put 7-7-8-8-9 sts mid front on a thread for neck and dec to shape the neckline on every other row: 2 sts 2-2-2-2-2 times and 1 st 3-3-4-4-5 times = 11-15-14-20-19 sts left on shoulder. Cast off remaining sts when piece measures approx 27-29-33-37-40 cm = adjust to a full pattern repeat. Right front piece: Like left front piece, but mirrored. Remember buttonholes on front band. Back piece: = 53-61-67-75-81 sts. Cast off for armhole each side as described for front piece = 41-51-51-65-65 sts. When piece measures 26-28-32-36-39 cm cast off the middle 17-19-21-23-25 sts for neck and dec 1 st towards neckline on next row = 11-15-14-20-19 sts left on each shoulder. Cast off remaining sts when piece measures approx 27-29-33-37-40 cm = adjust to front piece. Sleeve: knitted round on double pointed needles. Cast on 46-48-52-54-56 sts on needle size 3 mm. Knit 4 rounds in garter st and continue in stocking st. At the same time inc 2 sts mid under arm as follows: Size 1/3, 6/9 and 12/18 months: when sleeve measures 3 cm = 48-50-54 sts. Size 2 and 3/4 years: when piece measures 2 cm, 2-3 times on every 2 cm = 58-62 sts. When piece measures 5-5-5-6-10 cm cast off 6-6-6-6-6 sts mid under arm and finish sleeve back and forth on needle. Cast off for sleeve cap each side on every other row: 2 sts 1-1-1-2-2 times, 1 st 6-6-7-5-5 times, 2 sts 1-1-1-2-2 times and 3 sts 1-1-1-1-1 time. Sleeve now measures approx 11-11-12-13-17 cm. Cast off remaining sts. Assembly: Sew shoulder seams. Set in sleeves. Pick up approx 55 to 65 sts round the neck (incl sts on thread) on needle size 3 mm. Knit 4 rows garter sts and cast off. Crochet border: With crochet hook size 3 mm crochet as follows: 1 dc, *3 ch, 1 tr in third ch from the hook, skip 2 sts and 1 dc in next st*, repeat from *-* round the neckline and along bottom edges on jacket and sleeves. Sew on buttons. ------------------------------------------------------- SCARF: Cast on 3 sts on needle size 3 mm. Knit 2 rows garter sts and inc inside 1 edge st each side on second row = 5 sts. Continue in stocking sts with 1 edge st each side in garter sts, at the same time on every other row inc 1 st inside the garter st each side – inc by making a yo (creates a row of holes each side). Continue the inc until there are 71-77-81-87-91 sts on needle. Knit 4 rows garter st over all sts and cast off. ------------------------------------------------------- SHORTS: Knitting tension: 24 sts x 32 rows on needles size 3 mm in stocking st = 10 x 10 cm. Garter sts (back and forth): Knit all rows Each leg is knitted back and forth on needle. They are then put on the same circular needle and the shorts are completed knitting round. Right leg: Cast on 60-64-70-74 sts (incl 1 edge st each side) using needle size 2.5mm and knit 6 rows garter sts. Continue in stocking sts on needle size 3mm and when piece measures 2 cm inc 1 st each side a total of 6-7-8-9 times on 2nd and 3rd row alternately = 72-78-86-92. When piece measures 7-8-9-10 cm cast off 3-3-3-4 sts each side and put the piece aside = 66-72-80-84 m. Left leg: Cast on and knit as right leg. Shorts: Put both legs on the same circular needle size 3 mm = 132-144-160-168 sts. Place a marker mid front and mid back. Work stocking stitch. After 2 rounds inc mid back at the same time as dec mid front. Inc back as follows: 1 st on each side of the 2 center sts on every other round a total of 4 times. Increase with a yarn over and work the yarn over twisted on next round. Dec front as follows: 1 st on each side of the center 2 sts; 0-0-2-2 times on every round and then 8-10-10-10 times on every other round = 124-132-144-152 sts. Dec like this before 2 center sts: K2 tog. Dec like this after 2 center sts: slip 1 st, K1, psso. When piece measures 23-24-27-29 cm dec 14-16-24-28 sts evenly distributed on round = 110-116-120-124 sts. When piece measures 25-26-29-31 cm change to circular needle 2,5 mm. P 1 round (= folding edge), continue in stocking stitch for 1,5 cm, cast off. Assembly: Sew seam on inside of legs within 1 edge st. Sew stitches cast off between legs together. Fold edge on top double towards WS and sew on. Pull a ribbon in suitable length through fold - measure on the child. |
|||||||||||||
Diagram explanations |
|||||||||||||
|
|||||||||||||
|
|||||||||||||
|
|||||||||||||
|
|||||||||||||
Have you finished this pattern?Tag your pictures with #dropspattern #verinejacket or submit them to the #dropsfan gallery. Do you need help with this pattern?You'll find 34 tutorial videos, a Comments/Questions area and more by visiting the pattern on garnstudio.com. © 1982-2025 DROPS Design A/S. We reserve all rights. This document, including all its sub-sections, has copyrights. Read more about what you can do with our patterns at the bottom of each pattern on our site. |
|||||||||||||


With over 40 years in knitting and crochet design, DROPS Design offers one of the most extensive collections of free patterns on the internet - translated to 17 languages. As of today we count 314 catalogues and 11820 patterns translated into English (UK/cm).
We work hard to bring you the best knitting and crochet have to offer, inspiration and advice as well as great quality yarns at incredible prices! Would you like to use our patterns for other than personal use? You can read what you are allowed to do in the Copyright text at the bottom of all our patterns. Happy crafting!
Post a comment to pattern DROPS Baby 10-6
We would love to hear what you have to say about this pattern!
If you want to leave a question, please make sure you select the correct category in the form below, to speed up the answering process. Required fields are marked *.