DROPS Alpaca
DROPS Alpaca
100% Alpaca
from 3.40 £ /50g
DROPS Fabel
DROPS Fabel
75% Wool, 25% Polyamide
from 2.30 £ /50g
Get the yarn to make this pattern from 27.30£.

The yarn cost is calculated from the pattern’s smallest size and the yarn’s cheapest product type. Looking for an even better price? You might find it on the DROPS Deals!

DROPS SS24

Sweet Georgia

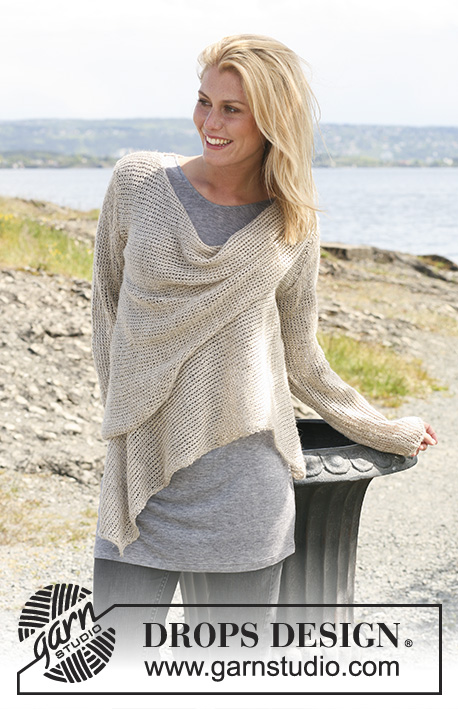
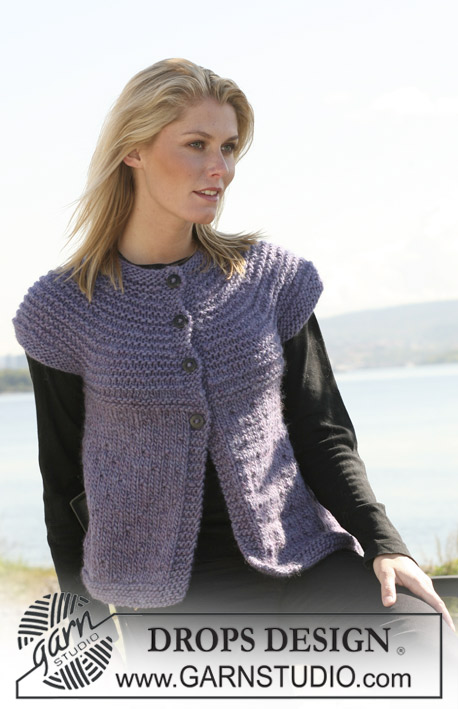
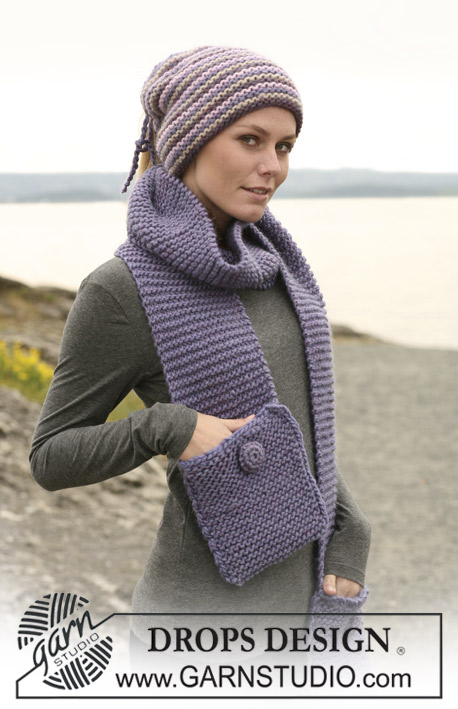
DROPS jacket in ”Alpaca” and ”Fabel” in garter st with star pattern border. Size S - XXXL.

DROPS 108-34
Size: S – M – L – XL – XXL - XXXL
Materials: DROPS Alpaca
250-300-300-350-400-450 g colour no 6736, blue/purple mix
50 g for all sizes colour no 0100, off-white
and use: DROPS Fabel
150-150-150-200-200-200 g colour no 904, lavender

DROPS double pointed needles and circular needle (80 cm) size 3.5– or size needed to get 23 sts x 46 rows in garter st with 1 thread Alpaca or 1 thread Fabel = 10 x 10 cm.
Note: In M.1 knitting tension is 25 sts x 46 rows because the pattern in several colours will tighten the piece slightly.
DROPS mother of pearl button, no 521: 7 pcs.

-------------------------------------------------------

Alternative Yarn – See how to change yarns here
Yarn Groups A to F – Use the same pattern and change the yarn here
Yarn usage using an alternative yarn – Use our yarn converter here

-------------------------------------------------------

DROPS Alpaca
DROPS Alpaca
100% Alpaca
from 3.40 £ /50g
DROPS Fabel
DROPS Fabel
75% Wool, 25% Polyamide
from 2.30 £ /50g
Get the yarn to make this pattern from 27.30£.

The yarn cost is calculated from the pattern’s smallest size and the yarn’s cheapest product type. Looking for an even better price? You might find it on the DROPS Deals!

Pattern instructions

NOTE: This pattern is written in British English. All measurements in charts are in cm. For conversion from cm to inches - click here. There are different terms for crocheting in British and American English. If this pattern includes crochet, click for "crochet terms" here. For this pattern in American English, please click here.
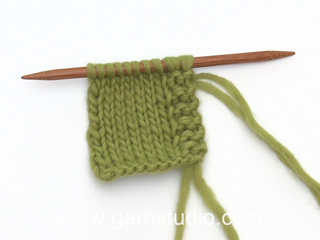
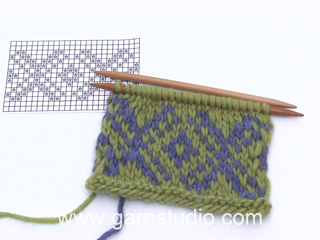
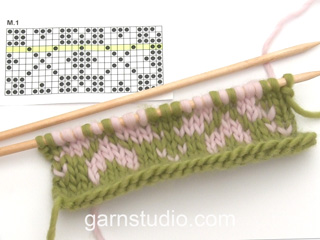
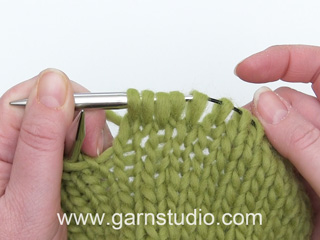
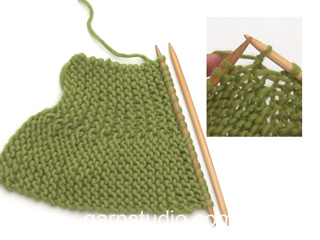
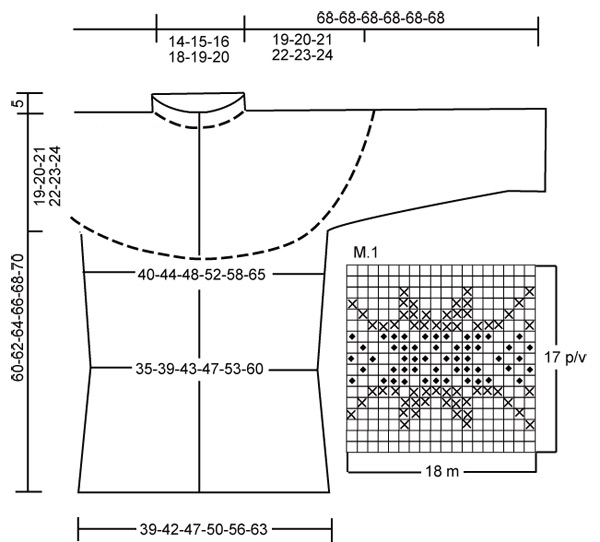
Garter st , back and forth on needle: K all rows.
Shortened rows: The yoke and neckline is worked in garter st. To shape the piece work shortened rows as follows (beg from RS): * 2 rows garter st on all sts, work row to MT-4, turn the piece, tighten thread and work return row. Work next row to MT-3, turn piece, tighten thread and work return row. Work next row to MT-2, turn piece, tighten thread and work return row. Work next row to MT-1, turn piece and work return row *, repeat from *-* (i.e. 1 repeat = 10 rows at the bottom and 2 rows at the top.
Pattern: See diagram M.1 – diagram shows 1 horizontal pattern repeat. The entire pattern is worked in stocking st.
Buttonhole, body piece: Cast off for buttonholes on right front band. Make the first buttonhole when front band measures 7-6-5-8-7-6 cm from where sts were picked up for body piece and make the additional 2 buttonholes with 9-9-9-10-10-10 cm between them. 1 buttonhole = cast off 4th and 5th st from mid front and cast on 2 new sts on return row.

Jacket: First knit the yoke and neckline, from side to side, from mid front to mid front. Then pick up sts at bottom edge of yoke and work the body piece.
Yoke and neckline: Worked back and forth on circular needle. Loosely cast on 56-58-60-62-64-66 sts on circular needle size 3.5 mm with Fabel.
Insert 4 Marking Threads (MT) in piece as follows from RS:
Size S: MT-1 after 11 sts, MT-2 after 22 sts, MT-3 after 33 sts, MT-4 after 44 sts = 12 sts left at the top for neck after the last MT.
Size M: MT-1 after 11 sts, MT-2 after 22 sts, MT-3 after 34 sts, MT-4 after 46 sts = 12 sts left at the top for neck after the last MT.
Size L: 12 sts between all MT, = 12 sts left at the top for neck after the last MT.
Size XL: MT-1 after 13 sts, MT-2 after 26 sts, MT-3 after 38 sts, MT-4 after 50 sts = 12 sts left at the top for neck after the last MT.
Size XXL: MT-1 after 13 sts, MT-2 after 26 sts, MT-3 after 39 sts, MT-4 after 52 sts = 12 sts left at the top for neck after the last MT.
Size XXXL: MT-1 after 14 sts, MT-2 after 28 sts, MT-3 after 41 sts, MT-4 after 54 sts = 12 sts left at the top for neck after the last MT.
All sizes: Let the MT follow the piece as you go along. Note: Work the top 4 sts in neckline (= on the left side of piece as seen from RS) in 1 thread blue/purple Alpaca and 1 thread Fabel (= 2 threads).
Continue in garter st and shortened rows - see above. Remember the knitting tension! Continue until piece measures 140-148-156-174-186-200 cm on the longer side (= bottom edge). Note: Place piece on a surface for measurement. Piece measures approx 28-30-31-35-37-40 cm at the top. Cast off very loosely.
Remove all 4 MT and now insert 4 new MT in bottom edge of yoke as follows: MT-1: after 18-20-22-24-27-31 cm, MT-2: 34-34-34-39-39-39 cm from MT-1, MT-3: 36-40-44-48-54-60 cm from MT-2 and MT-4: 34-34-34-39-39-39 cm from MT-3 = approx 18-20-22-24-27-31 cm left after the last MT.

Body piece: Pick up sts with blue/purple Alpaca on needle size 3.5 mm along bottom edge of yoke as follows: 42-46-51-55-62-71 sts from edge to MT-1 (= left front piece), cast on 10 new sts, skip forward to MT-2, pick up 84-92-102-110-124-142 sts to MT-3 (= back piece), cast on 10 new sts, skip forward to MT-4, pick up 42-46-51-55-62-71 sts (= right front piece) = 188-204-224-240-268-304 sts. K 1 row on all sts from WS. Change to Fabel and K 2 rows, at the same time on the last row inc 13-15-13-15-23-23 sts evenly = 201-219-237-255-291-327 sts. Change to off-white Alpaca and continue in M.1 with 1 edge st in garter st each side towards mid front (= 11-12-13-14-16-18 repeats across the row + 1 st). After M.1 K 2 rows with Fabel, at the same time dec 16-18-16-18-24-28 sts evenly on first row = 185-201-221-237-267-299 sts. Now measure piece from here!
Delete “Remove all MT”. Insert 2 new MT 46-50-55-59-67-75 sts in from each side (to mark the sides = 93-101-111-119-133-149 sts between MT on back piece).
Change to blue/purple Alpaca. Cast on 7 new sts at beg of row (= front band), K row and cast on 7 new sts at the end of row (= front band at the other side) = 199-215-235-251-281-313 sts.
Read all of the following section before continuing!
Continue in garter st, but P sts on front band on all rows (= 7 sts each side) otherwise it won’t show.
Dec at sides: At the same time after 2 rows with blue/purple Alpaca dec 1 st on both sides of each MT at sides on every 2-2-2.5-2.5-3-3 cm a total of 6 times = 175-191-211-227-257-289 sts.
Buttonholes: See above.
Inc at sides: When piece measures 16-17-18-19-20-21 cm (from MT at side) inc 1 st on both sides of each MT at sides on every 4 cm a total of 4 times = 191-207-227-243-273-305 sts.
When piece measures 34-35-36-37-38-39 cm (from MT after M.1) cast off very loosely – to make sure the jacket falls nicely when worn.

Sleeve: First part of sleeve is worked round on double pointed needles. Pick up 78-78-78-90-90-90 sts on double pointed needles size 3.5 mm with blue/purple Alpaca between MT-1 and MT-2 on yoke plus 1 st in each of the 10 sts cast on under sleeve on body piece = 88-88-88-100-100-100 sts. P 1 round. Change to Fabel, K 1 round, P 1 round, at the same time on the last round inc 2-2-2-8-8-8 sts evenly = 90-90-90-108-108-108 sts. Now continue in M.1 (= 5-5-5-6-6-6 repeats on round). After M.1 complete sleeve in garter st back and forth on circular needle. First work 2 rows garter st in Fabel, at the same time dec 8-8-8-10-10-10 sts evenly on first row = 82-82-82-98-98-98 sts, and now complete sleeve in blue/purple Alpaca. At the same time after 1 cm with blue/purple Alpaca dec 1 st each side on every 2-2-2-1.5-1.5-1.5 cm a total of 13-13-12-18-18-17 times = 56-56-58-62-62-64 sts. When sleeve measures 49-48-47-46-45-44 cm from where sts were pick up on body piece - less on the larger sizes because of wider yoke – cast off very loosely.
Work the other sleeve in the same way, picking up sts between MT-3 and MT-4 on yoke.

Assembly: Sew sleeve seams in outer loops of sts.
Left front band: Pick up 1 st in each of the 7 sts cast on for front band with blue/purple Alpaca. Work garter st until front band is almost the same length as M.1 and yoke (front band should be stretched slightly when sewn to body piece). Cast off and sew front band to body piece with neat sts.
Right front band: Like left front band but cast off for buttonhole (see explanation for buttonhole above) when front band measures 9-9-9-10-10-10 cm from the previous buttonhole on yoke and then 2 further buttonholes with approx 9-9-9-10-10-10 cm between each. Cast off for the last buttonhole when 4 rows garter st remain.
Neckline: Pick up approx 80 to 100 sts with blue/purple Alpaca on circular needle size 3.5 mm round the neck. K 3 rows back and forth on needle and cast off.
Sew on buttons.

Diagram

symbols = off-white Alpaca
symbols = blue/purple Alpaca
symbols = Fabel
diagram

Each of our patterns has specific tutorial videos to help you.

Do you have a question? See a list of frequently asked questions (FAQ)

Knitting tension is what determines the final measurements of your work, and is usually measured per 10 x 10 cm. It is provided like so: number of stitches in width x number of rows in height - eg: 19 stitches x 26 rows = 10 x 10 cm.

The knitting tension is very individual; some people knit/crochet loosely while others work tightly. You adjust the knitting tension with the needle size, which is why the suggested needle size is only meant as a guide! You need to adjust this (up or down) to ensure that YOUR knitting tension matches the knitting tension provided in the pattern. If you work with a different knitting tension than provided you will have a different yarn consumption, and your work will have different measurements than what the pattern suggests.

The knitting tension also determines which yarns can replace each other. As long as you achieve the same knitting tension you can replace one yarn with another.

See DROPS lesson: How to measure your tension/gauge

See DROPS video: How to make a gauge tension swatch

The required amount of yarn is provided in grams, eg: 450 g. To calculate how many balls you’ll need you first need to know how many grams are in 1 ball (25g, 50g or 100g). This information is available if you click on the individual yarn quality on our pages. Divide the amount required with the amount of each ball. For example, if each ball is 50g (the most common amount), the calculation will be as follows: 450 / 50 = 9 balls.

The important thing when changing from one yarn to another is that the knitting/crochet tension remains the same. This is so that the measurements of the finished piece will be the same as on the sketch provided. It is easier to achieve the same knitting tension using yarns from the same yarn group. It is also possible to work with multiple strands of a thinner yarn to achieve the knitting tension of a thicker one. Please try our yarn converter. We recommend you to always work a test swatch.

Please NOTE: when changing yarn the garment might have a different look and feel to the garment in the photo, due to individual properties and qualities of each yarn.

See DROPS lesson: Can I use a different yarn than the one mentioned in the pattern?

All our yarns are categorised into yarn groups (from A to F) according to thickness and knitting tension – group A contains the thinnest yarns and group F the thickest. This makes it easier for you to find alternative yarns to our patterns, should you wish to switch yarn. All yarns within the same group have a similar knitting tension and can easily replace each other. However, different yarn qualities have different structures and properties which will give the finished work a unique look and feel.

Click here for an overview of the yarns in each yarn group

At the top of all our patterns you’ll find a link to our yarn calculator, which is a helpful tool should you wish to use a different yarn than suggested. By filling in the yarn quality you wish to replace, the amount (in your size) and number of strands, the calculator will present good alternative yarns with the same knitting tension. Additionally it will tell you how much you’ll require in the new qualities and whether you’ll need to work with multiple strands. Most skeins are 50g (some are 25g or 100g).

If the pattern is worked with multiple colours, every colour will have to be calculated separately. Similarly, if the pattern is worked with several strands of different yarns (for example 1 strand Alpaca and 1 strand Kid-Silk) you will have to find alternatives for each, individually.

Click here to see our yarn calculator

Since different yarns have different qualities and textures we have chosen to keep the original yarn in our patterns. However, you can easily find options among our available qualities by using our yarn calculator, or simply pick a yarn from the same yarn group.

It is possible that some retailers still have discontinued yarns in stock, or that someone has a few skeins at home that they would like to find patterns for.

The yarn calculator will provide both alternative yarn as well as required amount in the new quality.

If you think it's hard to decide what size to make, it can be a good idea to measure a garment you own already and like the size of. Then you can pick the size by comparing those measures with the ones available in the pattern's size chart.

You'll find the size chart at the bottom of the pattern.

See DROPS lesson: How to read size chart

The needle size provided in the pattern serves only as a guide, the important thing is to follow the knitting tension. And since knitting tension is very individual, you will have to adjust the needle size to ensure that YOUR tension is the same as in the pattern – maybe you’ll have to adjust 1, or even 2 needle sizes, up or down to achieve the correct tension. For this, we recommend that you work test swatches.

Should you work with a different knitting tension than the one provided, the measurements of the finished garment might deviate from the measurement sketch.

See DROPS lesson: How to measure your tension/gauge

See DROPS video: How to make a tension/gauge swatch

Working a garment top-down provides more flexibility and room for personal adjustment. For example it is easier to try the garment on while working, as well as making adjustments to length of yoke and shoulder caps.

The instructions are carefully explaining every step, in the correct order. Diagrams are adjusted to the knitting direction and are worked as usual.

The diagram depicts all rows/rounds, and every stitch seen from the right side. It is read from bottom to top, from right to left. 1 square = 1 stitch.

When working back and forth, every other row is worked from the right side and every other row is worked from the wrong side. When working from the wrong side, the diagram will have to be worked reversed: from left to right, knit stitches are purled, purl stitches are knit etc.

When working in the round every round is worked from the right side and the diagram are worked from right to left on all rounds.

See DROPS lesson: How to read knitting diagrams

The diagram depicts all rows/rounds, and every stitch seen from the right side. It is worked from bottom to top, from right to left.

When working back and forth every other row is worked from the right side: from right to left and every other row is worked from the wrong side: from left to right.

When working in the round, every row in the diagram are worked from the right side, from right to left.

When working a circular diagram you start in the middle and work your way outwards, counter clockwise, row by row.

The rows usually start with a given number of chain stitches (equivalent to the height of the following stitch), this will either be depicted in the diagram or explained in the pattern.

See DROPS lesson: How to read crochet diagrams

Instructions for working several diagrams after each other on the same row/round, will often be written like so: “work A.1, A.2, A.3 a total of 0-0-2-3-4 times". This means you work A.1 once, then A.2 is worked once, and A.3 is repeated (in width) the number of times provided for your size – in this case like so: S = 0 times, M = 0 times, L=2 times, XL= 3 times and XXL = 4 times.

The diagrams are worked as usual: begin with the first row in A.1, then work the first row in A.2 etc.

See DROPS lesson: How to read knitting diagrams

See DROPS lesson: How to read crochet diagrams

The total width of the garment (from wrist-to-wrist) will be larger in the larger sizes, despite the actual sleeves being shorter. The larger sizes have longer sleeve caps and wider shoulders, so there will be a good fit in all sizes.

The measurement sketch/schematic drawing provides information regarding the full length of the garment. If it’s a jumper or a jacket the length is measured from the highest point on the shoulder closest to the neckline, and straight down to the bottom of the garment. It is NOT measured from the tip of shoulder. Similarly, the length of yoke is measured from the highest point on the shoulder and down to where yoke is split into body and sleeves.

On a jacket measures are never taken along bands, unless specifically stated. Always measure inside band stitches when measuring the length.

See DROPS lesson: How to read a schematic drawing

Diagrams are often repeated on the round or in height. 1 repeat is the diagram the way it appears in the pattern. If it says to work 5 repeats of A.1 in the round, then you work A.1 a total of 5 times after/next to each other in the round. If it says to work 2 repeats of A.1 vertically/in height you work the entire diagram once, then begin again at the start and work the entire diagram one more time.

Chain stitches are slightly narrower than other stitches and to avoid working the cast-on edge too tight, we simply chain more stitches to begin with. The stitch count will be adjusted on the following row to fit the pattern and measurement sketch.

The rib edge is more elastic and will contract slightly compared to, for example, stocking stitch. By increasing before the rib edge, you avoid a visible difference in width between the rib edge and the rest of the body.

It’s very easy to cast off too tightly, and by making yarn overs while casting off (and simultaneously casting these off) you avoid a too tight cast off edge.

See DROPS video: How to bind off with yarn overs (yo)

To achieve an even increase (or decrease) you can increase on, for example: every 3rd and 4th row alternately, like so: work 2 rows and increase on the 3rd row, work 3 rows and increase on the 4th. Repeat this until the increase is complete.

See DROPS lesson: Increase or decrease 1 st on every 3rd and 4th row alternately

Should you prefer to work in the round instead of back and forth, you may of course adjust the pattern. You’ll need to add steeks mid-front (usually 5 stitches), and follow the instructions. When you would normally turn and work from the wrong side, simply work across the steek and continue in the round. At the end you’ll cut the piece open, pick up stitches to work bands, and cover the cut edges.

See DROPS video: How to knit steeks and cut open

Should you prefer to work back and forth instead of in the round, you may of course adjust the pattern so you work the pieces separately and then assemble them at the end. Divide the stitches for the body in 2, add 1 edge stitch in each side (for sewing) and work the front and back pieces separately.

See DROPS lesson: Can I adapt a pattern for circular needles into straight needles?

Pattern repeats can vary slightly in the different sizes, in order to get the correct proportions. If you’re not working the exact same size as the garment in the photo, yours might deviate slightly. This has been carefully developed and adjusted so that the complete impression of the garment is the same in all sizes.

Make sure to follow instructions and diagrams for your size!

If you have found a pattern you like which is available in women’s size it’s not very difficult to convert it to men’s size. The biggest difference will be the length of sleeves and body. Start working on the women size that you think would fit across the chest. The additional length will be worked right before you cast off for the armhole/sleeve cap. If the pattern is worked top-down you can add the length right after the armhole or before the first decrease on sleeve.

Regarding additional yarn amount, this will depend on how much length you add, but it is better with a skein too many than too few.

All yarns will have excess fibres (from production) that might come off as lint or shedding. Brushed yarns (ie hairier yarns) have more of these loose, excess fibres, causing more shedding.

Shedding also depends on what is worn under or over the garment, and whether this pulls at the yarn fibres. It’s therefore not possible to guarantee that there will be no shedding

Below are some tips on how to get the best result when working with hairier yarns:

1. When the garment is finished (before you wash it) shake it vigorously so the looser hairs come off. NOTE: do NOT use a lint roller, brush or any method that pulls at the yarn.

2. Place the garment in a plastic bag and put it in your freezer - the temperature will cause the fibres to become less attached to each other, and excess fibres will come off easier.

3. Leave in the freezer for a few hours before taking it out and shaking it again.

4. Wash the garment according to the instructions on the yarn label.

Pilling is a natural process that happens to even the most exclusive of fibers. It's a natural sign of wear and tear that is hard to avoid, and that is most visible in high friction areas of your garment like a sweater's arms and cuffs.

You can make your garment look as new by removing the pilling, using a fabric comb or a pill/lint remover.

Still can't find the answer you need? Then scroll down and leave your question so one of our experts can try to help you. This will be done normally within 5 to 10 working days.
In the meantime, you can read the questions and answers that others have left to this pattern or join the DROPS Workshop on Facebook to get help from fellow knitters/crocheters!

You might also like...

Post a comment to pattern DROPS 108-34

We would love to hear what you have to say about this pattern!

If you want to leave a question, please make sure you select the correct category in the form below, to speed up the answering process. Required fields are marked *.

Comments / Questions (29)

country flag Val92 wrote:

I have a hard time knowing how high the collar should be. Can you tell me how many long side ribs there should be. I’m a size XL and I’ve calculated 380 foam dimensions. The model says 174 cm high side long, and on that I have to raise 240 m. Thank you for your help.

26.10.2019 - 11:34

DROPS Design answered:

Dear Val92, this will depend on your tension, just make sure your measurements are right to get the right finished measurements. Bottom edge should measure 174 cm, then insert markers as explained later, and pick up stitches + cast on new stitches under sleeves for a total of 240 sts. Happy knitting!

04.11.2019 - 11:58

country flag Valerie wrote:

J’ai du mal à savoir à quelle hauteur rabattre le col. Pouvez-vous me dire combien il doit y avoir de côtes mousse coté long. Je fais une taille XL et j’ai calculé 380 cotes mousse. Le modèle dit 174 cm hauteur coté long, et là-dessus je dois relever 240 m. Merci de votre aide

26.10.2019 - 11:32

DROPS Design answered:

Bonjour Valérie, tout dépend de votre tension en hauteur, ce qu'il faut pour que les mesures soient justes, c'est que votre ouvrage mesure bien 174 cm en bas, vous allez ensuite placer des marqueurs et relever des mailles entre les marqueurs + monter les mailles du dessous des manches pour un total de 240 m (cf détail sous Dos & devants). Bon tricot!
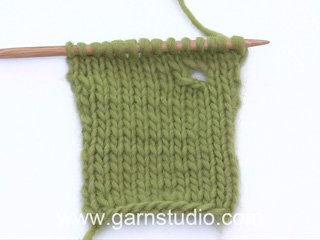
04.11.2019 - 11:56

country flag Liva Hermansen wrote:

De små huller ved vending, er en del af mønsteret, og ses fint i ensfarvet garn. Jeg har hæklet borten.

20.04.2019 - 09:46

country flag Johanneke wrote:

Als ik bij het patroon in maat m, 12 herhalingen doe van 18 steken, kom ik op 216 steken. Twee kantsteken aan beide kanten is 218 steken. In de rij ervoor was er gemeerderd tot 219 steken. Is dit een patroon fout, of lees ik het verkeerd.

15.02.2019 - 16:47

DROPS Design answered:

Dag Johanneke,

Je breit 12 herhaligen van het motief + 1 st, waardoor je met de kantsteken erbij op 219 steken komt.

28.02.2019 - 11:09

country flag Uta wrote:

Hallo. Ist die Zu-und Abnahme für M1 weil es glatt rechts gestrickt wird? Oder weil das Garn gewechselt wird ? Danke

10.09.2018 - 18:27

DROPS Design answered:

Liebe Uta, die Zu- und Abnahmen vor und nach M.1 sind so gestrickt, damit man die gewünschte Breite hat. Viel Spaß beim stricken!
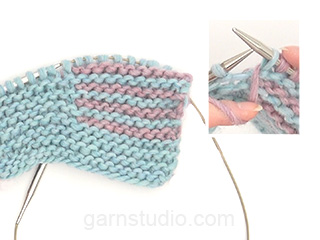
11.09.2018 - 09:06

country flag Drops Design wrote:

Du kan prøve å løfte av den første masken og stramme tråden etterpå.

06.01.2009 - 10:06

country flag Elise wrote:

Hva gjør jeg for å unngå hull når jeg snur på de forkortede pinnene. Hjelper ikke å bare stramme tråden.

24.12.2008 - 22:48

country flag Line wrote:

Synes denne jakken var utrolig søt og fin.

29.09.2008 - 10:34

country flag Christina wrote:

Kjempe fin jakke, men jeg er ening med Strikkebella vedr. balance. Hadde jakken vært A-formet eller volang, kunne borden ha vært mer på sin plass. Hva med Gresk bord i stede for sjerner...

21.07.2008 - 12:05

country flag Rebekka wrote:

Jeg synes den ser meget smuk ud

13.07.2008 - 18:07