
Popular categories
Looking for a yarn?


|
|||||||||||||
DROPS 52-10 |
|||||||||||||
 |
 |
||||||||||||
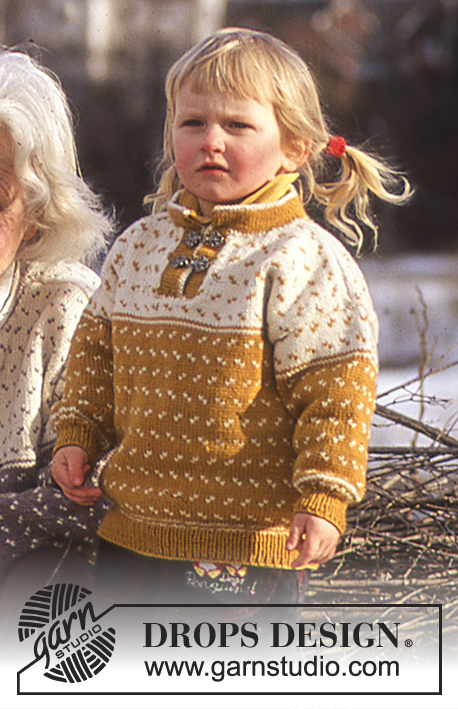
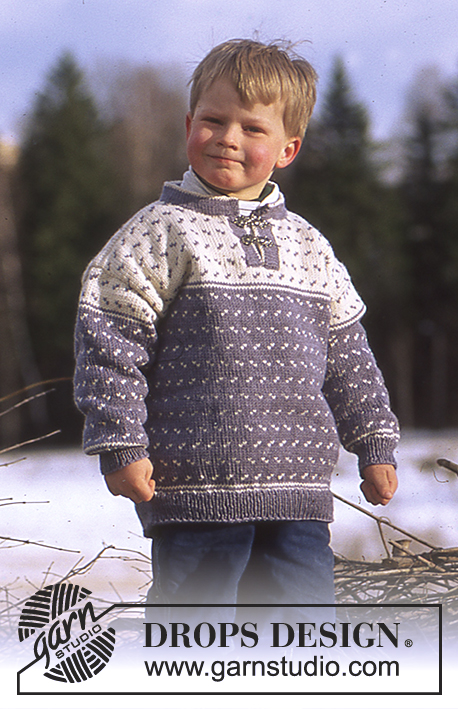
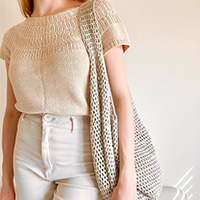
DROPS Iceland-inspired child's sweater and socks in Karisma Superwash
DROPS 52-10 |
|||||||||||||
|
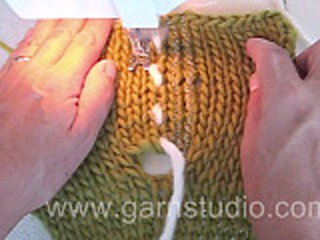
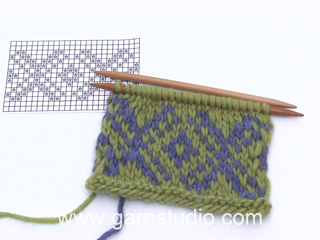
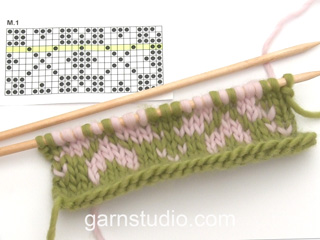
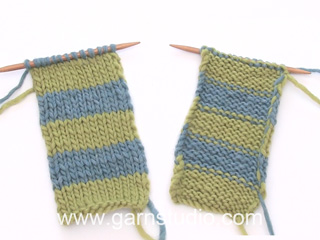
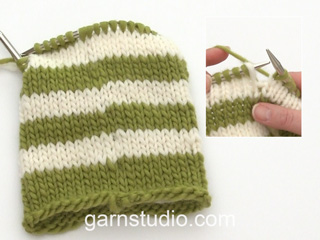
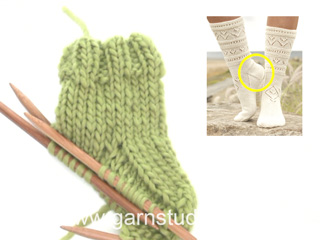
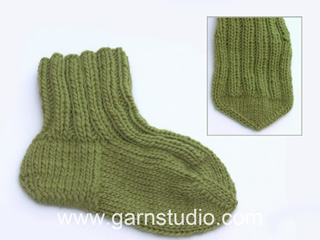
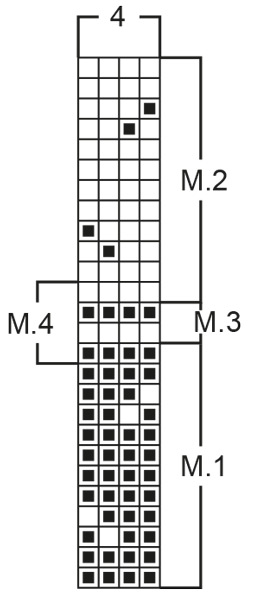
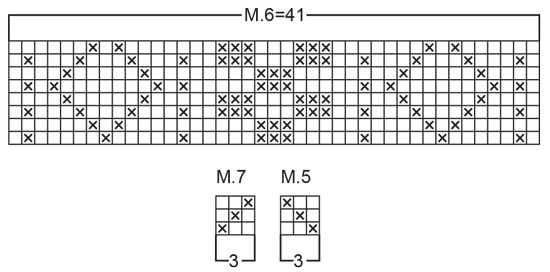
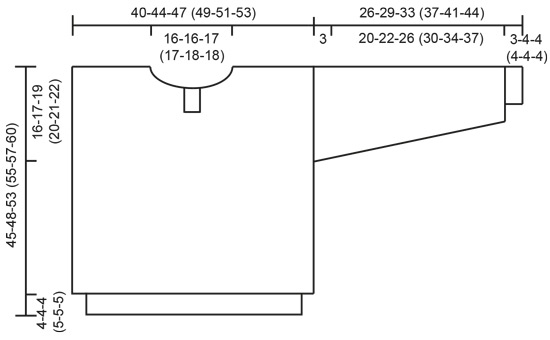
Gauge: 22 sts and 30 rows on larger needle in pattern = 10 x 10 cm Border: 2.5 cm stockinette stitch with mustard (blue heather), change to natural (natural) and knit 1 row stockinette stitch, purl 1 row (for the folding edge), change back to mustard (blue heather) and knit 2.5 cm stockinette stitch. Rib: *knit 1, purl 1*, repeat from * - *. Pattern: See chart (1 chart = 1 repeat). The pattern is shown from the right side and is knit entirely in stockinette stitch. All charts are identical for all sizes. Body: Knit the sweater in the round on circular needles and cut steeks for armholes and neck split. Cast on 176-192-208 (216-224-232) sts with mustard (blue heather) on smaller circular needles and knit rib for 4-4-4 (5-5-5) cm. Change to larger circular needles and knit Pattern 4 once, then repeat Pattern 1 until the work measures approximately 29-32-35 (36-38-39) cm [11-3/8" - 12-5/8" - 13.75" (14-1/8" - 14-7/8" - 15.75") - adjust for complete pattern. After Pattern 1 knit Pattern 3 once, then repeat Pattern 2 to finished dimensions. At the same time, when the work measures 29-31-34 (35-36-38) cm [11-3/8" - 12.25" - 13-3/8" (13.75" - 14-1/8" - 15.75") inc 4 sts on either side (at the marker and after 88-96-104 (108-112-116) sts). These sts are for the steeks and are not knitted into the pattern. When the work measures 32-35-38 (39-41-42) cm bind off the center 10 sts in the front for the neck split. On the next row cast on 5 new sts over the bound-off sts - these sts are for the steek and are not knitted into the pattern. When the work measures 40-43-48 (49-51-54) cm bind off the center front 18-18-20 (20-22-22) sts + 5 steek sts for the neck and knit the rest back and forth back and forth on the needles. Bind off at each neck edge every other row: 2 sts 1 time, 1 st 2 times. At the same time, when the work measures 43-46-51 (53-55-58) cm, bind off the center back 32-32-34 (34-36-36) sts for the neck. Then bind off 2 sts at each back neck edge on the next row. Bind off all sts when the work measures approximately 45-48-53 (55-57-60) cm [ 17.75" - 18-7/8" - 20-7/8" (21-5/8" - 22.5" - 23-5/8") - adjust for complete pattern. Sleeves: Cast on 38-38-40 (42-44-46) sts on smaller double pointed needles with mustard (blue heather); join and place a marker at the join. Knit rib for 3-4-4 (4-4-4) cm and inc 4-6-8 (6-6-4) sts evenly distributed on the last row = 42-44-48 (48-50-50) sts. Change to larger double pointed needles and knit Pattern 4 once, then repeat Pattern 1 until the work measures 21-24-28 (32-36-39) cm. At the same time, after the rib, inc 1 st each side of marker 14-16-18 (20-21-24) times: Sizes 3/4 + 5/6 years: alternately every 3rd and 4th row Sizes 7/8 + 9/10 + 13/14 years: every 4th row Size 11/12 years: alternately every 4th and 5th row = 70-76-84 (88-92-98) sts. After Pattern 1 knit Pattern 3 once, then repeat Pattern 2 to finished dimensions. When the work measures 23-26-30 (34-38-41) cm [9" - 10.25" - 11.75" (13-3/8" - 14-7/8" - 16-1/8") put 2 sts each side of marker on a stitch holder and knit the rest back and forth on the needles. Then put 5-6-6 (7-7-7) sts on a stitch holder for sleeve caps on either side every other row 4 times. The work measures approximately 26-29-33 (37-41-44) cm. Put all sts back on the same needle and knit 2 cm reverse stockinette stitch in the round for a seam allowance over the cut edge on the body. Assembly: Sew a marker thread in the center of the steek sts on either side and at the center front. Sew two machine seams around the marker thread, 1st seam = 1/2 stitch from the marker thread, 2nd seam = 1/2 stitch from first seam. Cut steeks for armholes and split. Sew shoulder seams. Pick up approximately 20-30 sts along the left side of the split on smaller needles with mustard (blue heather) and knit border. Repeat along the right side of the split. Fold the edges over against the wrong side and sew. Sew the split together at the bottom from the right side. Pick up approximately 80-94 sts around the neck and over the split on smaller needles with mustard (blue heather) and knit border. Fold the edge over against the wrong side and sew. Sew the sleeves to the body from the right side as follows: Sew alternately a stitch in the last row on the sleeve before the seam allowance and a stitch on the body after the machine seam. Turn the sweater inside out and sew the seam allowance from the sleeve over the cut edge on the body by hand. Sew on the hooks. SOCKS: Sizes: 3/4 - 5/6 - 7/8 (9/10 - 11/12 - 13/14) years footlength: 17 - 19 - 21 (22 - 23 -25) cm Materials: DROPS KARISMA SUPERWASH from Garnstudio 150-150-150 (200-200-200) g col. 01, natural white DROPS 3 mm and 3.5 mm double pointed needles, or sizes needed to obtain correct gauge. Gauge: 22 sts and 30 rows on larger needle in pattern = 10 x 10 cm Pattern: See charts (1 chart = 1 repeat). The pattern is shown from the right side and is knit in the round. All charts are identical for all sizes. Rib: *knit 1, purl 1*, repeat from * - *. Socks: Cast on 44-46-48 (50-52-52) sts on smaller needles; join and place a marker at the join (this is the center back of the sock). Knit rib for 5 cm. Change to larger needles and knit 1 row stockinette stitch, increasing 4-6-4 (6-4-4) sts evenly distributed on the row = 48-52-52 (56-56-56) sts. Then establish the pattern as follows: knit 3-5-5 (7-7-7) sts of Pattern 5, Pattern 6, 3-5-5 (7-7-7) sts of Pattern 7, 1 st at the center of the back knit in stockinette stitch on all rows until the work measures 24-24-28 (27-30-32) cm [9.5" - 9.5" - 11" (10-5/8" - 11.75" - 12-5/8"). Then begin shaping the leg: Dec 1 st on each side of the stockinette stitch at the center back every 4th row: 4-5-4 (6-5-5) times = 40-42-44 (44-46-46) sts. Make the decreases as follows: Before the center stitch: slip 1, knit 1, pass the slipped stitch over. After the center stitch: K 2 tog. When the work measures 30-32-34 (36-38-40) cm, put the uppermost 22-24-26 (26-28-28) on a stitch holder and knit the heel in stockinette stitch: 5-5-5 (6-6-6) cm stockinette stitch back and forth over the center 18 sts in the back. Turn the heel: 1st row (right side): Knit 10 sts, K 2 tog into back of stitch, knit 1, turn the work. 2nd row (wrong side): slip 1, purl 8, purl 2 tog, purl 1, turn the work. 3rd row: slip 1, knit 7, K 2 tog into back of stitch, knit 1, turn the work. 4th row: slip 1, purl 6, purl 2 tog, purl 1, turn the work. 5th row: slip 1, knit 5 sts, K 2 tog into back of stitch, knit 1, turn the work. 6th row: slip 1, purl 4, purl 2 tog, purl 1, turn the work. 7th row: K 2 tog, knit 3 sts, K 2 tog into back of stitch = 10 sts on needle. Now pick up 11-11-11 (13-13-13) sts on either side of the heel and put all sts evenly distributed on 4 needles = 54-56-58 (62-64-64) sts. Then dec 1 st each side of the uppermost 22-24-26 (26-28-28) sts every other row: 6-6-5 (7-7-7) times = 42-44-48 (48-50-50) sts. When the foot measures 13-15-16 (17-18-20) cm from the start of the heel turning, shape the toe. Attach a marker on either side of the foot and dec 1 st on either side of the markers (4 decreases per row in all) 8-8-10 (10-10-10) times alternately every row and every other row = 10-12-8 (8-10-10) sts. Pull the yarn doubled through the last sts and sew together. |
|||||||||||||
Diagram explanations |
|||||||||||||
|
|||||||||||||
|
|||||||||||||
|
|||||||||||||
|
|||||||||||||
|
Have you made this or any other of our designs? Tag your pictures in social media with #dropsdesign so we can see them! Do you need help with this pattern?You'll find tutorial videos, a Comments/Questions area and more by visiting the pattern on garnstudio.com. © 1982-2024 DROPS Design A/S. We reserve all rights. This document, including all its sub-sections, has copyrights. Read more about what you can do with our patterns at the bottom of each pattern on our site. |
|||||||||||||


With over 40 years in knitting and crochet design, DROPS Design offers one of the most extensive collections of free patterns on the internet - translated to 17 languages. As of today we count 304 catalogues and 11422 patterns - 11422 of which are translated into English (UK/cm).
We work hard to bring you the best knitting and crochet have to offer, inspiration and advice as well as great quality yarns at incredible prices! Would you like to use our patterns for other than personal use? You can read what you are allowed to do in the Copyright text at the bottom of all our patterns. Happy crafting!
Comments / Questions (5)
I am knitting size 3/4 of pattern 52-10. Is there a video that can help me with the sleeve to “put 5 stitches on a stitch holder for sleeve caps on either side every other row 4 times.” As it says this is for the sleeve cap, do I do this at the top of the sleeve, 5 stitches on either side of the middle of the row?
26.10.2021 - 23:31DROPS Design answered:
Dear Mary, unfortunately we do not have a video of this method. You are putting these stitches on a holder (or on a thread) instead of casting them off to frorm the sleeve cap, so later, when the sleeve cap is finshed, you can knit all of them at once. You start it where you would start casting off the stitches for sleeve cal, in the middle of the undersleeve. Happy stitching!
28.10.2021 - 11:50You ask for suggestions for a name for this pattern - I have just knitted this for my 6year old grandson and he loves it. Will hardly take it off! He has suggested two names and hopes you will decide to have one of them. 'NORS' because it is similar to a Nordic pattern OR 'FERGUS' as he is called Fergus which is a very Scottish name.
22.04.2017 - 21:11Wo gib es die Ösen zu kaufen?
05.11.2016 - 19:32DROPS Design answered:
Liebe Frau Kleinert-Graupe, diese Ösen haben wir leider keine mehr, aber gerne kann Ihnen sicher Ihr DROPS Laden damit helfen.
07.11.2016 - 09:16Hoi Linda. Wat zou je graag willen weten? Je meerdert de steken zoals beschreven en brei deze in tricotst. Bij het afwerken worden deze steken doorgeknipt. Ik heb een beschrijving voor deze werkwijze, maar alleen in een document. Zou je deze graag willen ontvangen, stuur me dan een mail. Gr. Tine
29.03.2009 - 14:37Linda wrote:
Meerder tegelijkertijd bij een hoogte van 29-31-34 (35-36-38) cm 4 st aan weerskanten voor de armsgaten (deze st worden bij het afwerken opengeknipt, en maken zodoende geen deel uit van het motief). Het is mijn eerste keer dat ik met een rondbreinaald een trui brei. Kun je mij raad geven over die steken die je meerdert aan de mouwkant en die steken daarna knipt. Dank je vriendelijk, Linda
24.03.2009 - 05:32