
Popular categories
Looking for a yarn?


|
||||||||||||||||||||||
Henrik |
||||||||||||||||||||||
 |
 |
|||||||||||||||||||||
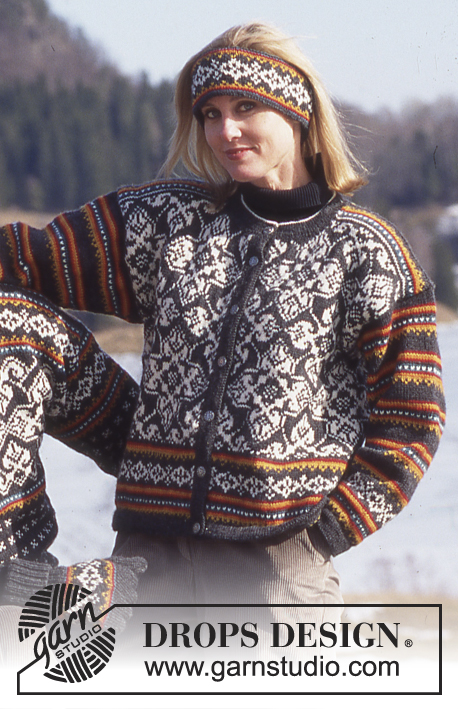
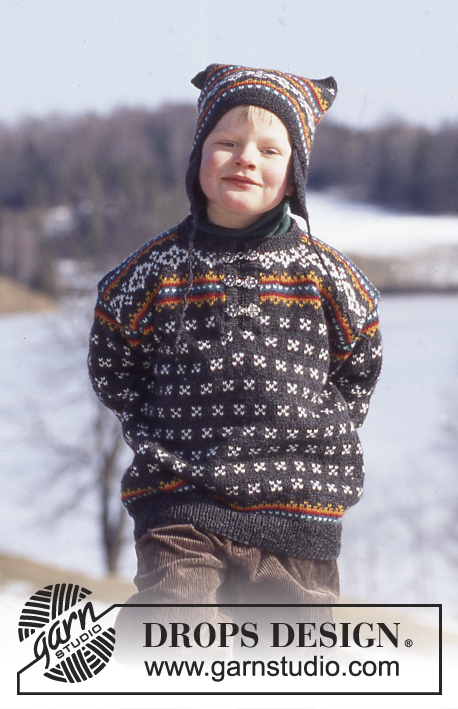
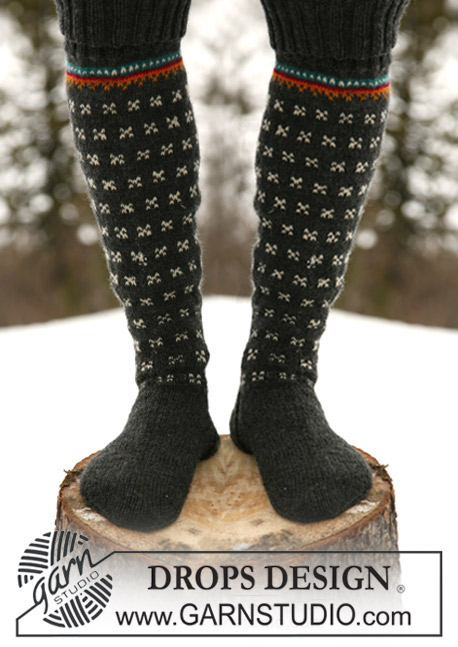
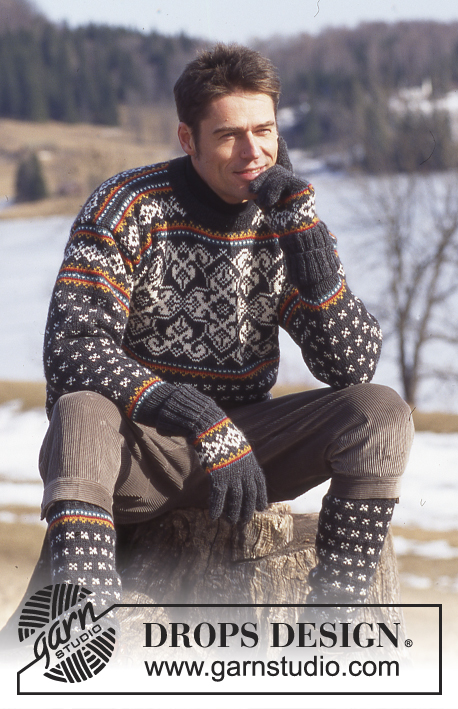
DROPS Sweater for men, Gloves and socks in Karisma Superwash
DROPS 52-2 |
||||||||||||||||||||||
|
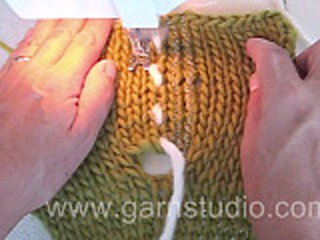
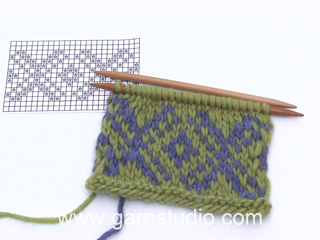
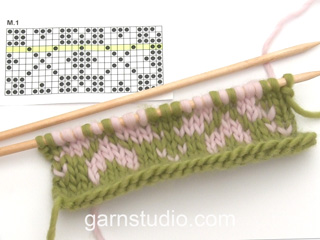
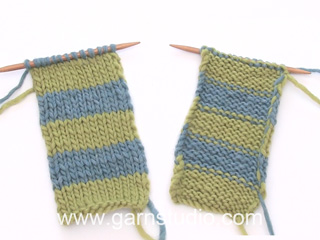
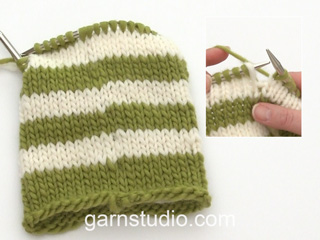
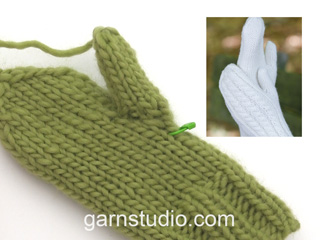
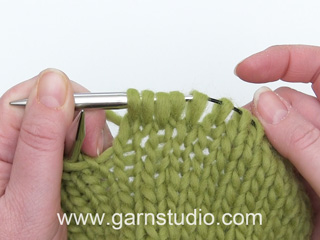
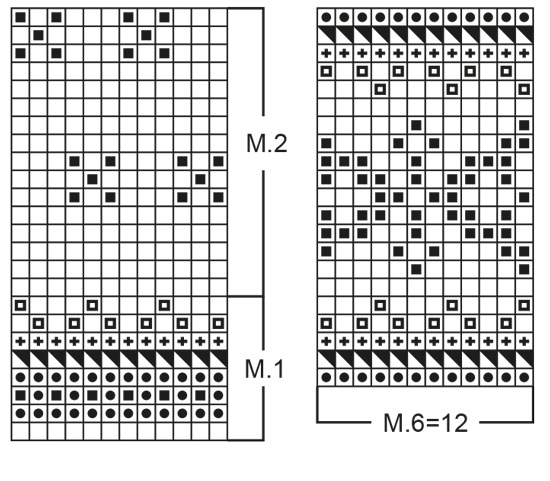
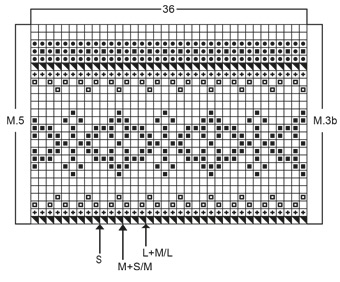
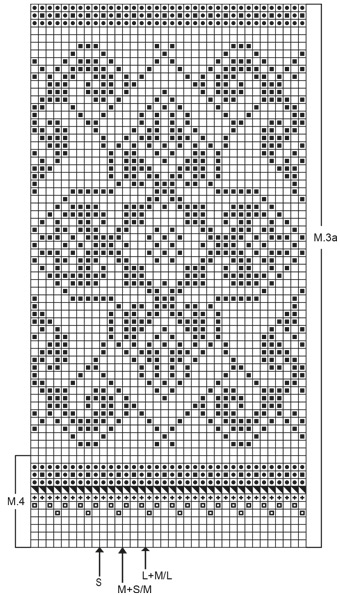
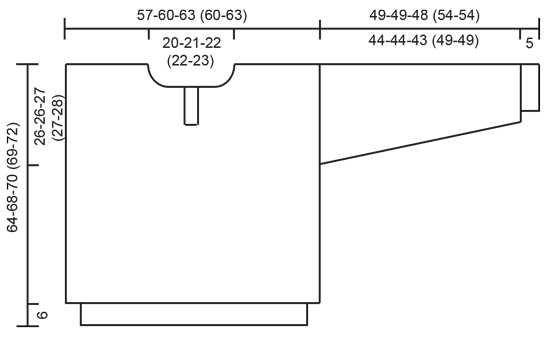
SWEATER: Gauge: 22 sts and 30 rows on larger needles in pattern = 10 x 10 cm Pattern: See charts (1 chart = 1 repeat). The pattern is shown from the right side and is knit entirely in stockinette stitch. The chart for Patterns 1 & 2 is identical for all sizes. The chart for Patterns 3, 4 & 5 arrows indicate the starting points for different sizes. NOTE: the sweater diagram shows a neck placket; this is an error. All the measurements are correct. Rib: *knit 1, purl 1*, repeat from * - *. Body: Numbers in ( ) = men's sizes. Knit the sweater in the round and cut steeks for armholes. Cast on 192-200-208 (208-216) sts with coal gray on smaller circular needles; join and place a marker at the join. Knit rib for 6 cm. Change to larger circular needles and knit Pattern 1, increasing 60-64-68 (56-60) sts evenly distributed on the 1st row = 252-264-276 (264-276) sts. Place a second marker halfway across the row for the other side. Front and back each have 126-132-138 (132-138) sts. After Pattern 1 knit Pattern 2 until the work measures approximately 32-36-38 (37-40) cm - adjust for pattern (approximately 32 cm remains to be knit). After Pattern 2 knit Pattern 3 - start at the arrow on the chart and knit sts over the front, start at the arrow again and knit sts over the back. At the same time, when the work measures 38-42-43 (42-44) cm, cast on 5 sts on either side (these sts are for the steeks and should not be knitted into the pattern). When the work measures 58-62-64 (63-66) cm bind off the center front 24-26-28 (28-30) for the neck and knit the rest back and forth on the needle. Then bind off at each neck edge every other row: 3 sts 1 time, 2 sts 2 times, 1 st 3 times. At the same time, when the work measures 62-66-68 (67-70) cm, bind off the center back 40-42-44 (44-46) sts for the neck. Then bind off 2 sts on each neck edge on the next row. Bind off after Pattern 3 - the work measures approximately 64-68-70 (69-72) cm. Sleeves: Cast on 56-58-58 (58-60) sts on smaller double pointed needles with coal gray; join and place a marker at the join. Knit rib for 5 cm. Change to larger double pointed needles and knit Pattern 1. After the rib, inc 1 st each side of marker 29-28-30 (30-32) times: Women’s Sizes S + L and Men's Size M/L: every 4th row Women’s Size M: alternately every 4th and 5th row Men's Size S/M: alternately every 4th and 5th row = 114-114-118 (118-124) sts. After Pattern 1, repeat Pattern 2 until the work measures approximately 36-35-35 (41-41) cm - adjust for complete pattern. Approximately 13 cm of the work remains. Knit Pattern 4 and then Pattern 5. The work measures approximately 49-49-48 (54-54) cm. Then knit 2 cm reverse stockinette stitch for a seam allowance over the cut edge on the body with coal gray. Bind off. Assembly: Sew a marker thread in the center of the steek sts on either side. Sew two machine seams around the marker thread, 1st seam = 1/2 stitch from the marker thread, 2nd seam = 1/2 stitch from first seam. Cut steeks for armholes. Sew shoulder seams. Pick up approximately 104-116 sts around the neck on smaller double pointed needles with coal gray; join and knit 1 row stockinette stitch and then rib for 6 cm, bind off. Fold the rib over against the wrong side and sew. Sew the sleeves to the body from the right side as follows: Sew alternately a stitch in the last row on the sleeve before the seam allowance and a stitch on the body after the machine seam. Turn the cardigan inside out and sew the seam allowance from the sleeve over the cut edge on the body by hand. GLOVES: Sizes: Women’s (Men’s) Materials: DROPS KARISMA SUPERWASH from Garnstudio 100 (100) g col. 53, coal gray + the remaining pattern colors left over from sweater DROPS 3 mm and 3.5 mm double pointed needles, or sizes needed to obtain correct gauge. Gauge: 22 sts and 30 rows on larger needle in stockinette stitch = 10 x 10 cm Pattern: See chart (1 chart = 1 repeat). The pattern is shown from the right side and is knit entirely in stockinette stitch. The chart is identical for all sizes. Rib: *knit 2, purl 2*, repeat from * - *. Gloves: Numbers in ( ) = men's. Cast on 52 (56) sts on smaller double pointed needles with coal gray and knit rib for 15 cm. Dec 8 sts evenly distributed on the last row = 44 (48) sts. Change to larger double pointed needles and knit Pattern 6 and at the same time put a marker after the 22nd and 23rd (24th and 25th) sts - this is the top of the hand (inc sts for the thumb at these markers) - the remaining 21 (23) sts are the inside of the hand. Measure the work from here. When the work measures 1 cm, inc 1 st at each marker 5 (6) times every 4th row (every 3rd row) = 54 (60) sts - knit the increased sts into Pattern 6. After finishing the thumb increases, put the 11 sts of the thumb on a stitch holder. Then cast on 1 new stitch over the sts on the stitch holder = 44 (50) sts. After Pattern 6 knit stockinette stitch in coal gray. Continue until the work measures 10 (11) cm. Knit the fingers: Little finger: Pick up 4 (6) sts from the top of the hand and 4 (5) sts from inside the hand and cast on 1 st at the ring finger = 9 (12) sts; join. Knit 5 (6) cm with coal gray in stockinette stitch. Knit 2 sts together across the next row, then pull the length of yarn doubled through the remaining sts. Knit 3 rows over the remaining sts on the glove before knitting the remaining fingers. Ring finger: Pick up 6 (6) sts from theon top of the hand and 6 (7) sts from inside the hand and cast on 1 st at the little finger and 1 st at the center finger = 14 (15) sts. Knit 6 (7) cm stockinette stitch with coal gray. Knit 2 sts together across the next row and then pull the length of yarn doubled through the sts. Center finger: Knit like the ring finger but knit 7 (8) cm stockinette stitch with coal gray. Index finger: Pick up 6 (6) sts from the top of the hand and 6 (7) sts from inside the hand and cast on 1 st at the center finger = 13 (14) sts. Knit like the ring finger. Thumb: Pick up the 11 sts from the stitch holder and 3 (5) sts against the hand and knit 6 (6.5) cm stockinette stitch with coal gray and bind off as on the ring finger. Sew a stitch between the fingers. Knit another glove, reversing finger placement. SOCKS: See instructions under Model No. 52-1. |
||||||||||||||||||||||
Diagram explanations |
||||||||||||||||||||||
|
||||||||||||||||||||||
|
||||||||||||||||||||||
|
||||||||||||||||||||||
|
||||||||||||||||||||||
|
||||||||||||||||||||||
|
Have you made this or any other of our designs? Tag your pictures in social media with #dropsdesign so we can see them! Do you need help with this pattern?You'll find tutorial videos, a Comments/Questions area and more by visiting the pattern on garnstudio.com. © 1982-2024 DROPS Design A/S. We reserve all rights. This document, including all its sub-sections, has copyrights. Read more about what you can do with our patterns at the bottom of each pattern on our site. |
||||||||||||||||||||||


With over 40 years in knitting and crochet design, DROPS Design offers one of the most extensive collections of free patterns on the internet - translated to 17 languages. As of today we count 304 catalogues and 11422 patterns - 11422 of which are translated into English (UK/cm).
We work hard to bring you the best knitting and crochet have to offer, inspiration and advice as well as great quality yarns at incredible prices! Would you like to use our patterns for other than personal use? You can read what you are allowed to do in the Copyright text at the bottom of all our patterns. Happy crafting!
Comments / Questions (19)
There appears to be an error in the glove pattern for this pattern and 52-18. This is between the little finger and starting the ring finger. Since one is knitting 3 rows over palm and back before the longer fingers, casting on 1st between little finger and ring finger at base of ring finger is not right.
10.02.2024 - 15:40DROPS Design answered:
Dear Marilyn, you don't cast on 1 extra stitch towards small finger when working the 3 rounds over all stitches for hand, if you did, then you should decrease this stitch on first round to let the number of stitches work. Happy knitting!
20.02.2024 - 09:17Hej. Det er ikke muligt for mig at trykke på diagrammerne (eller åbne dem)? Er det noget i kan hjælpe mig med?
22.01.2024 - 10:00DROPS Design answered:
Hei Nanna. Her manglet den danske diagramteksten, den er nå lagt til og alle diagram og målskisse skal nå vises. mvh DROPS Design
22.01.2024 - 13:28Hei. Tenkte å strikke disse vantene, men stemmer det at en skal legge opp på pinne 3.5 for så å bytte til pinne3.5?
14.03.2023 - 00:36DROPS Design answered:
Hei Hege, Du skal legge opp med pinnestørrelse 2,5. God fornøyelse!
14.03.2023 - 07:03Je tricote le pull Henrik. Vous dites qu'il ne faut pas tricoter les mailles steek en jacquard, mais en jersey. Dans ce cas comment faites vous pour emmener les 2 fils de l'autre côté de ces mailles ? Tricoter 2 fils en même temps ? Commencer un nouveau fil à chaque tour ? Merci pour votre réponse.
07.03.2023 - 21:26DROPS Design answered:
Bonjour Véronique, on ne doit pas les tricoter dans le motif du pull (elles ne comptent pas dans ces motifs), mais vous pouvez les tricoter alternativement d'une couleur et de l'autre en largeur et en hauteur - ou seulement en largeur - dans cette vidéo, on montre, à titre d'exemple, des mailles steek tricotés pour une bordure devant. Bon tricot!
08.03.2023 - 09:16Hei. Hvor er diagrammet M3? Jeg vet det var der tidligere, men er borte nå. Hilsen Monica
20.11.2022 - 19:17DROPS Design answered:
Hei Monica, M.3 er diagrammet som er rett ovenfor målskissen. God fornøyelse!
21.11.2022 - 06:48Hei. \r\nHvor er mønster M3? Jeg vet det var i oppskriften tidligere, men er borte nå. (?)\r\nHilsen Monica
20.11.2022 - 19:15Hej, hvor høj er jeres model? Findes der evt et billede, hvor modellen står op så man kan se hele blusen? På forhånd tak Med venlig hilsen Lissi
10.11.2022 - 21:54DROPS Design answered:
Hej Lissi, du finer tøjets mål i måleskitsen nederst i opskriften. Vi har ikke flere billeder, men mønsteret ser ud som i drengeblusen du ser på et billede lidt længere nede i opskriften :)
11.11.2022 - 13:34Bonsoir, je voudrais savoir une fois le jacquard terminé pour atteindre la longueur du pull souhaité avant de rabattre les mailles pour l’encolure devant est ce que on continue en jerseys avec la couleur de fond ou en refait la bande M2 pour mon modèle il faut que j’atteigne 66 cm merci beaucoup
23.02.2021 - 22:36DROPS Design answered:
Bonjour Sima, normalement, on rabat après M.3, autrement dit, si l'échantillon est juste en hauteur vous devriez terminer M.3 en même temps que la hauteur pour rabattre les mailles des épaules. S'il vous manque quelques rangs, essayez d'ajuster au mieux en fonction du nombre de rangs/cm qu'il vous reste à faire. Bon tricot!
24.02.2021 - 07:38Bonjour; je reviens encore vers pour m'expliquer le diagramme M3 qui est sur 36 mailles est ce qu'on divise l'ouvrage sur 36 mailles pour voir combien de fois ce diagramme se répète dans mon cas c'est la taille L Homme j'ai donc 138 (dos) et 138 (devant) donc 3x M3 merci.
04.02.2021 - 14:57DROPS Design answered:
Bonjour Sima, en taille homme M/L, tricotez M.3 ainsi en commençant par la flèche: les 15 dernières mailles du diagramme, puis répétez 3 fois les 36 mailles du diagramme, et terminez par les 15 premières mailles du diagramme (= 15 + 3*36 + 15 = 138), puis reprenez de nouveau pour la 2ème moitié: les 15 dernières mailles, 3 x M.3 et les 15 premières mailles. Le diagramme ne tombe pas juste sur les côtés mais il est ainsi centré au milieu devant et au milieu dos. Bon tricot!
04.02.2021 - 15:37Rebonjour; Quand vous dites monter 5 m de chaque côté est ce que on monte 5m de part et d'autre des 138 m devant et derriere? c'est à dire on ajoute 5*2 au début et à la fin devant (138m) et 5*2 au début et à la fin dos (138m) au total 20 mailles merci de votre aide :)
15.01.2021 - 17:01DROPS Design answered:
Bonjour Sima, ces 5 mailles x 2 sont les mailles steek qui seront ensuite découpées pour les manches, elles doivent être de chaque côté du pull: vous aurez ainsi: 5 m steek, 138 m, 5 m steek, 138 m. (cf aussi la vidéo. Bon tricot!
18.01.2021 - 11:31