
Popular categories
Looking for a yarn?


Comments / Questions (16)
![]() Brigitte wrote:
Brigitte wrote:
Bonjour, Je tricote ce modèle en aiguille circulaire comme indiqué. Mais au moment du dos et devant ou il faut séparer l'ouvrage en 2, je ne comprends pas comment finir le tricot séparément ? Si je le fais séparément je dois de ce fait travailler en aller retour. Comment faire le dessin sur l'arrière/ l'envers du travail ? Merci d'avance pour votre aide.
18.03.2026 - 21:11DROPS Design answered:
Bonjour Brigitte, effectivement, vous allez tricoter le motif désormais une fois sur 2 sur l'envers; notez dans le diagramme quelle est la dernière maille sur l'endroit que vous tricotez, ce sera la 1ère maille à tricoter sur l'envers, lisez ensuite le diagramme de gauche à droite sur l'envers (et toujours de droite à gauche sur l'endroit). Retrouvez ici, en vidéo comment on tricote un diagramme avec 2 couleurs en allers et retours. Bon tricot!
19.03.2026 - 08:49
![]() Annie Annie Martinez wrote:
Annie Annie Martinez wrote:
Bonjour. Le bas du pull se tricote en jersey . Ça roulotte c'est pas comme sur la photo où le bas est bien droit. De plus sur la photo je ne vois pas les 9 rang jersey écru. D'autre part le fait de tricoter en rond sur l'endroit fait que le mouvement part vers la gauche. Y a t'il un moyen de contrarier cela ? Merci pour votre réponse
12.12.2024 - 09:40DROPS Design answered:
Bonjour Mme Martinez, les 9 premiers tours jersey endroit en écru ne se voient pas car on les retourne sur l'envers au niveau du tour jersey envers (= rang de cassure) pour le coudre - (cf Assemblage). Attention lors de la couture à ne pas trop serrer pour éviter que le bord ne s'enroule, vous pouvez toutefois bloquer votre pull terminé pour bien aplanir les bordures. Lorsque l'on tricote du jacquard en rond, on a un décalage au niveau des tours, cette astuce pour les rayures peut parfois, en fonction du motif, être utilisée. Bon tricot!
12.12.2024 - 10:11
![]() Inge Minnema-Vrolijk wrote:
Inge Minnema-Vrolijk wrote:
Moet ik niet meer steken afkanten bij de hals bij het rugpand? Ik kom bij maat m/l niet uit met het aantal steken op de schouder Aad.
14.10.2024 - 11:47
![]() Ann Mathieson wrote:
Ann Mathieson wrote:
I am knitting small/ medium , finished M1 do I just leave out 2 rows of plain knitting and go onto start of s/m dame, leaving out second pattern. Confused!!!!!! Many thanks
16.07.2024 - 15:19DROPS Design answered:
Dear Ann, after M.1, start working the second pattern (M.2) at the indicated arrow. Then, when you repeat M.2 again, start from the very beginning of M.2 (so, in the arrow for M/L) and continue repeating like this. So you don't work the light beige triangles the first time you work M.2, but you will include them from the next repeat onwards. Happy knitting!
21.07.2024 - 17:50
![]() Karin wrote:
Karin wrote:
Hej! Jag förstår inte alls hur det ska stickas när man har 108 maskor och ska dela diagrammet. Väldigt svårt o otydligt? Enligt \"hjälpen\" ska jag räkna 55 maskor för det är mitten, sedan 13 m till höger, sedan 24 m sen står det att man ska ha 4 m kvar men jag har 18. Ska jag börja sticka då på maska 6 från höger i diagrammet som är över 24 m? Jag förstår ingenting - behöver verkligen hjälp med detta. It makes no sense!
12.08.2021 - 16:39
![]() Aaltje wrote:
Aaltje wrote:
Ik heb Drops Paris (van beide 18 bolletjes) gekocht in de kleuren 102 (sprayblauw) en 41 (mosterd geel). Van beiden heb ik een trui gebreid. En nu de grote teleurstelling, de blauwe trui is maar liefst 10 centimeter gekrompen in de was van 30 graden, maar de gele is perfect gebleven. U snapt dat dit een enorme teleurstelling is en wat kan hieraan gedaan worden? Met vriendelijke groet, Aaltje Rensenbrink
31.01.2021 - 15:50DROPS Design answered:
Dag Aaltje,
Dat is inderdaad een grote teleurstelling en hoort niet zo te zijn als je exact dezelfde soort garens gekocht hebt. DROPS Paris kan bovendien tot 60 graden gewassen worden. We willen je vragen om contact op te nemen met het verkooppunt waar je het garen gekocht hebt om te helpen het probleem op te lossen .
01.02.2021 - 08:40
![]() Anna wrote:
Anna wrote:
Jag stickar mönster 40-2 och det är diagram M2
11.01.2021 - 16:58
![]() Anna wrote:
Anna wrote:
Hej! Jag har precis kommit till delningen och ska sticka framsidan -108 maskor! Men hur får jag bäst till mönstret då de är 24 m som inte är delbart med 108 - vartannat varv är avigt o då blir de väl att läsa fr vänster... men jag förstår inte hur jag ska läsa mönstret. Tacksam för svar
11.01.2021 - 16:49
![]() Majda Saadoune wrote:
Majda Saadoune wrote:
Salut, est ce qu'il y a qualqu'un qui vend ces articiles ? je cherche de puis très long temps des trictos jacuard mais j'arrive pas à trouver
30.09.2020 - 23:59DROPS Design answered:
Bonjour Mme Saadoune, contactez les différents magasins DROPS, on pourra vous renseigner, même par mail ou téléphone.
01.10.2020 - 10:19
![]() Camilla wrote:
Camilla wrote:
Alltså jag kan ju inte med 184 maskor börja sticka längst ner till höger o gå mot vänster som i vanliga BRA mönster! De blir ju tokigt i denna... Hur ska jag tänka o var börjar jag så mönstret blir rätt?????
23.06.2020 - 14:13DROPS Design answered:
Hej Camilla. Du börjar med att sticka M.1 (från höger till vänster) och du stickar då M.1 sju gånger och sedan stickar du de 16 första maskorna = 184 m. När M.1 är stickat 1 gång på höjden stickar du M.2 från pilen vid din storlek och på första varvet ökas det 32 m = totalt 216 m. Du stickar sedan M.2 nio gånger på ett varv (216/24=9). Mvh DROPS Design
24.06.2020 - 08:59
|
|||||||||||||
DROPS 40-2 |
|||||||||||||
|
|
|||||||||||||
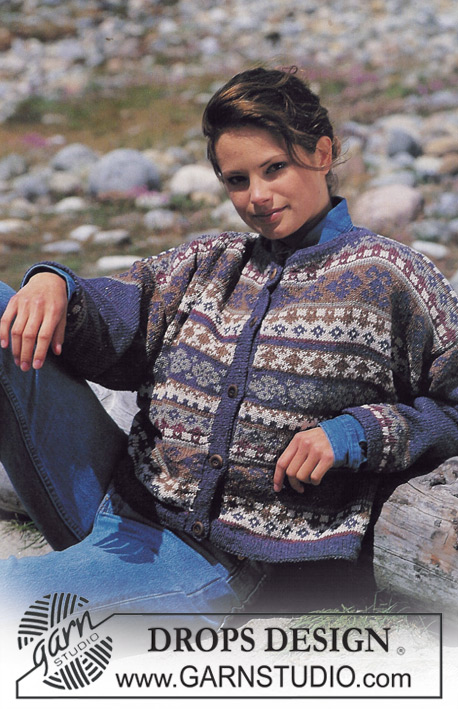
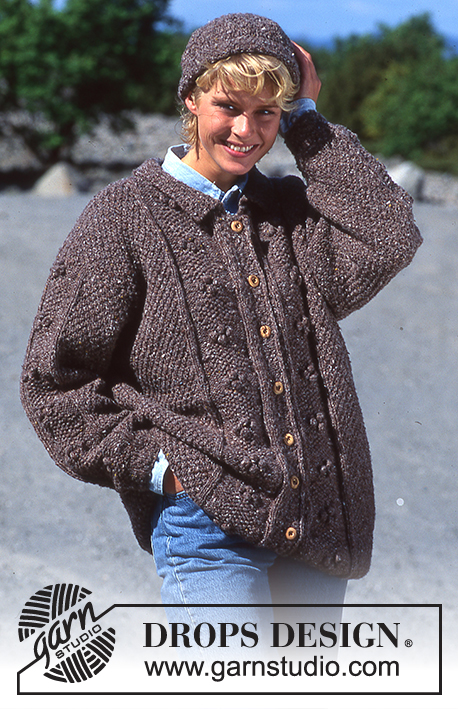
Sweater in Alaska with Borders
DROPS 40-2 |
|||||||||||||
|
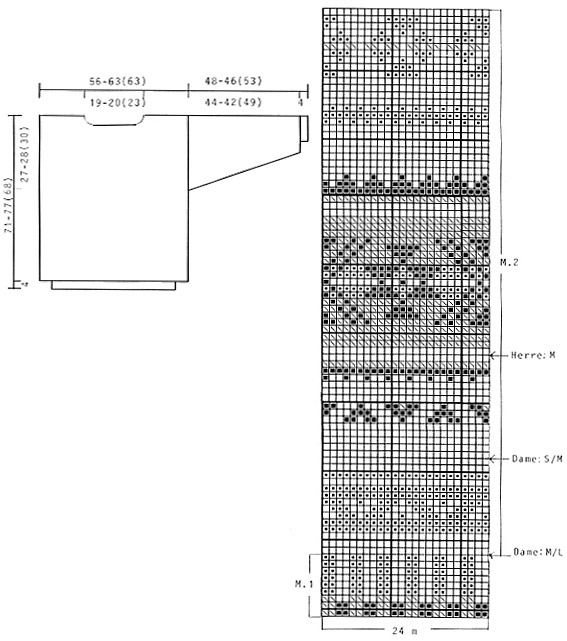
Tension: 17 sts x 22 rows on needle size 5 mm and pattern = 10 x 10 cm. Needle size is only recommended! Pattern: See diagram (1 diagram = 1 repeat). Diagram is showing pattern from RS. Dame = Lady / Herre = Gentleman Body: Numbers in () = Gent size. Knit round on circular needle. Cast on 176-184 (172) sts on circular needle size 4 mm with off white and knit 9 rounds in stocking stitch, P1 round, 1 round in stocking stitch and then continue according to M.1. Change to circular needle size 5 mm, knit M.2 (start at the arrow and continue to finished measure) and at the same time inc 16-32 (44) sts evenly distributed on 1st round = 192-216 (216) sts. Check your tension. When piece measures 44-49 (38) cm divide in two; front and back piece and knit separate to finished measurement (make sure to get a repeat mid front). Front piece: = 96-108 (108) sts. When piece measures 65-71 (62) cm cast off the center 16-18 (24) sts for neck. Continue dec towards neck on every other row: 2 sts 3 times, 1 st 2 times. Cast off when piece measures 71-77 (68) cm. Back piece: = 96-108 (108) sts. When piece measures 69-75 (66) cm cast off the center 28-30 (36) sts for neck. Continue dec 2 sts each side on next row towards neck. Cast off when piece measures 71-77 (68) cm. Sleeve: Cast on 36-40 (40) sts on double pointed needles size 4 mm with off white and knit 9 rounds in stocking stitch, P1 round, 1 round stocking stitch and then continue according to diagram M.1. Change to double pointed needles size 5 mm, knit M.2 to finished measure (start at arrow and make sure to get a repeat mid on sleeve) and at the same time inc 8-6 (8) sts evenly on 1st round = 44-46 (48) sts. At the same time after M.1 inc mid under sleeve: 2 sts 24-25 (27) times on Lady S/M and Gent M: alternately * every 3rd and 4th round * and Lady M/L: alternately * every 3rd, 3rd and 4th round * = 92-96 (102) sts. Cast off when piece measures 48-46 (53) cm. Assembly: Sew shoulder seams. Pick up approx 92-96 sts round the neckline on double pointed needles size 4 mm with off white and knit 1 round in stocking stitch, then M.1, but turn pattern upside-down, change to off white, 1 round in stocking stitch, P1 round and then 9 rounds in stocking sts, cast off. Fold all edges double towards WS and sew by hand. Sew in sleeves. |
|||||||||||||
Diagram explanations |
|||||||||||||
|
|||||||||||||
 |
|||||||||||||
Have you finished this pattern?Tag your pictures with #dropspattern or submit them to the #dropsfan gallery. Do you need help with this pattern?You'll find 20 tutorial videos, a Comments/Questions area and more by visiting the pattern on garnstudio.com. © 1982-2026 DROPS Design A/S. We reserve all rights. This document, including all its sub-sections, has copyrights. Read more about what you can do with our patterns at the bottom of each pattern on our site. |
|||||||||||||


With over 40 years in knitting and crochet design, DROPS Design offers one of the most extensive collections of free patterns on the internet - translated to 17 languages. As of today we count 324 catalogues and 12278 patterns translated into English (UK/cm).
We work hard to bring you the best knitting and crochet have to offer, inspiration and advice as well as great quality yarns at incredible prices! Would you like to use our patterns for other than personal use? You can read what you are allowed to do in the Copyright text at the bottom of all our patterns. Happy crafting!
Post a comment to pattern DROPS 40-2
We would love to hear what you have to say about this pattern!
If you want to leave a question, please make sure you select the correct category in the form below, to speed up the answering process. Required fields are marked *.